
by Tom Scotto | Apr 30, 2017 | Master Instructor Blog
 In my last article I focused on the implications of making adjustments to the drivetrain (seat height, fore-aft, tilt, etc.) to compensate for issues and limitations surrounding the upper-body and cockpit.
Drivetrain … Cockpit….. are these “technical” terms in the cycling industry? No, not really. They are however terms that have been used for years when we want to refer to an area on the bike and not a specific part or movement. For example, I could say that we are going to discuss the impact of handlebar height, handlebar fore-aft position and posture to address comfort and performance, but it is much easier to lump the whole thing together as the “cockpit”.
SIDE NOTE: Keep in mind that indoor bikes are often limited in their adjustments. On a real bike, in addition to handlebar height and fore-aft position, the following would be considered: handlebar width, angle, position of brake levers, reach, drop and type of bend.
4 Considerations for Handlebar Position
As always, there can be multiple factors which contribute to each consideration, but here are some basic principles to give you a starting point in helping riders make the best decision and adjustment.
Comfort: Many riders (both indoors and outdoors) find handlebars that are set low to be uncomfortable. This can be due to weak core muscles, poor posture, back and spine issues, and simply because it is not something they are accustomed to. Raising the handlebars can relieve pressure, relax tight muscles and provide a more upright and comfortable position.
Performance and Power: Relatively speaking, handlebars that are lower can help riders gain more power and better performance. Besides aerodynamic considerations, deeper torso flexion can provide better gluteal and hip flexor activation often resulting in a more efficient pedal stroke and more powerful down-stroke.
Flexed Spine: When the fore-aft position of the handlebars is too close to the rider (cockpit too short), riders may have the tendency to hunch (curve or flex their spine). This can put their back and spine at risk particularly when they are using large amounts of resistance. Adjusting the fore-aft position to lengthen the cockpit can help neutralize and relax the spine and surrounding muscles.
Over-Extended: When the fore-aft position of the handlebars is too far away from the rider (cockpit too long), riders can find themselves reaching, hyper-extending the spine and in deep flexion at the hips. This over-extended position can cause lower back pain, shoulder pain, strain on the neck and leave riders with fatigued arms. Adjusting the fore-aft position to shorten the cockpit will relax some of the aggressive angles and allow the arms and core muscles to support the upper body.
In many cases you will find yourself both adjusting the handlebar height the fore-aft simultaneously to get the desired position. Also, don’t assume that more aggressive settings (in either direction) are necessarily wrong. I’ve seen road cyclists and triathletes that are comfortable and safe using a very low handlebar position, as well as, a rider recovering from back surgery with their handlebars appropriately in the highest, closest position.
Determining The Optimal Cockpit
Our first concern is always safety which is why the first question we should ask any rider before we suggest or make an adjustment to their bike is “Do you have any injures that may be aggravated by riding?” Knowing this information upfront can save you from putting a rider in a risky position plus allow you to help them make better decisions as to what may be best at this time.
Handlebar Height
Assuming we have no physical concerns, it is simply a matter of comfort vs. power. When I setup a rider for the first time, I prefer to place their handlebars level with their seat (often referred to as “neutral”). This can sometimes be a challenge with shorter riders because the handlebars on some indoor bikes cannot be adjusted that low. Do what you can. If a rider feels uncomfortable, raise the handlebars in small increments. If a rider feels they are too high or wants more power, lower their handlebars in small increments. I’ve talked to instructors who feel that the handlebars should never be lower than the seat. I’m not sure where they received that information, but it is incorrect. It is not uncommon for outdoor riders (particularly road cyclists and triathletes) to have their handlebars more than 4 inches below the level of their seat. Consider the safety and needs of the individual rider and avoid making up rules.
Handlebar Fore-aft Position
Many of the bikes we use indoors may still not have the ability to adjust the fore-aft position of the handlebars. Even though, you still may be able to make suggestions for where a rider should grip the handlebars based on what you observe. As I mentioned in my previous article, this is the reason we should avoid numbered hand positions.
To determine the optimal starting point for handlebar fore-aft position, have the rider (seated) bring their foot and pedal to 12 o’clock keeping their ankle relaxed. Have them place their elbow to their kneecap with the end of their arm (hand and wrist) on top of the handlebars. The other hand should be gripping the handlebars and providing support.
Simply observe the alignment of the wrist and the crossbar of handlebars. If the crossbar is more than a fingers-width in either direction, you can suggest making an adjustment (keeping the above considerations in mind). You may find yourself incorporating a combination of hand position and handlebar position depending on what range of adjustment is available.
My Strong Opinion
I’m certain no one is surprised as I’m also certain I’m preaching to the choir on this one: “there are no short cuts when dealing with the variables and complexity of the human body in motion”. Certifications and individuals that advocate specific settings and positions will often find themselves wrong, and worse, lead others astray or toward injury. However, I’m comforted knowing that all of us at ICI/Pro default to knowledge. Doing something right requires understanding, where following rules…not so much.
Originally posted 2011-12-29 12:36:14.
by Tom Scotto | Mar 15, 2012 | Master Instructor Blog
 A number of instructors (and riders) have asked me how one should approach the next training phase and how to know their class is ready. These instructors are usually believers and followers of a periodized format for delivering the focus of their indoor classes. So considering we are rolling towards the end of March, this is the perfect time to address our focus beyond base training.
How Do We Know Our Class is Ready for More?
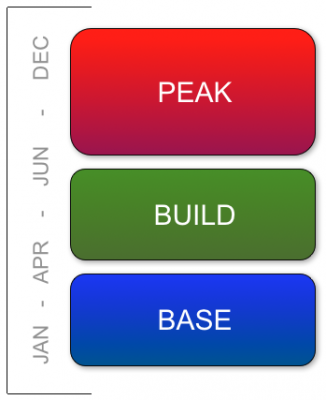
Let’s answer the easy question first. Well…sort of. The short answer is that it doesn’t matter. Hey, at least I didn’t say, “it depends”. The reason it doesn’t matter is because we have riders at all levels plus those that will pop into our class without notice, so we never really know who will be present from one week to another. Thus everyone will be in different places with their training and level of fitness. For this reason, I like to keep things on a general schedule for those faithful regulars that use our classes for consistent training (See the image for a general timeframe for each basic training phase). I also like to stay on the periodization model because it conveys the message that “we have a plan” in this class. Having a longer-term plan for how one delivers classes is also a great way to keep people coming back. For example, I will make the following announcement before introducing a new profile, “So as you know we have been focused on “X” (whatever that is) for the last 3-4 weeks and now we are going to build on that with today’s ride”. I’ve seen new riders turn to the person next to them to ask what type of rides they missed. I’ve even had people come to me after class and tell me that they are new (which I knew), wanting to know what was ahead for the next few weeks. The bottom line: they now want to be a part of what we are doing and don’t want to miss a class.
Obviously, as always, we need to provide options and give people permission to work at their own levels. Make sure to emphasis the point that everyone is at a different level and place in their training, so no one feels behind or unsuccessful during class.
What’s Next?
For those that have been following a periodized model, our focus has been on aerobic development / endurance, leg speed and muscular endurance (moderate climbing). With this foundation in place, from both a physical and educational sense, we can now get more specific in our focus and start shifting from volume to intensity. So what does this mean? The training done during base is designed to target general fitness and conditioning. The training performed during the next phase (often referred to as Build) begins to focus on developing muscular strength and power. With this shift in focus also comes an increase in intensity (bringing with it more recovery — hopefully). This can be a hidden trap for instructors because many will continue to increase the intensity, but not provide more time to recovery. In effect, intensity is not effectively increased because without appropriate recovery, people can work as hard as they need. Hence mediocre-ville and a dreaded plateau in fitness often follows.
This is often where taking the time to educate your class goes a long way. Having gone through 12 weeks of base training and understanding the purpose makes it easier to transition their mind to the concepts of training at a higher level.
Keep an eye out for my latest Audio PROfile entitled “CycleSTRONG” for an introduction to pure strength training — a perfect ride for the next phase of training.
by Tom Scotto | Feb 23, 2012 | Master Instructor Blog
 I love evolving. It is exciting to realize that you can and have changed for the better. I can remember like it was yesterday, the first time my knuckles stopped dragging on the floor. Seriously though, one of the areas I have evolved in is music. Not so much the type of music I like, but rather the variety of music I like to use.
From Pre-Class to In-Class Music
Maybe this has happened to you — While browsing iTunes you find this perfect song. The rhythms are so cool and hip (although saying “hip” may not be cool). You’re already imaging how you are going to use this song in your upcoming playlist. You click the “Buy” button and wait in anticipation for the progress bar to make its way to the right so you can get the full dose of this inspirational new song. However, approximately 2 minutes into the music, everything goes silent….then weird sounds….some dude singing opera….a mysterious sound…..(2 minutes later) the beat kicks back in. Utterly disappointed and heart broken, you file the song into some obscure folder and mourn the lost of $1.99.
I’ve got a number of pre-class music playlists that I rotate from week to week. These are the tunes I play before class begins. I also have post-class playlists (for…well…after class) that include a variety of mellow cool-down music. These playlists are where I dump all of the songs I download that fall into the above scenario. However, I’m now finding myself going back into my pre-class music playlists thinking, “wow, this is a cool tune, I can use this.” The song then graduates out of the folder of misfit tunes.
Insert Some Drama
I’ve been drawn more and more to the songs with the weird interludes (or the funky non-rhythmic sections). These seemingly non-musical, awkward sounding sections provide a great backdrop for some drama. There are usually less instruments and a lot of space to talk, so it is perfect for building up the suspense for what is to come. Sometimes I will tell a short story about something we believe we couldn’t do and then when the actual music kicks back in — WE GO FOR IT!
Depending on the song, I’ve found these tunes to be great for 2-3 minute intervals. We’ll work hard until the music goes wack and then use the bizarre musical backdrop for a short bit of recovery before going at it again. It’s a lot of fun, particularly when you time it just right.
What I Hated I Now Love
I find it ironic that the reason I didn’t like certain music is now the driving force for using it. It is also nice to know that we can continue to grow as instructors and coaches. Growth in this way may be from building a better cueing vocabulary or becoming more confident or both. Obviously one helps the other.
So give it a go. Dig back to wherever you hid those lonely rejected songs and see if you find that your horizons have expanded and…just maybe… you are ready for some drama.
by Tom Scotto | Feb 2, 2012 | Master Instructor Blog
 As an athletic coach, nothing bothers me….OK, “ticks me off” more than when legitimate methods of training are misused. It blatantly demonstrates a lack of knowledge and professionalism. Unfortunately, this tendency is rampant in the fitness industry, which has thus spilled over into indoor cycling.
Professor Izumi Tabata — You are the Man!
Now before you think I’m against Tabata training, I’m not. I think it is an amazing protocol, which was put forth with sound research. Basically, Professor Izumi Tabata performed studies where bouts of short, high intensity training was followed by short periods of recovery and repeated 8 times. In an interview with Professor Tabata, he laughs as he openly admits that the credit for the protocol goes to Japanese speed skating coach, Mr. Irisawa Koichi. Professor Tabata was simply asked to analyze the effectiveness of Mr. Irisawa’s training regiment.
The official, researched protocol is: 20 Seconds of intense work followed by 10 seconds of rest repeated 8 times.
Let’s Beat Everyone To a Pulp Mentality
When the Tabata protocol was released into the public, fitness “professionals” began drooling and scheming with big smiles on their faces as they imagined people flailing away to utter exhaustion praising their names as the greatest trainers on earth just before limp bodies hit the ground. Professor Tabata stated in his interview “This means that, excluding the warming up and cooling down, the exercise can be completed in only 4 minutes if repeated 8 times, more than enough to make even a fit person exhausted”. So what does the fitness industry do?… THEY MAKE AN ENTIRE 60-MINUTE TABATA CLASS!!!!! Total insanity. It is the “more is better — bigger is badder” approach, which is void of both science and proper regard for safety.
Group Fitness Hell
Here is another quote from Professor Tabata: “Such high-intensity exercise is exhausting, so it’s not good for those simply interested in general promotion of their health.” I’m trying to figure out how this statement translates into building Tabata-based group fitness and indoor cycling classes consisting of such a wide age and fitness-level demographic. At least if you’re working with a single individual, you can monitor their response to the training and adjust accordingly. With classes upwards of 20+ people, this is impossible and irresponsible.
Tom, Calm Down — What’s Going On?
I’ve been in numerous conversations in recent months where indoor cycling instructors are throwing around Tabata training like salt at McDonalds. They add it to everything with little to no regard for the focus of the class or the benefit to those participating. Here are two examples:
(1) I’m helping a group of indoor cycling instructors create a ride profile. We had decided that the focus was going to be on moderate, long climbs since it was early in the year and they wanted to help riders increase their muscular endurance. We had designed a nice ride profile with 3 long climbs, but as we looked at the timing, we were short about 3 minutes. Before I was able to suggest we adjust the length of one of the climbs or decent (recovery), one instructor said we could throw in some Tabata. WHAT?!?!? We’re in the &$*W$ mountains on a long climb in the early part of the year and you want to “throw it” some high intensity intervals?!?!
(2) I just finished a ride that concluded with a 25-minute steady-state effort targeting Zone 3 (~75% perceived exertion). It was tough and people were definitely feeling it at the end. After we completed the stretch and people were exiting the room, one rider was still on the bike working hard. As I approached the rider, who is a seasoned fitness instructor, they told me how much they like the class. They continued to say that it would have been nice to end the class stronger with some Tabata training. I smiled and packed up.
A License to Kill
Training methods and protocols like Tabata are legitimate and effective ways to train in the appropriate environment. Let’s make sure we are doing our homework as fitness professionals and demonstrating the responsibility we have with those that will follow our example and passion. Indoor cycling instructors have unfortunately used Tabata training, in particular, as a license to throw high-intensity into their classes whenever they want. “Oh, I’m just doing some Tabata Training”.
For those of use who have taken the time to study, research and design classes built on sound training science, we see right through the smoke screen.
————————————————–
Here is the link to the interview with Professor Izumi Tabata – http://www.ritsumei.ac.jp/eng/html/research/areas/feat-researchers/interview/izumi_t.html/
by Tom Scotto | Dec 8, 2011 | Master Instructor Blog
 Some may say I’m all work and no fun. Oh, come on! What can be more fun than final exams?
Although this time of year is loaded with holiday parties and a time to take a well-deserved break from training structure, it is also a great time to determine our conditioning before we begin the upcoming year.
We want to be more than just a weekly class to our riders, but rather part of their overall training and fitness solution. In order to do that, we must be able to give them guidance and suggestions as they set goals for next year. Any good coach or trainer knows that where a person is starting is just as important as what they are trying to achieve. Part of the reason for testing is to set a benchmark so we can track progress. Also, putting ourselves to the test often reveals our strengths and weaknesses. So bring on the testing, the learning and the fun.
Pick a Test or Take them All
There are four tests I like to throw at my riders at the end of the year. You can decide to subject them to just one or all 4, just not at the same time. During the last few weeks of the year, I’ll announce that the remaining classes are going to be very challenging (they like that), and that we are going to put their aerobic ability, leg speed, muscular strength and sustainable power to the test.
SIDE NOTE: If you were planning on taking a periodized approach to next year (read my earlier article), providing an end of year test is a way of showing your commitment to the plan. It transforms you from a mere instructor to a coach who knows the correct way to train and prepare people for success.
Create an Event and Have some Fun
Really, you can have some fun with this. I recommended giving your class at least a week’s notice that an end-of-year test is coming. Couple it with a little holiday get-together. Work hard and then have some fun celebrating after class.
Also, make sure you have the tools you need before selecting your test. Obviously you will need bikes that measure watts to conduct a sustainable power challenge. Targeting a consistent power can also be helpful during long muscular strength efforts, but choosing climbs of varying length can also work. Bikes that display cadence are useful for leg speed tests, but music set to specific tempos can also keep riders on track. And finally, heart rate monitors are best when putting one’s cardiovascular system to the task.
This may prove to be the perfect time to get your riders using a heart rate monitor. For example, take the time to explain the benefits of using heart rate when riding and training and how it will be a part of your class next year. Give riders a heads-up that you will be conducting a threshold test next week and that a heart rate monitor will help them track their results and allow them to start incorporating training zones. If your club sells heart rate monitors, even better! Get some information about the models they sell and ask to have one that you could display during class.
Repeatable Results
Once you created the class profile that will put your riders to the test, don’t throw it away. Instead, I recommend pulling it out every 5 to 6 weeks to allow your riders to retake the challenge. It will give them something to train for while providing a way to demonstrate improvement in their fitness.
I need to jump in here and say Thank You Tom! for committing to provide your valuable incites and knowledge through all of 2012! – John