I can’t find even the slightest bit of humor in the irony. This weekend, I finished editing Jim’s post on Jeff Wimmer’s passing. Jim’s tribute was moving, as I would have expected.
A few minutes later, I got a call that Jim, who was at a show in Brazil presenting Myride+ demo rides as only he could, had died of a heart attack.
I had to deliver the news to a number of people close to Jim, first and foremost his wife Angela. The calls couldn’t have been comforting because I couldn’t stop crying.
I’ve known Jim since my early college days. He was a diamond in the rough back then, but turned himself into the most impressive figure in the fitness industry. Many who read this will know I’m not exaggerating, that everything that’s been said about Jim is 100% accurate. Many fitness pros are more famous, but none is better than he was. When Jim talked about training, everyone listened.
Jim was my mentor. Among numerous other things, I learned from him how to teach Performance Max, one of the outstanding and unique programs Jim created, in the way he originally envisioned it. It meant so much when he said I was the best student he’d ever had.
Jim recently left PMax because his schedule got too full. The program is still in existence, but its soul has been replaced by statistics. Jim had that mind/body thing down and brought it to training as no one else ever could. I worked hard to stay true to it, but Jim was an impossible act to follow. The owner of PMax said about my attempts, “Jim does it better.” Of course, I knew that, but I never stopped using Jim’s classes as my blueprint. Why not emulate the very best?
Jim was my best friend, as well as my ex-husband. We remained so close over the years that it actually popped into my mind for a moment to call him when I needed to share this terrible news. Yikes.
The reactions of the people I’ve told have been as grief-stricken as my own. Jim touched many, many lives and in a profound way.
My entire family died within the space of a couple of years, and without Jim’s support I’d never have gotten through it. His departure leaves an alone-ness that might be difficult for most to comprehend.
I’ll dare to say that Jim was in many ways the best thing that ever happened to the fitness industry. In some ways, he was the best thing that ever happened to me.
I used a new metaphor this morning that seemed to resonate with my class.
Watch this video and see if you can see the similarity between an eagle catching a fish and proper pedaling technique.
Through the magic of slow-motion photography it's obvious that the act of plucking a large salmon out of the water is a very fluid, near circular, motion by these powerful birds.
This morning was a cycling strength day. I really enjoy teaching these classes and I describe the format to the class as; BIG PEDALS turning slowly. But slow = STOMP for many in my class.
To help everyone move beyond stomp, I've been introducing the concept of ankling through each pedal stroke to my class. If you missed it here are two videos that demonstrate what local bike fit Guru Chris Balser categorized as USA vs. EU pedaling techniques. To help communicate the concept I've been talking about how there shouldn't be any specific action; stomp, scrape, pull up, ect.. Rather just one fluid motion of your feet rotating around the pedals, with flexible ankles. Tough to describe until I happened to see this video and then it clicked – the focus is on your toes! Or in the case of the eagle, its claws & talons.
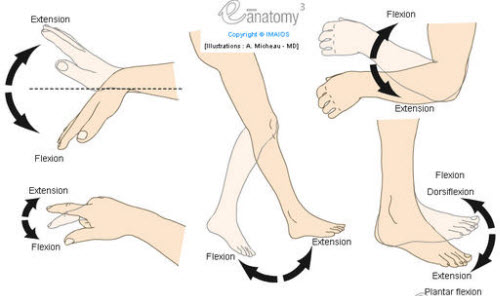
Watch the video again and see how the eagle's talons and *ankles are at full extension as it reaches forward and down in preparation to grab the fish. The eagle's claws then flex forward, essentially rotating around its catch, as it lifts it from the water. This is the same movement Chris was helping me learn to improve my pedaling mechanics and power output.
The difference between extension and flexion in joint movements.
How would you describe this movement to your class?
I had everyone try to visualize what it would feel like to be an eagle, swooping down on a fat, tasty salmon. Talons extended as your pedal crosses the top of the circle, then, flexing forward while you sink your talons into the flesh. Your claws rotate around the fish as you drag your catch from the water… only to drop it… so you try again.
*I'm not sure what that joint is called on a bird, but you get the point.
In the early days of indoor cycling, there was a problem. When bike resistance was low, the weighted flywheel connected to a fixed gear with a chain produced an unnatural degree of momentum. It permitted riders’ legs to spin at cadences far above their natural ability.
This resulted in the infamous “bouncing” in the saddle, as well as potentially catapulting them over the handlebars if they were to suddenly stop pedaling. Then there were the as-yet-unknown, uninvestigated forces working on knees and hips.
So a ceiling was put on cadence. Everyone believed 120 rpm was fast enough. Some education bodies restricted it to 110 rpm. The reasons were obvious at the time. One look around a cycling class filled with “jumping beans”, or the surprised look on Superman’s face as he went over the handlebars made it clear that we instructors needed to control cadence.
As IC evolved, cadence became less of a worry. Better control was taught from the start, and IC became safer. The 110-120 rpm ceiling has been challenged on occasion, but usually sticks. People don’t typically ride at higher cadences, the logic goes, so why use them in cycling classes?
Is high cadence still unsafe? Do higher cadences offer training benefits in an authentic class, or general exercise benefits in a non-authentic class?
My opinion on safety is that high cadence is unsafe in some situations, but not in others. Cycling coaches are documented as recommending max-effort cadence drills up to 140-160 rpm. Arnie Baker’s Smart Cycling is an example.
Arnie Baker’s not alone. Cycling coaches don't have the same concerns IC instructors do about cadences above 110-120 rpm. They train athletes who are on road bikes on a track stand or a Computrainer. There’s no weighted flywheel. There’s no help on a real bike. It's all you. To spin at 140-160 rpm, you have to develop the necessary muscular composition and/or neuromuscular recruitment, or you can’t do it.
Not so on a chain-driven indoor cycle. The weighted flywheel creates substantial inertia, which we’ve spent decades teaching our students to control with technique and proper resistance. Chain-driven bikes create excess momentum and allow you to cheat on cadence training.
But belt-driven bikes can allow high-cadence training to become part of indoor cycling. The reduced momentum on a belt-driven bike makes it more like a real bike in terms of how hard you have to work to spin fast. I wrote about this in a previous post (“From Chain Junkie to Belt Convert”).
Should we create high-cadence trainings for our students if they’re riding belt-driven bikes? The statement that we don't typically ride at those cadences and shouldn’t train at them makes little sense to me.
High-cadence training, called spinning, can be defined as any cadence that exceeds a rider’s preferred cadence, usually 120-160 rpm. These cadences are performed in lower gears, applying lighter pressure to the pedals with each stroke. Neuromuscular adaptation increases pedal stroke fluidity and reduces the force the leg muscles and joints must transmit for a given workload.
Higher cadences also allow the muscles to work aerobically. Less activation of type II muscle fibers delays the burning of carbohydrate stores. In a study by Ahlquist et al., a higher cadence resulted in less stimulation of fast-twitch muscle fibers. As fast fibers deplete their glycogen stores from slower, high-strength pedaling, they become less forceful. Additional muscle fibers must then be activated to maintain a given speed. The activation of a larger number of muscle cells leads to higher oxygen consumption rates and reduced economy.
With proper high-cadence training, pedaling rates of 80-100 rpm become easy for slow-twitch muscle fibers to handle. High-cadence training may also make type I muscle fibers faster and more fatigue-resistant. Then, even less glycogen is used within type II fibers because slow-twitch, type I fibers can handle the fast, low-force contractions.
To take advantage of these adaptations, cyclists use cadence drills. They train the neuromuscular system to increase coordination and efficiency at high pedaling rates and promote fatigue resistance in type I fibers at the same time. In the end, higher cadences preserve glycogen, leading to faster and more powerful finishes over a day of riding.
None of this makes a difference unless you believe in the effectiveness of high rpm. We do at ICG because the cycling world does. We train at much higher rpm than we promote in the industry because of the traditional 110-120 rpm ceiling and the stigma of going above it.
Also, some cyclists do pedal fast. Track cyclists do, as do riders on fixed-gear bikes going downhill — unless they’re braking to slow their legs.
So high cadences have been validated in real cycling. What about non-authentic indoor cycling?
SoulCycle uses cadences over 120 rpm. They now produce their own bike, a chain drive. Is this safe? Maybe not. That's one reason we suggested that ACE research SoulCycle's training program. Would exceeding 120 rpm be safe on a belt-driven bike? We think so.
Still, the benefits I list above relate to cyclists. How does high-cadence benefit general membership? For one thing, it burns a ton of calories.
My view, and that of ICG, is it’s time to allow faster spinning in certain situations. We’ve advocated a belt drive for years, and I frequently train at cadences far in excess of 120 rpm on our bikes. Although our education still limits cadence to 120 rpm as a general rule, we’re in discussion regarding high-intensity spinning.
When is high cadence okay? When the bike's momentum can be controlled and the instructor’s training is of sufficient caliber to instruct correct pedaling efficiency.
(Jim Karanas has been travelling on ICG business and hasn’t been available to supply posts for ICI-Pro for several weeks now. I’m sure his many followers are disappointed, but I hope this brief post will be of interest and practical use for instructors and students of indoor cycling.)
Over 15 years ago, Frank Day created independent crank arms for bicycles. With independent crank arms, one leg can’t assist the other in turning the pedals. The cyclist can’t relax on the upstroke, but must actively raise the pedal, using the hip flexor and hamstring. If the rider does it right, the pedal stroke will be smooth and feel like a “regular” bike. If the pedal stroke is wrong, the entire stoke will be off in timing and simply fall apart. Mastering independent crank arms forces the rider to pedal more efficiently. It’s said to increase power, as well. Another benefit is that the right and left leg muscles become more balanced, whereas fixed crank arms could perpetuate any strength imbalance between the sides. Finally, the rider gets to train ancillary muscles and coordination.
I never gave much thought to independent crank arms until I started Kranking in 2007. As most of you know, Johnny G created Spinning. (Where would any of us be today without that?) He also created Kranking and put independent crank arms on the Krankcycle.
Johnny knew Spinning would never “go” if he used independent crank arms because cyclists and riders of stationary fitness cycles in the gym were too accustomed to fixed crank arms. (One of my friends, a highly accomplished cyclist and a regular in Jim’s classes, did a 95-mile ride with independent crank arms, which impressed me no end. He’s an obvious exception.)
Kranking, however, had no such limitation because there were no expectations about the crank arms. The Krankcycle is a complete departure from the upper body ergometer. Few people like UBEs anyway, so departing in one more way was unlikely to meet with resistance. Enter independent crank arms on the Krankcycle, with all the benefits they provide.
All of that said and out of the way, here’s the point of this post. Kranking can help you and/or your students develop better pedaling technique on an indoor cycle.
In order to Krank without letting the crank arms “clunk” as they go around the axis, you need to smooth out the basic arm stroke. One of the best ways to do that is to imagine and feel that you’re making the biggest circle possible by pushing the crank arm around the largest circumference you can.
In Silicon Valley, where I’ve done a lot of teaching, the engineers think I’m crazy when I say that (“The crank arms are this long and won’t change!”), but use your imagination and make the biggest circle possible. Push outward against the edge.
Keeping the crank arms together on the double Krank stroke takes coordination. Keeping them 180 degrees apart for a split rotation, as the legs are positioned on a bike, takes even more work. It will improve your upper body coordination, muscle balance and core strength. Once you’ve smoothed out the basic stroke and mastered keeping your arms exactly 180 degrees apart for a good 15 minutes or longer, you’re probably ready to transfer what you’ve learned to indoor cycling.
I honestly don’t have any specific training plan for you to follow here and wish I could present one. What happened to me after doing a lot of Kranking is that I noticed my cycling felt different. My pedal stroke on the bike — indoors and out — felt smoother and more even. I found myself pushing to the “outside” of the circumference of the circle as an automatic and natural motion.
It would be great to report that I did pre- and post-Kranking power tests on the bike, but as researchers say, it was a serendipitous finding, and purely anecdotal. Other faithful Krankcycle users did confirm having the same experience on bikes.
Of course, you could — and can — improve your pedaling technique on a bike with PowerCranks. But your students might not have access to one, while many gyms have Krankcycles.
At any rate, if you’re looking for a way to help your students improve and balance their pedal stroke, this might be the unconventional solution. And it’s fun. Please let me know how it works.
Because of the bad press carbs have received for a number of years — and the new gluten-free trend is only its most recent manifestation — many of your students may be avoiding carbs.
People who avoid “carbs” tend to define them as starches (bread, pasta, crackers, cereals, potatoes) and sugars (cakes, cookies, candy and syrups). I include agave in that last group, but few people want to acknowledge it as the sugar it is.
As indoor cycling instructors probably know, there are plenty of other carbs out there, such as vegetables, lentils, beans, sweet potatoes and more. Many of them are good for us, particularly as fuel for training.
It’s a bad idea for your students to avoid carbs, especially if they’re working out on a regular basis. Here are a few reasons for that, some of which you may already know.
Avoiding carbs doesn’t fit well with athletic training, especially tough training. In extreme cases, a low-carb diet could cause a full-fledged bonk. But even without that, low-carb eating can make it difficult, if not impossible, for the student to reach higher workloads in high-intensity classes.
A very low-carb diet can lead to cardiac arrhythmia, particularly in people who train hard. If you run hard workouts in your classes, you might need to remind your students to eat some starches both prior to, and following, a class. Fueling and refueling appropriately are important factors in fitness and health. In turn, the right carbs become an important factor in both.
Eating too few starches can increase appetite. This has to do with serotonin production, which involves carbs. Serotonin gives us a feeling of satiety, that we’ve had enough food and don’t need to seek more. Satiety caused by serotonin can be general, and its lack may lead to increased appetite. Satiety caused by serotonin can also be carb-specific, so a high-carb lunch might lead to a lower-carb dinner.
Someone who avoids starches as a general dietary strategy may not feel the satiety that starches (and serotonin) would produce. They may crave lots more food in general, and/or carbs in particular.
If your students avoid starches, the cravings could lead them to sugars. Because that general feeling of satiety might not be there, when they finally eat sugar, they’re likely to eat a lot of it. Sugar is dietary trouble, and health issues may ensue. (Don’t get me started.)
Eating too few starches can also lead to cravings for alcohol. See the preceding paragraphs for the mechanism of action; it’s the same for sugar and alcohol. I’ve seen this in many food logs submitted by clients — low starch intake, combined with substantial alcohol consumption. Alcohol can cause a host of heath, sleep and mood issues, as covered in previous post.
Less known is that the long-term effects of a low-carb diet can include an up-regulation of insulin receptors. Up-regulation is sometimes misunderstood. It takes place when the level of insulin is low, such as when the diet contains few insulin-triggering foods. In its ever-vigilant effort to maintain homeostasis, the body responds to the shortage of insulin-triggering foods by increasing both the number of insulin receptors and the sensitivity of the existing ones.
The result is that the body is ready to receive ANY insulin that’s triggered and respond vigorously to it. In someone who’s susceptible, that may translate to serious weight regain if and when the student returns to “normal” eating, even if only for a temporary period of time.
If your students need, or want, to avoid gluten, they can still consume healthful starches. Gluten-free starches include vegetables, lentils, various beans, sweet potatoes, yams, turnips and other root vegetables, squash, quinoa, and brown rice. These foods can help your students avoid the various health issues described above and keep them training well and often.
The subtleties of teaching authentic-style indoor cycling are what make it exciting. One difficult thing to teach is the feeling of how resistance varies when you’re turning a big gear on a flat road, as opposed to climbing.
Several years ago, I learned how to use 80 rpm to simulate “big-gear flats.” I’ve been told there’s no difference between indoor flats at 80 rpm and indoor climbing at 80 rpm, that it’s just a matter of terminology. But, despite the similar resistance, the training feels quite different.
Say you’re powering your bike at 80 rpm on a flat in your big chain ring, doing 20 mph. Now let’s say you’re climbing a 4% grade in your small chain ring at 80 rpm, doing 10 mph. The cadence is the same; the intensity is likely to be similar. How do you interpret the difference in the resistance? Is it worth communicating to your class?
This has actually turned out to be a favorite training approach of mine, so I thought I’d pass along what I’ve learned for anyone who hasn’t yet done this in class and might want to try.
The first difference is what we see, the terrain. You want to describe the flat road to your classes and fix in their minds that they’re moving down that flat road very fast because of the big gear. As all of you know, a big gear feels like high resistance on the legs, with a long distance covered on each revolution of the pedals. Get the class to visualize and feel their speed on the flat road.
If you’re using video, clearly you’d want to select a flat road — the longer the better — and have them keep their eyes on the road as they ride.
Another difference is where on the saddle you sit. On a climb, we shift back a bit on the saddle, giving the down-stroke a slightly more forward thrust and creating an almost elliptical shape in the pedal stroke. On a big-gear flat, our position is moved a bit forward (“on the rivet”), making the legs circle smoothly but with more of an up-and-down, piston-type action.
A third difference is hand position. While the hands would be separated on the horizontal portion of the handlebars for a climb (known by some indoor cyclists as position 2), they stay centered on the handlebars (in position 1) for these big-gear flats. This is to keep you more centerline on the bike, as you would be on a flat road when going fast.
A fourth difference between big-gear flats and climbing has to do with upper-body motion. On climbs, we may rock the body side to side, since indoor cycles obviously don’t move the way outdoor bikes do, and we’re simulating the bike motion. But on a flat road, the upper body is still. Keeping the hands centered on the handlebars, as described above, will also help to eliminate any side-to-side action of the torso as you ride.
Another aspect of upper-body positioning involves the degree of forward lean. On an outdoor climb, the hill angle puts the front wheel much closer to your face, but that doesn’t happen on a flat, so we simulate the flat indoors by maintaining a “normal” forward angle of the torso.
The final difference I’ll describe here between climbing and riding in a big gear on a flat road has to do with cadence. On big-gear flats, the cadence never drops below 80 rpm, although everyone knows it may on climbs. Stay in a monster gear and stay at 80 rpm. Keep the resistance as high as possible without dropping to a climbing cadence.
This is where beat-match can be absolutely invaluable. If the cadence begins to fall as your legs fatigue, you can beat-match the music to stay true to the 80-rpm cadence while keeping the gear as big as you can handle. Continuing to visualize moving very fast down the flat road will help, as well.
The cadence and the resistance are everything in this training. Encourage your students to fidget as little as possible. Encourage them to ride from the center and stay close to it, keeping one hand on the handlebars at all times. You might tell them to “cut as fine a line through the atmosphere” as they can.
When done this way, this training — an all-time favorite of mine, as I mentioned — feels quite different from climbing, especially if the music is a consistent 80 rpm with an upbeat feel.
After a solid warm-up, I run my classes through three or four of these 5-minute intervals at or above threshold heart rate, with relatively long recovery between intervals. A long high-cadence spin after the last interval helps to recover the legs, too.
If you’ve never done this and give it a try, I hope it adds a new dimension to your class. Please let me know how it goes.