Pain sucks. When we get injured or sore or uncomfortable, we instinctually try to fix it. We reach into our medicine cabinets, pop some pills, and “get back out there.” But are we really doing ourselves a service? Can we actually be inadvertently putting ourselves at risk? Turns out, maybe so.
Non-steroidal anti-inflammatory drugs (NSAIDs), which include ibuprofen (Motrin, Advil), naproxen (Aleve), celecoxib (Celebrex) and a ton of others, are available over-the-counter and are widely used by the general population for, well, everything. Studies have found a disproportionately high use of NSAIDs amongst athletes, particularly elite athletes, as well as a lack of awareness of key dangerous side effects.
Standard care in medical practice is to discourage prophylactic use (taking medications in advance of preventing a problem, as opposed to treating an existing problem) of NSAIDs. But what about NSAID use after injuries? NSAIDs have traditionally been part of hallmark treatment, particularly for facilitating an early return to activity. But there is a controversy in sports medicine about whether NSAID use in the first few days after acute sports injuries can actually compromise the healing process. Let’s examine how that might be so. (more…)
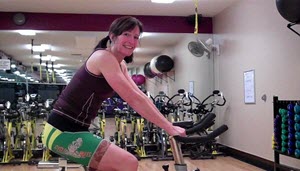
Have you ever been on your bike, inside or outside, and your hands go numb when you ride?
Then you take your numb hand off the handlebars, shake it around for a bit, drop it to your side, and wait for the tingling to stop and the feeling to come back.
A couple of nights ago in one of our cycling classes, this very question came up about “numb hands” when you ride. I want to help you have a more comfortable ride — both indoor and out side. Here's a video that shows it all!
Roll Your Wrists No “cocked” wrists for any position on your handlebars! You should have a nice long line from your forearm to the top of your hand. If you are bent at your wrist (with your wrist down), you are putting a lot of pressure on the carpal tunnel and medial nerve. Use a Light Grip No death grip on your handlebars. Hands should have enough grip for balance and steering, and that’s about it. Of course, if you are on a mountain bike trail, you are actually using your arms and body to lift your front wheel or bike from time to time, so you’ll have a tighter grip when you need it.
Redistribute your Weight No heavy leaning on your handlebars. Weight should be in your saddle. If your “reach” to your handlebars is too long, you may be putting too much weight on your handlebars. This can be changed by bringing your handlebars closer to your saddle (indoor cycle adjustment, out door bike shorter handlebar stem) OR bringing your saddle closer to your handelbars. If the latter, be careful that you don’t throw your knee to foot alignment off — when your foot is in the 3:00 o’clock position (forward), you want your knee aligned with where the pedal attaches to the pedal arm. If your knee is forward of this point, you are putting too much forward force pressure on your knee and may feel pain in the front of your knee pain.
Soft Elbows No stiff straight arms! Keep a slight bend in your elbows all of the time. This is like the “athletic ready” position with a slight bend in your knees, except …..that it is in your elbows. Not only will this help your circulation, but you’ll be ready to absorb bumps and road noise when you are outside.
Relaxed Shoulders Take your shoulders out of your ears…try this exercise: Take in a big breath and raise your shoulders as close as you can to your ears, now as you exhale, relax your shoulders all the way down. This is where you want them when you ride.
I coach a four month long winter training camp that offers 14 indoor cycles and 6 bicycle trainers. This allows participants to bring their own bikes, mount them on the trainers and ride alongside the stationary bikes. Everyone gets a fantastic experience with this mix. But there are a few things to know about mixing trainers and spinners.
Why offer Road Bike Trainers? Having bike trainers as part of your program will expand your market, increase your class capacity with a small budget, and give new interest and challenge for instructors and riders alike.
There are three important things to consider if you are mixing spinners and trainers in the same room: Why BYOBike, Location/Set-Up/Noise, and Cueing for Instruction. 1.) Why BYOBike?
Why would someone want to bring their own bike in the first place? For a number of reasons, using your bike on a trainer is a more realistic experience.
It’s About Fit.
The fit is just better on a “real” bike. Owners of bikes have the seat/handle bar location adjusted, a saddle that they are accustomed to, and crank positions that fit their body. If not, this is a great opportunity to help your riders with a proper bike fit.
Vital to fit is that the spread of the pedals on your own bike is the right width. I find that on some brands of spinners, the pedals are set much wider apart than you’d find on a road bike. This can cause knee pain. We tested the Kaiser M3 bikes at my Club and several riders (me included) experienced knee pain. While I like many features on the Keiser M3, I discovered that the pedals are set 1” wider than the Lemond Revmaster. This can be a make or break in comfort and dissuaded us from purchasing the bikes.
Practice with Changing Gears
While it is not quite like riding outside, riding your own bike on a trainer does give you practice in shifting gears and learning your own gear ratios related to work effort. We’ve had many riders who bring in a new bike and want to try it out to “learn the bike” before taking it outside.
It’s a Harder Ride
On your own bike, there is no help from a weighted flywheel. If you are not pedaling on a bike, the wheel stops going around. That means every pedal stroke counts a little bit more. It is 100% your own effort.
Spinning bikes are a “fixed gear” with a weighted fly wheel that retains energy which means you are getting assistance with every pedal stroke from the momentum of the flywheel, especially at high RPM.
Trainers are 20% the Price
Bicycle trainers are about $350 compared to a spinning bike at $1800 (of course, prices vary wildly for both of these options). If you want to add more bikes to a room, you could add 5 trainers for the price of one Spinning® bike.
I use Kurt Kinetic Fluid trainers because they are fairly indestructible and give a very smooth, quiet ride. All you need is the trainer, a mat, and the front wheel cup. When you mount a bike to a trainer, the rear wheel has now been lifted off the floor by several inches. To avoid feeling like you are riding “downhill” (since the front wheel is lower than the back), you need to raise the front wheel. Most brands of trainers come with a front wheel support. I like the supports that offer a variety of tire sizes and heights — sometimes you may want to even raise the front tire higher than the rear if you are going to focus on a hill climbing workout. This will help to put the rider’s body in a more realistic climbing position.
In a pinch, if I don’t have a front wheel support, I’ll use a riser from a step aerobics bench. They are about the right height to level the bike.
Who you Attract
You want your program to meet the needs of a variety of participants. With trainers, you will attract riders who may otherwise never consider a “spinning” class. The cyclists who want to go through the trouble of bringing their own bikes to a class are usually the ones who are avid outdoor riders. This will expand your market — with a low cost – to a whole new group of cycling enthusiasts. Of course it will be up to you, as an instructor, to make it worth their while. And your spinning participants may see the bikes on trainers and develop the interest to take up biking outdoors. This makes your members much more likely to continue with bike related fitness programs.
2.) Location, Set-up, and Noise
OK, let’s say you are going for the mix of indoor cycles and trainers in you class. What can you expect?
Location
Where, oh where, do you put the BYOBers? Near the entry door.
With years of experimentation on where to physically put them in the room, I have found that it is simplest to group them nearest to the entry door. This makes it easier for navigating the bikes in and out of the room. Plus you want all the trainers in one area. Close proximity makes it easier to give specific cues to the trainers vs. the others. I can look at the group on trainers, give the cue, and know they are staying on track with the rest of the group.
Dirt
Bikes can be dirty. We require that the riders bring clean bikes and clean shoes to class. Plus we always have them wipe down their mats after class. This helps everything stay clean. If you can set up a bike cleaning station outside of your facility, you will win the hearts and admiration of cyclists.
Set-Up
We provide the trainer, on a mat, with a front wheel cup. A bike on a trainer takes up about 30% more length than the foot print of a spinning bike. I usually set the trainer off the back of a typical bike mat with the front wheel cup at the front of the mat. This way the sweat from the rider still falls on the mat.
As an instructor, you need to know how to attach the bike to the trainer. There are several steps to be aware of. I usually let the rider set up their own bike, but if they haven’t done it before, you’ll need to give them help. We always have a floor tire pump on hand because tires should be filled to the correct pressure to have the best ride on a trainer.
1. Rear Skewer
Most trainers have some sort of screw on cup that attaches to the rear wheel skewer on the bike. Some bikes have skewers that will not fit in these attachment points. It is a good idea to have loaner skewers on hand (Kurt Kinetic Trainers come with a skewer that will fit the trainer) and you can swap it out for the rider. It is simple to do, but you should be confident in what you are doing. If you have any questions about how to swap out a skewer, go to your local bike shop and have them show you how before you do it on someone else’s bike. Chances are that your rider will know how to do this.
2. Jiggle Test
Once the bike is mounted to the trainer and before you add the tension to the rear wheel, make sure the bike is stable. I simply grab the frame and give it a jiggle. If the bike seems a little wiggly, increase the tension on the axel mount. If the bike is stable, you are good to go.
3. Skid Test
After adding tension with the resistance roller to the rear wheel, grab the wheel and give it a tug to spin the wheel. Does it skid on the resistance roller? If it does, then apply more resistance to the rear tire. Tug it again. When there is no skidding or squealing, you are ready.
Before class starts, it is a good idea as an instructor to give each bike the jiggle and skid test.
Noise
Yes, bikes on trainers are louder than the stationary bikes. That sound, the revving of the bike tires on the trainers, gives added “feel and fuel” for everyone as you increase/decrease speeds through your workout. If you aren’t used to wearing a microphone when you teach, you may want to start.
The noise level of the trainer will depend on two things: the trainer model and the tread on the bike wheel. Some models of trainers are simply noisier. That is why I like the fluid trainers — they tend to be quieter.
More tread (and wider tire) = more friction = more noise. A smooth tire will be much quieter than a knobby one. If you notice a rider with a noisy tire, suggest for the purposes of the class that they switch out their tire to a narrow smooth one. This will also reduce the wear and tear on their regular tire.
I'll follow up next week with how I actually teach one of my BYOB (Bring your Own Bike) Indoor Cycling Classes.
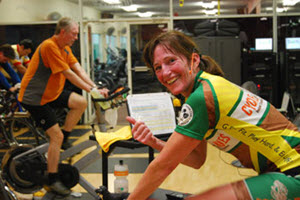
John's note: We're excited to have Coach Robin (AKA CycleMole) on the ICI/PRO Team and I can't wait for her to share her story about where the name CycleMole came from and I'm super interested in learning exactly what it takes to ride around the world on a bicycle!
Robin Robertson
Creator of Cycle Moles: Indoor Cycling for Outdoor Adventure
USAC Level 2 Coach, ACE Personal Trainer www.cyclemoles.com www.powertopedal.com
Based on all the great comments we're getting, it looks like many of us like to wear a bit of eye make up when we teach. Last week was all about mascara. This week we'll look at eyeliner- how to best wear it, and good liners that have staying power.
I often get asked, “Should I wear eyeliner on the top or on the bottom?” My answer is: both.
Although dramatic, lining the bottom of our eye all the way back to center can minimize the look of our eyes.
Having said that, care should be taken not to minimize the look of our eyes by lining the bottom completely back into the corner. (See side picture).
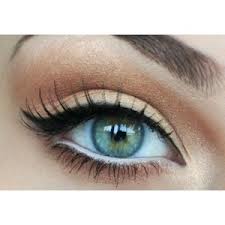
A more natural, eye opening option, is to line the entire top of our eye, and the lower eye half -way to the middle of our iris. (See picture below).
Black liner is of course the most dramatic, and least forgiving, color. Brown, bronze and gray are softer and more natural. A smudged pencil also gives a more natural look, gel liners the next step towards drama, with liquid liners being the most dramatic, but not necessarily the most long wearing.
Before gel liners came into being, I found liquid liners to be the best long wearing option. Since experiencing the gels, I've noticed liquids disappear a bit in comparison.
Gel and liquid liners are the most ‘age friendly' because we don't need to hold, or tug our lid in order to apply them well. Liquid liners, with a felt tip vs. a brush, are also user friendly and quite easy to apply.
If you're new to using liquid liner, an easy application method is to apply mascara first. Let your mascara dry. It gives a hard line to draw liner on. Looking down into a hand mirror, rather than directly into a wall mirror, will also make liquid application easier.
Kohl type pencils are great for smudging and creating a smokey eye, but aren't typically very long wearing due to their soft nature. Many liner pencils do come in waterproof formulas, but I've often found them to be quite hard to apply and I hate tugging at my eye area in order to get the hard pencil to go on properly.
This is a great example of liner in the water line (black on top, white on the bottom) and also using liner to open eyes by partially lining on the bottom.
Lining the ‘water line' (the eye membrane, or inside line of our eyelid) can lead to a very natural look (when used alone), or extra dramatic look (when paired with regular lining techniques). I find my eyes get quite irritated when I do it, and wonder about the sanitary nature of sticking eyeliners literally in our eye membrane???? At least with a gel liner and brush, we can wash the brush each time to keep things sanitary.
If your liner tends to transfer to your eyelid, in addition to using a long wearing liner, often a waterproof eyeshadow base can help. Oily eyelids are common and can be a culprit in eyeliner coming off long before we want it to. A couple shadow bases I've tried and like are: Stila Prime Pot ($20)- comes in two colors Caramel and Taffy, Tarte Clean Slate 360 Creaseless 12 Hour Smoothing Eye Primer ($19) and Elizabeth Arden Eye Fix Primer ($21.50).
A great ‘beginner' liquid liner is Lancome's Artliner in Ice Black ($30). The applicator is a felt tip (no stray brushes to worry about) and the Ice Black color is more like a translucent steel gray, so it's very forgiving as we're learning to apply it. I also like this color because it's much softer than black, brown and regular gray. The artliner's wear quite well, but come off easily with facial cleanser and water. I don't find I need make up remover to get them off. Although a bit pricey, they last 6-9 months with everyday use. (Be sure to shake well before use.)
*Lancome recently introduced Artliner 24H, which I don't like at all. It seems to have a vinyl component that looks fake and worse yet, pulled my lashes out when I tried to remove it at the end of the day. Travesty!
Tarte Amazonian Clay Waterproof Liner with Double Ended Brush ($24) is soft and easy to use and wears until you take it off. (I do need to use a make up remover. If I just use my cleanser, I have residual, which is a small price to pay for all-day wear IMHO). I also like the brush and love that it's included in the price. It comes in brown, black, indigo, bronze, plum and green. If you like a very soft look, the bronze is lovely. Tarte products have no parabens, mineral oil, phthalates, triclosan, sodium laurel sulfate, or gluten, so maybe popping this in our water line wouldn't be so horrible….I might try it.
Maybelline Eye Studio Lasting Drama Gel Eyeliner ($9.99) doesn't last quite as well for me as Tarte or Lancome, but the price point is great. It comes in Blackest Black, Brown, Charcoal and Eggplant. It also comes with a brush, although I like the Tarte brush much better and use that one all the time.
I know there are many great liners out there (and many not-so-great ones!) Time, money and the length of this post :), prevent me from writing about more, and trying most of the others. Please let us know what you've tried and liked, or tried and not liked.
Thanks, everyone, for your feedback on mascara!
Please comment, or reach out to me: amyjo@groupfitnessradio.com
*I don't receive compensation for writing PRO/STYLE, other than an occasional unsolicited piece of ‘advice' from John Macgowan, founder of ICI/PRO, my skydiving buddy and husband of 25 years. If I ever get something like product, or real cash money, I'll happily disclose that fact.
Q: “I've been on a beta-blocker (atenolol) for my high blood pressure. Lately I find that I can't keep up with the profiles my instructor presents in the Spinning classes I take. When I push to the target energy zones, I feel like I am overexerting myself. I'm exhausted. Can you help me understand how this medication might be affecting my heart rate?”
– J.T.
Melissa writes:
An excellent question indeed. I'm glad you've noticed that something isn't quite as you expect, and that you've empowered yourself to get to the ‘heart' of what's going on. (Bad joke…)
Beta-blockers are one kind of well over 15 types of different medications used to treat hypertension (high blood pressure), some of which you may also have heard of: angiotensin converting enzyme (ACE) inhibitors, angiotensin receptor blockers (ARBs), calcium-channel blockers, diuretics, and many more. Each class of drugs works on different receptors in different locations (heart, blood vessels, lungs, skeletal muscles, etc.), and thus has different effects. I will limit my discussion here to Beta-blockers, and defer the others for a later article. (more…)
 Pain sucks. When we get injured or sore or uncomfortable, we instinctually try to fix it. We reach into our medicine cabinets, pop some pills, and “get back out there.” But are we really doing ourselves a service? Can we actually be inadvertently putting ourselves at risk? Turns out, maybe so.