I had a rider wearing a Timex HRM in class yesterday and it would not pick up her heart rate on the Keiser console of any of the bikes? It does work on other equipment in the facility (treadmills etc.)
Is there a reason for this? and what she should check if purchasing another HRM to look out for?
thanks
This had me thinking about my Grandfather John Sr. (I'm the third) who could fix anything. Whenever I had a problem with something, specifically a car with issues I couldn't correct, he would advise me to carefully examine any assumptions I was working under. He knew me well enough to know that I had a tendency to see problem “A” and assume it was caused by a failure in part “B”. So I'd start to tear apart “B”, find nothing wrong with it, put it back together and after wasting a few hours bring the problem to him.
Learning to challenge assumptions can be very helpful in situations where someone brings a problem to you. Most people will try to solve their own problem, before bringing it to you. Along the way they may have created a few assumptions that they will expect you to follow.
My response was…
I'm thinking that it maybe hard to trouble shoot this.
Before I'd do anything I would confirm that the strap is actually working at the time. I've had similar situations where a student says; “it works everywhere else” but that's in the past days or weeks ago… only now the battery is dead 🙁
Does the signal show on their watch, but not on the M3? Or if they don't have a watch have them go directly to another piece of equipment and see if it shows there.
If the strap works other places, but not the M3, as a last step confirm that the M3 works with another HR strap.
If everything checks out then I'd connect you with one of the smart people at Keiser.
Learning to challenge assumptions can be very helpful in situations where someone brings a problem to you. Most people will try to solve their own problem, before bringing it to you. Along the way they may have created a few assumptions that they will expect you to follow.
You need to be careful not to sound cynical or condescending when you question assumptions; especially if you're a man talking to a women*. Rather than saying; “are you sure the strap works?” which can come off negatively, I'd suggest something like; “how about we go over to that treadmill over there just to confirm everything?”
*Trust me on this one. I worked for a number of years at a service gas station (remember those?) and have a vivid memory of being accused of insulting a women, who turned out to be the best friend of the owner's wife, because I didn't appear to take her prognosis of her car's problem seriously.
As a follow up to the story, a response from Keiser…
I started to share this over at pedal-on.com and quickly realized that this is another Best Practice for Indoor Cycling Instructors.
Suggestion to anyone reading this who is planning to use Spotify in class.
A cycling coach / friend of mine taught me that race day is never a good day to try something new.
The mark of a Rookie is someone who changes his seat height the night before a big event, or slams the latest energy drink on the way to the race – only to find the new saddle height feels weird and uncomfortable… and the stimulants have your heart (and mind) racing so fast you're worried about what effect all of these changes will have on the race you've trained months for that you're an emotional wreck as you roll to the line and are off the back before the end of the 1st lap.
Experiment during your training and only bring what's familiar to the starting line. Same is true with using Spotify in your class. I've lost track of how many calls and emails I have gotten that begin with; the first time I tried to use Spotify in my class ____________________ happened. It worked perfectly at home… I have no idea why it didn't __________.
Show your professionalism by doing a dry run at your studio before you attempt to use Spotify to deliver your class music.
Teach a whole class by yourself and experiment with your new toy;
Will it play with Air Plane Mode turned on?
Can you find your playlist if it's buried in a folder?
Is the cross fade working correctly?
Hit a few of the wrong buttons… do you know how to get back?
Accidentally tap the shuffle (no, just tapping it again won't return it to ordered play) … can you quickly turn shuffle off?
Get sweaty and try to scroll through the playlist – can youwithout inadvertently changing tracks?
Have some sweat drip on the screen – will you resist the temptation to wipe it off with your towel = changing songs? or learn that you can dab the screen without messing everything up?
Do your local files play when the should?
I'm sure this is only a partial list of the potential problems (feel free to add your own) you could suddenly be faced with, if you run into class without taking the time to become proficient with Spotify.
Myth #8 – Adjusting bicycle shoe SPD cleats correctly is hard/confusing/frustrating/impossible and should be left to professional bike fitters or the guy at the local bike shop.
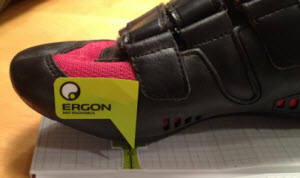
Amy's Shoes are now perfectly adjusted!
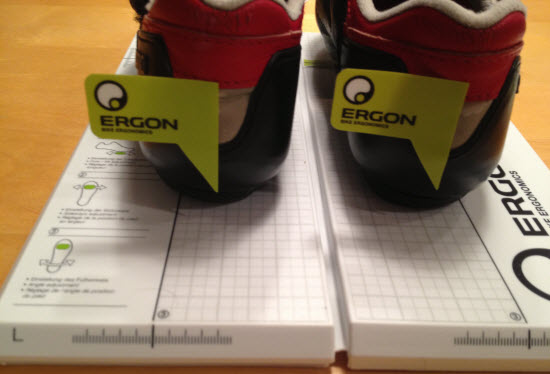
This actually wasn't a myth (as far as I was concerned) up until yesterday. Properly adjusting cleat position can be a maddening process to get right. So I wouldn't have included this in my 10 myths of Indoor Cycle Rider Setup / Bike Fit, but I can now after the UPS guy delivered this amazing $25.00 Ergon TP1 Bicycle Pedal Cleat Tool yesterday.
If you've ever tried to adjust the cleats on your own shoes you're probably nodding your head in agreement to how difficult this is to get right.
First; with your shoes on, find the joint of your big toe it's under the fleshy bump on the inside of your foot – the widest part – and mark it's location.
Then loosely attach the cleat.
Move the cleat to what looks like the right position and then tighten the two screws securely.
Clip the shoe into the pedal to see if you got it right… you didn't?
Note the change(s) needed and un-clip.
Flip the shoe over and prepare for the inevitable confusion; I want the shoe to go forward and in and rotate out a bit more… but everything is backwards so I should move the cleat back, out and rotate it in… but this is the left shoe so it goes; down, over and in?
After a dozen or more attempts you throw up your hands and declare; this just isn't so importantand call it good, wherever it ends up. You then vow to ignore any feelings that your feet aren't quite right while riding, choosing instead to get used to it 🙁
So it would make perfect sense that you would shy away from offering to adjust one (or both) of your participants cleats.
After trying out this new tool last night, I found myself rummaging around the house for every old pair of shoes I could find, so I could adjust their cleats. It was so easy (and efficient) to use that it became like a sort of therapy for me. I was actually enjoying adjusting cleats! In mere minutes I was able to adjust both cleats properly; ball of the foot over the pedal spindle, Q Factor and rotation all perfect – and perfect mirror each other's settings.
Notice in this before picture how both Amy's shoes are rotated inward = her knees would need to move out to compensate, not good.
Here's a short video showing how simple this tool is to use.
Myth #6 You should be concerned with setting the saddle height too high.
If you've taught for any length of time you have probably observed that; left to their own devises, our participants will universally have their saddles set somewhere between just right and too low. I discussed how you should approach these low riders in an earlier post about my 10 Myths.
But should you have any concerns about raising them too high?
No.
Let's start deconstructing this Myth with a visualization exercise.
To begin I'd like you to close your and see if you can call up an image of the last participant whom you observed riding with their saddle set too high.
Can you see one? No?
Well keep trying…
OK, that's enough. You can open your eyes.
There's a good chance that you've never had a student in your class riding with their saddle set too high. I personally can't think of a time when I've seen this and felt I needed to respond / intervene between the rider and the cycle. Even when I thought I saw someone set too high (doing the classic Toe Pointed Peddling) it turned out that when I encouraged them to loosen their ankles and drop their heels, their seat was still set too low.
There's a simple reason for this > peddling with too high a saddle is painful and riders will instinctively choose a lower height where there's no pain.
I need to credit my Schwinn certification for this one. Schwinn teaches two levels of bike setup; a “Quick Fit” and a “High Performance Fit”. While “Quick Fit” is basically “get em close”, the “High Performance Fit” version relies on the comfort of the rider to determine saddle height.
From my Schwinn Indoor Cycling Instructor manual:
In the proper riding position, with hands on the handlebars, have the rider place their leg at the bottom of the pedal stroke. Kneel down beside the pedal, and make sure the rider's heel stays level with the floor.
Check that the knee extends as far as comfortably possible while the rider is pedaling Raise and lower the seat until the rider finds the highest comfortable adjustment. This should not be determined simply by observing the leg length, but rather by observing leg length AND through trial and error.
The minute I heard this during the certification, my ears perked up and I thought it made perfect sense. Riding with too high a saddle is painful… or riding with a saddle that's at the proper height, but higher than your flexibility allows, isn't comfortable to ride either.
And uncomfortable riders won't sit there in pain for an hour, and they certainly won't come back 🙁
Your focus needs to be on the comfort of the student, not some arbitrary number on a Goniometer or Spinning® Fit System tool.
I'll never forget the guy at the amusement park years ago with the stick he used to measure each rider's height, to see it they were tall enough to ride the Charlie Brown swings. He was so focused on the top of my daughter Carly's head, and if it was over the top of his measuring stick, that he completely missed how Carly was doing her best ballerina impersonation (up on her tip-toes) as she walked past his review station. He gave her an approving nod and she was in, while I watch her lose 6″ in height, in her next two steps, as she returned to her heels. Then she turned and smiled back at me about her cleverness – it was priceless.
Schwinn's system is beautiful in it's simplicity and how it's focused on feedback from the student. When you see a Low Rider in class suggest that they will be more efficient / burn more calories or develop more shapely legs if they raised the saddle. Then raise it a notch and ask them; “how does that feel?”
If they answer with anything other than; “it feels too high”, suggest they try another notch and ask again. Repeat until they respond with; “that feels too high” and drop them down one hole.
One of the beauties of taking another Instructors class is that you can observe the problems and/or issues they have during class and make a note to ensure the same doesn't happen to you.
Case in point…
I was taking the class of an un-named Instructor last week. Even though I was sitting the the front row, I couldn't hear most of what she was saying. It wasn't that she was trying to talk over the lyrics (thankfully) but I was only able to pickup about 50% of her cues.
I found myself asking the person next to me; “what are we supposed to be doing now?” But then I had to stop. I was getting less than friendly looks from the un-named Instructor, so I turned to face forward, smiled and tried to concentrate on her cues… that I was only hearing bits and pieces of.
There's a perfectly technical reason why this can happen.
Instructors don't hear what their student's are hearing.
The sound levels you hear up on the Instructor bikecan be are different from what your class hears. Speaker placement, room acoustics and the number of riders in the room all affect the sound levels – beyond the settings you make to the studio's sound system.
One universal problem is studios with wall mounted speakers, on either side of the Instructor platform, facing the class. Sound travels in a straight line and the sound's energy decays quickly as it travels through the air. So your participants in the front row get everything, second row a little less and so on. You sit in a relative Cone of Silence. Most of what you hear comes after bouncing around the room = weaker that what the rest of the class hears.
We had a phenomenal sound system, complete with a Sound Engineer and his big mixing board, at our last conference. Big speakers on either side of the stage. I thought it sounded great. Barbara Hoots was one of the Instructor team on stage during Tom Scotto's ride with a live band. She explained to me after the ride that she had a very difficult time understanding what Tom was saying, even though she was riding only 2 feet away from him and neither could the un-named Instructor sitting right next to her. We hadn't thought to provide monitors pointed back at the Instructors on the stage like they use during a concert.
But our studio also has speakers on the back wall facing me… so this doesn't apply to me, right?
Maybe yes, and maybe no. It didn't help the un-named Instructor in my example above. The distance you are from the source of sound has a huge effect on how loud it sounds.
There's a simple way to solve this* – get off your bike 🙂
When I first started riding in with my class, while teaching to a video, I would begin class up front in the normal position. Then, after we were through the warm up I would dismount and climb on a bike with the rest of the class. Often I'd find myself needing to reduce the volume of my music so I (and presumably the rest of the class) could hear me properly**. But then the music would be too low… so I would find myself constantly adjusting my iPhone down when I needed to cue and then back up for more energy.
I figured out that if I started class, with what I thought was a good balance between my voice and the music, I could walk around the room and test what everyone else was hearing. If I was a little too weak, compared to what sounded like the right level for the music, I could naturally return to the sound system's controls and make any needed adjustments. Only then, after finding a good balance, will I join the class for the rest of training.
Give this a try and let us know your experience.
*No, the solution is not to ask the class; “How's my volume?' With each student hearing you slightly differently (or having a different sensitivity to sound) who do you respond to? Besides, in public environments like your class, most people will tend to lie to you (not want to be critical) and tell you everything is just fine, when maybe it isn't.
**I use a $20 wireless Bluetooth connection for my iPhone so I can control it anywhere in the room. This post explains more.
I was in Rochester MN yesterday and took an awesome class at the Dan Abraham Healthy Living Center. It's a beautiful club, with a stadium style studio, full of FreeMotion S11.9 Indoor Cycles. If you're ever find yourself in Rochester It would be worth your time to pop in and take a class at the DAHLC – that's what they call it.
I've made it a habit to take other Instructor's classes as often as possible. My objective is to learn from as many different people as possible – it doesn't matter who they are or their experience level. I find I can always pick up something of value, not to mention it's just fun take someone else's class!
The Instructor's name was Julie and she had a great playlist that included two tracks that worked very well together as a 70 rpm steep climb that transitioned into a 94ish flat. I'm never in class without my iPhone these days and Shazam identified and saved them so I could add them to my Spotify library and also share them with you.
They have a SoundEar Sound Meter hanging on the back wall of the studio to help the Instructor understand how loud her music is playing. I see this as a valuable tool (although very pricey @ $700.00) that solves the “YOUR MUSIC IS TOO LOUD” problem. With the studios speakers mounted to either side of the Instructor and pointed at the class, Julie isn't hearing her music at the same level as her class. It was interesting to watch her make adjustments to her iPod when she saw the SoundEar's red light flashing – which indicates a volume above the preset level of 85 dBs. In case you are wondering 85 decibels is pretty loud, at least it sounded loud enough for me 🙂


 Here's a short video showing how simple this tool is to use.


