
by Guest Contributor | Oct 22, 2020 | Master Instructor Blog

By Team ICG® Trainer Elliott Bringman
Growing up cycling and swimming, I never knew that without a flexibility regimen, the muscles would tighten more and more and, cumulatively, end up rigid. Rigidity, in the long run, decreases range of motion, which is detrimental to optimal performance. Performance aside, tight muscles affect how you feel in your body on a daily basis. Overly tight muscles can also lead to associated issues, such as chronic pain and unmanageable stress. All of this is avoidable, however, through integrating a yoga practice into your cardio training.
After swimming competitively in high school without much (if any) stretching, I already suffered from tight muscles by the time I entered college. I was lucky in college to take a jogging fitness class with Olympic runner Jane Kirkpatrick at UC Santa Barbara. Jane emphasized stretching for all her runners, and the benefits were immediately obvious.
It wasn’t till the end of college that I discovered yoga. Once I began adding yoga to my repertoire, my practices really began to bloom. Muscle tightness in the legs was not as severe. In swimming, my shoulders felt more fluid and the “clicking” sounds began to dissipate.
Fast-forward ten years: I find myself professionally offering this practice to casual and serious athletes in the San Francisco Bay Area. I began by teaching early morning indoor-cycling classes, followed by a yoga practice at Club One. (I’m now a RYT-200 Yoga Instructor.) I then teamed up with San Francisco’s first and only dedicated cycling and yoga studio — OMpower, home of ICG® Academy — to offer a class that integrates both practices in a single session. The students who have followed me on this journey all agree: Why haven’t they been doing this all along?!
With modern life crunching the amount of time people can spend away from home or work, a class that more or less offers two practices in the time of one extended practice simply makes practical sense.
Physically, participants receive the cardio boost and strength training for the lower body through indoor cycling, while strengthening the upper body, toning the core, opening the joints, and lengthening the muscle fibers through yoga.
Mentally, students energize themselves through the intensity of the cardio practice, and then relax with yoga.
Spiritually (and yes, there is a spiritual component), trainees push their boundaries and expand with cycling, while rooting and feeling a deep earth connection with yoga.
I could go on and on about the benefits of this practice, but I encourage everyone to take the experiential route. Try it for yourselves. It’s through our own experience that we discover whether certain practices resonate or “work” for us.
But if my experience has shown anything, it’s that this practice is the best balanced of them all.
Elliott Bringman, MA is a San Francisco-based athlete and yogi offering smart cardiovascular training through indoor-cycling, and yoga practices designed to strengthen, open, relax, and detox. Elliott is a Master Trainer with the Indoor-Cycling Group and is the creator of a number of hybridized spin/yoga programs. His welcoming, all-levels classes boost students’ aerobic ability for easy application to any number of high-endurance activities, while simultaeneously working the body through classical yoga-poses to build sustainable strength and flexibility. In addition to the physical, Elliott’s deep knowledge and dedication to both eastern and western traditions make his classes some of the most authentically uplifting and empowering around.
Originally posted 2013-02-04 05:50:23.

by Guest Contributor | Mar 26, 2018 | Best Practices, Stages Indoor Cycling
The Power of the Pedal Stroke – Anatomical View
For a road cyclist pedaling while in the saddle, most of the power happens between the 12 o’clock and 5 o’clock position of the pedal stroke. This is when a majority of the primary muscles are activated. Hip and knee extension, along with hip flexion, are the main movements of a pedal stroke. Between the 6 and 12 o’clock position in the pedal revolution, there is some knee flexion to help bring the pedal back to the top, but the downward force being placed on the opposite pedal by the opposite leg is generally far greater. Lessening this negative (downward) force through the back half of the pedal stroke is accomplished through the action of the hamstrings and calves at the bottom of the stroke pulling the foot backward, to the hip flexors at the top, lifting the foot and knee back to the 12 o’clock position.
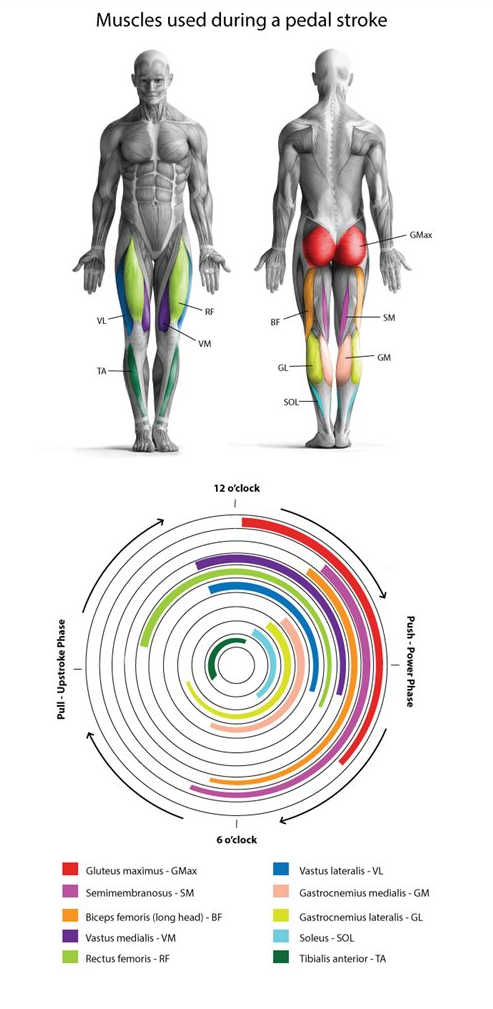
The power phase happens while the hip and knee extend, pressing downward on the pedal. This action starts with a combination of the gluteus and quadriceps muscles but then is joined by the hamstrings and calf muscles a quarter ways through the revolution. This shows the need for equally strong hamstrings, hips, and quadriceps. These muscles are some of the largest in the body and are the primary power producers in a pedal revolution.
A Brief on Pedal Torque
Is there such a thing as the perfect pedaling technique? And does anyone have it? The answer to both of these questions is probably ‘no' but the answer to ‘is there good technique?' is definitely ‘yes' and answering the question ‘what's the difference between good and bad technique?' is the objective of this article.
Let's consider the following four scenarios:
1. Cranks at 3 o'clock (horizontal). Pressing down on the front pedal will cause the cranks to rotate in the direction that we want them to go. Pressing down on the rear pedal will cause the cranks to turn in the wrong direction. If the force on the front pedal (lever) is greater than the force on the rear (lever), then we'll get some rotation in the right direction. Any downward force on the rear pedal has to be overcome by downward force on the front pedal before any effort is used to propel the bike forward. Let's keep that in mind.
2. Cranks at 6 o'clock (vertical). Theoretically pressing down on the top pedal won't cause the cranks to rotate but in practice, it will simply because the position is unstable. Whether it causes them to rotate forward (to 3) or backward is anyone's guess. Pressing down on the lower pedal will not cause the cranks to rotate – in fact, it will stop them. In addition to being 100% ineffective, a straight downward force at when pedals are positioned at 6 and 12 o’clock is also biomechanically stressful, and over time may result in pain or injury to the knee joint.
3. Cranks between 1 and 2 o'clock. Pressing down on the top pedal will cause the cranks to rotate in the direction we want them to go – but only a small part of the force will contribute to the rotation. The rest of the force is wasted. Pressing down on the bottom pedal will cause the cranks to rotate in the wrong direction – but again with only part of the force. As long as the force on the top pedal is greater than the one on the bottom rotation will be in the right direction.
4. Cranks between 4 and 5 o'clock. Similarly to 3, a proportion of the downward force applied to each pedal will affect the rotation, the remainder will have no effect.
If we look at the diagram below, we can understand why bad pedaling works (i.e. why anyone can ride a bike – or a stationary one at least). Pressing harder on one pedal than the other will result in the pedals turning in one direction or the other. It's easy to apply a large force to the front pedal through the 3 o'clock position, enough to turn the pedals to 6 o'clock. There will be enough momentum in the legs to get past the vertical after which it's easy to exert a larger downward force on the upper crank than the lower one. The momentum (energy applied to the pedal) ensures that the rotation direction remains the same.
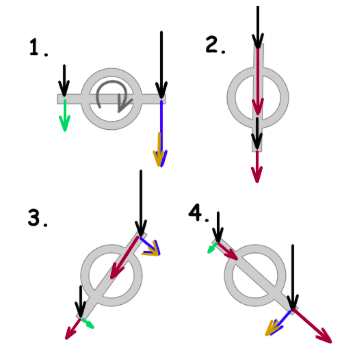
In the diagrams above the direction of travel is left to right (as with the animations below). The black arrow represents applied force. The colored arrows show the applied force resolved radially (in red) and tangentially (in blue and green).
Bad pedaling works because the blue arrows are longer than the green ones. The effective contribution is blue minus green, I've shown that in amber. The amber arrows represent the ‘torque'.
Bad pedaling is bad because all of the force represented by the red and green arrows is wasted.
The aim of good pedaling is to modify the direction of the black force to minimize radial forces and maximize torque.
The Ankling Technique
Deriving from the above explanation of Torque, we can conclude that the main application of force to the pedals is in the downward thrust which comes naturally to almost everyone. The technique of drawing force across the bottom of the revolution arc and upwards to the start of the downward thrust is called ankling. The action involves a lowering of the heel as the downward force of the pedals takes place, and a lifting of the heel as the pedal begins the upward movement of its revolution. Think of scraping mud off the bottom of your shoe at the bottom of the pedal stroke. Ankling enables the application of constant pressure upon the pedals throughout the revolution eliminating the dead spots at the upper and lower points. This pedal stroke requires less peak muscle contraction which spreads the load over the muscles (engaging more calf muscles) and promotes a smooth efficient style that allows the production of more power with less difficulty.
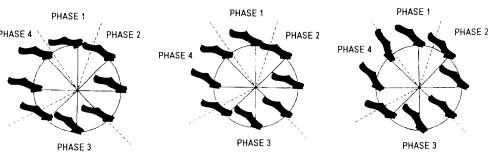
Different cyclists will vary in the position of their heel while pedaling. Depending on one's flexibility and basic biomechanics, some of us will use a high heel action and some may use a low heel action. Heel height also depends on one's cadence (see illustration bellow). One may end up injured if an attempt to change the basic heel height of the pedal stroke if it doesn’t feel natural. One should try to develop ankling within the constraints of their basic pedaling movement. A proper bike fit along with cleat positioning goes hand in hand with this and is well worth the money to optimize your pedal stroke. Because good anklng technique is dependent on proper foot placement on the pedal, it is important to remind indoor riders who do not use cleated shoes to place the BALL of the foot on the pedal before tightening the toe straps. Placing one’s foot all the way to the end of the cage can result in the arch of the foot being on the pedal and restrict ankle movement.
The faster one's cadence, the more difficult and unnecessary it will be to use the ankling technique. The downwards force on the pedals and the muscle contraction will be so quick in a sprint at 150 RPM that one won’t be able to do this effectively. However, we can observe that track sprinters will often use a high heel action when in a full sprint. Indoor riders are notorious for riding with an overly exaggerated “toe down” style, especially at high RPMs. However, unlike the outdoor sprinter, this style indoor usually reveals an inability of the rider to “keep up” with the momentum of the weighted flywheel.
Road cyclists often use a low heel action resulting from their cleat being positioned past the ball of the foot (towards the toe). The low heel technique is important in hill climbing while sitting back on the saddle and one can notice an improvement in climbing abilities upon mastering this technique. (note: keep in mind this technique most likely does NOT apply indoors, as simulation of a “hill” is simply an increase in resistance; there is no real incline to lift the front portion of the bike above the rear).
See illustration below for an example on heel action at different cadences (pay more attention to the pedal angle than the heel angle in these pictures. The heel appears to be higher than I would suggest. This will depend on the flexibility of the rider).
Understanding the role of the ankle joint is quite important; however cueing indoor riders about foot position (i.e., “point your toes,” or lift your toes up”, etc.) are NOT likely to result in better ankling technique, or more effective force generation. Instead, remind riders to keep their ankle “loose and flexible”, while seeking to apply effective force to the pedals with cues that describe the circular nature of the pedal stroke and the role of the primary force producers in the pedal stroke. This will encourage good ankling to occur naturally.
Co-authored by Stages Master Educators Paulo Stroud-Baranda and Lenita Anthony
by Guest Contributor | Nov 6, 2012 | Big Box Instructor, Instructor Training, Training With Power

Guest Contributor: Schwinn Master Trainer Shannon Fable
If we hope to expand our reach as indoor cycling instructors, measurement – whether in the form of power/wattage or heart rate monitoring – is best used to add motivation to an already effective workout. In our enthusiasm, we as instructors many times end up complicating the experience when we add technology. We over-load our students with too much information and thereby narrow our audience down to an elite “hard core” group. We forget that the gift of technology is to actually make things simpler or more exciting. That’s why your preschooler is hogging your iPad, right? It’s the simplicity of riding a bike that attracts a WIDE variety of people to experience and enjoy our classes and what speaks loudest to everyone who exercises is the hope of just a little extra motivation to go longer, harder and more often. Adding measurement can do just that.
The addition of power/wattage to bikes is an amazing advancement in the indoor cycling category. We can now actually tell if someone is getting fitter, losing fitness or maintaining fitness. It’s been a long time coming and students who use cardio machines in the gym will tell you they have had measurement on the console in front of them on the treadmill, stepper and elliptical for years! For them, it feels normal to be able to measure their workout! It’s our job to now make that measurement mean something.
Many instructors began their careers as front row riders. But once we go from being a front row participant to being the instructor we sometimes forget that successful instructing is not about how scientific we can make the experience, but how addictive! Maybe you’re shaking your head and thinking, “but we have to produce RESULTS”. Yes, though I believe we create long-term results in clients by making the experience extraordinary and this includes incorporating technology in an unintimidating way.
One way to do this is to coach riders to set their individual baseline wattage for work in a class and commit to staying above it and returning to it after recoveries. We can compare our work effort objectively from hill to hill and from class to class. And, of course, measuring work is a key component in achieving stellar results. I love that we have a new way to set bench marks for our participants so they can see progress in distance ridden, our time holding wattage, versus riding a bike going no where in a dark, smelly room by “feel” alone. It’s a new day in indoor cycling and the smartest instructors in the industry are the ones that can take the really intricate stuff and translate it to the novice rider in the oversized t-shirt, baggy sweats and running shoes as well as the hot shot triathlete in the front row.
Having personally launched power on bikes in more than one club, I find success, of course, starts with education. But not education that makes class any more complicated with charts and graphs and rider homework, but education that gives instructors the cycling science on measurement and the coaching tools to layer this easily over the great rides they are already teaching.
Can I take my knowledge of power and heart rate training and make it more specific and customized? Of course! In a small group setting or with a paid-for program with a specific focus, when I know everyone is in there with the same goals and the same level of commitment…Yes. But industry wide, that’s just not the mass appeal of indoor cycling and the most successful instructors I know, know how to reach the masses.
I have been more inspired and seen more results teaching with measurement in the last 5 years than in the previous 10 without it! And I encourage all instructors to invest in the education needed to deliver measurement in the most meaningful and motivating way. It’s here to stay, so make it work for you. The most important strategy is to make sure the entire cycling team at your facility is on the same page and to then to hone the coaching skills to deliver measurement as motivation – SIMPLY – to everyone.
John's note: Thanks Shannon 🙂 I appreciate your response.
I had asked for comments from a number of Indoor Cycling education providers in response to this post that identifies some of the issues we face implementing Power based classes. Schwinn's Master Educator Jay Blahnik is scheduled to be on the Podcast at the end of the month. Our plan is to explore his strategies to helping you successfully transition from conventional Indoor Cycling classes to classes that include Power.