I used a new metaphor this morning that seemed to resonate with my class.
Watch this video and see if you can see the similarity between an eagle catching a fish and proper pedaling technique.
Through the magic of slow-motion photography it's obvious that the act of plucking a large salmon out of the water is a very fluid, near circular, motion by these powerful birds.
This morning was a cycling strength day. I really enjoy teaching these classes and I describe the format to the class as; BIG PEDALS turning slowly. But slow = STOMP for many in my class.
To help everyone move beyond stomp, I've been introducing the concept of ankling through each pedal stroke to my class. If you missed it here are two videos that demonstrate what local bike fit Guru Chris Balser categorized as USA vs. EU pedaling techniques. To help communicate the concept I've been talking about how there shouldn't be any specific action; stomp, scrape, pull up, ect.. Rather just one fluid motion of your feet rotating around the pedals, with flexible ankles. Tough to describe until I happened to see this video and then it clicked – the focus is on your toes! Or in the case of the eagle, its claws & talons.
Watch the video again and see how the eagle's talons and *ankles are at full extension as it reaches forward and down in preparation to grab the fish. The eagle's claws then flex forward, essentially rotating around its catch, as it lifts it from the water. This is the same movement Chris was helping me learn to improve my pedaling mechanics and power output.
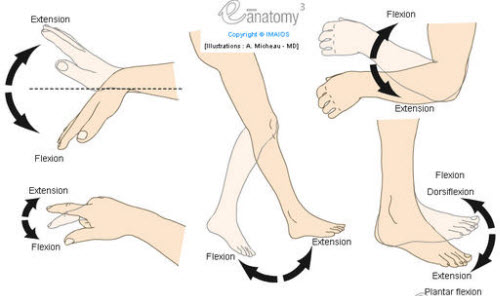
The difference between extension and flexion in joint movements.
How would you describe this movement to your class?
I had everyone try to visualize what it would feel like to be an eagle, swooping down on a fat, tasty salmon. Talons extended as your pedal crosses the top of the circle, then, flexing forward while you sink your talons into the flesh. Your claws rotate around the fish as you drag your catch from the water… only to drop it… so you try again.
*I'm not sure what that joint is called on a bird, but you get the point.
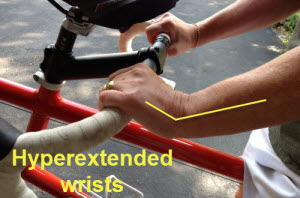
Back on May 30th of last year, this post; Correcting Student’s Form — Proper Hand Position discussed a problem that a rider in my class was experiencing. Her hands were going to sleep after riding for 30 or so minutes. I offered my suggested solution once I figured out where her problem was coming from.
This is a not uncommon problem with outdoor cyclists and it sounds like it's becoming more of a problem indoors.
I stumbled onto a post this morning on spinningfreak.com that discusses the potential for carpal tunnel injuries from improper hand positions.
His (I don't know his name) post linked to a interesting video segment;Spinning® and carpal tunnel riskfrom WABC New York and their medical advisor Dr. Jay Adlersberg. Dr. Adlersberg gives a quick explanation of what is occurring during the class that could be causing pain/numbness in the hands of your students. At the end of the report he even gives this a name; Spinner's Hands.
Regardless of what brand of Indoor Cycling you teach, the simple solution is to educate everyone on the importance of riding with a straight wrist and then cue frequent hand positions. But not just at the beginning… my experience is that most everyone has good form early in the ride. It's when everyone is getting fatigued; heads, shoulders, elbows and finally wrists are dropping, that you need to remind people of the need to straighten up.
If you're reluctant to get off of the bike, taking a quick walk through your class with an eye out for cocked wrists could be the excuse you're looking for.
Myth # 10 – There's only one place your knee should be “over pedal” and that's when the forward pedal is horizontal.
Actually there's a second place where your knee should line up vertically with the center-line of pedal – when the pedals are at BDC (bottom dead center) like this picture shows.
From http://www.pezcyclingnews.com/?pg=fullstory&id=3617 – I added the yellow line.
But wait John, for the knee to be over pedal, doesn't that mean that the lower leg would be perfectly vertical?
Isn't there supposed to be an angle in there some where? Of course there is and it's there right in front of you. It's created by rearward offset of the saddle which is a function of the Seat Tube angle, typically around 73°.
Why I see this as a myth is because we all live in a world filled with right angles, created by perfectly horizontal and vertical lines. Floors are level, walls are plumb and bicycle riders need a soft bend in their knee – an angle of around 30°. Because we are looking for this angle, the tendency is to reject the premise and assume it can't be perfectly vertical/plumb, except it can and often is* 🙂
The easiest way to check this is to simply step back away from the rider. Observe them with still pedals at BDC and a relaxed ankle/horizontal foot.
*You'll find this applies when the saddle fore-aft is set properly. Where it is not applicable is in those situations where the rider has moved the saddle all the way forward. Can you see how this will decrease the amount of offset = reduce the amount of the angle at proper extension?
Myth #6 You should be concerned with setting the saddle height too high.
If you've taught for any length of time you have probably observed that; left to their own devises, our participants will universally have their saddles set somewhere between just right and too low. I discussed how you should approach these low riders in an earlier post about my 10 Myths.
But should you have any concerns about raising them too high?
No.
Let's start deconstructing this Myth with a visualization exercise.
To begin I'd like you to close your and see if you can call up an image of the last participant whom you observed riding with their saddle set too high.
Can you see one? No?
Well keep trying…
OK, that's enough. You can open your eyes.
There's a good chance that you've never had a student in your class riding with their saddle set too high. I personally can't think of a time when I've seen this and felt I needed to respond / intervene between the rider and the cycle. Even when I thought I saw someone set too high (doing the classic Toe Pointed Peddling) it turned out that when I encouraged them to loosen their ankles and drop their heels, their seat was still set too low.
There's a simple reason for this > peddling with too high a saddle is painful and riders will instinctively choose a lower height where there's no pain.
I need to credit my Schwinn certification for this one. Schwinn teaches two levels of bike setup; a “Quick Fit” and a “High Performance Fit”. While “Quick Fit” is basically “get em close”, the “High Performance Fit” version relies on the comfort of the rider to determine saddle height.
From my Schwinn Indoor Cycling Instructor manual:
In the proper riding position, with hands on the handlebars, have the rider place their leg at the bottom of the pedal stroke. Kneel down beside the pedal, and make sure the rider's heel stays level with the floor.
Check that the knee extends as far as comfortably possible while the rider is pedaling Raise and lower the seat until the rider finds the highest comfortable adjustment. This should not be determined simply by observing the leg length, but rather by observing leg length AND through trial and error.
The minute I heard this during the certification, my ears perked up and I thought it made perfect sense. Riding with too high a saddle is painful… or riding with a saddle that's at the proper height, but higher than your flexibility allows, isn't comfortable to ride either.
And uncomfortable riders won't sit there in pain for an hour, and they certainly won't come back 🙁
Your focus needs to be on the comfort of the student, not some arbitrary number on a Goniometer or Spinning® Fit System tool.
I'll never forget the guy at the amusement park years ago with the stick he used to measure each rider's height, to see it they were tall enough to ride the Charlie Brown swings. He was so focused on the top of my daughter Carly's head, and if it was over the top of his measuring stick, that he completely missed how Carly was doing her best ballerina impersonation (up on her tip-toes) as she walked past his review station. He gave her an approving nod and she was in, while I watch her lose 6″ in height, in her next two steps, as she returned to her heels. Then she turned and smiled back at me about her cleverness – it was priceless.
Schwinn's system is beautiful in it's simplicity and how it's focused on feedback from the student. When you see a Low Rider in class suggest that they will be more efficient / burn more calories or develop more shapely legs if they raised the saddle. Then raise it a notch and ask them; “how does that feel?”
If they answer with anything other than; “it feels too high”, suggest they try another notch and ask again. Repeat until they respond with; “that feels too high” and drop them down one hole.
Comment from Myth #4Indoor Cycles require a lot of Fore/Aft Saddle adjustment to accommodate the range of cyclists coming into your class.
Well… the difference between real bikes and an IC bikes is that real bikes come in many frame sizes/geometries. They don’t need much room for saddle fore/aft positioning because if you have the right size frame, you don’t need that much fore/aft movement to find the right fit.
I should have anticipated this response and addressed it in my original post.
Changes in saddle Fore/Aft on an Indoor Cycle replicate the similar movement you would experience on various sizes of a typical road bicycle.
Let me explain…
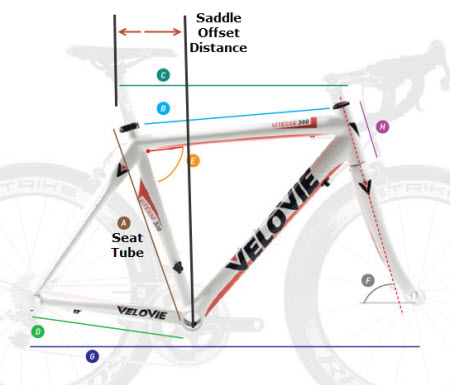
I found this frame sizing chart at ribblecycles.co.uk and it's typical of most any modern road bicycle frame design sold in stock sizes.
Areas in yellow don't change, regardless of frame size
Certain dimensions* at the rear of a bicycle do not change with frame size:
Dimension [B] is Bottom Bracket Height = how far the horizontal center-line of the Bottom Bracket is off the ground.
Chain Stay length [I] sets the distance the rear wheel axle is from the vertical center-line of the Bottom Bracket
Changes in frame sizes come primarily from:
Seat Tube length [A] affects saddle / stand-over height and is the most common method of sizing bicycles
Top Tube length [C] changes the reach to the handlebars.
So with the back of the bicycle essentially unchangeable, if you want to increase the frame size you're limited to; make it taller or longer… but only through increasing the length of the Top Tube.**
Notice that there's no dimension for Saddle Post position Fore/Aft. That's because it's controlled by the Seat Tube Angle [E] which is near universally @ ~ 73° plus/minus on Road Bikes.*** Lengthen the Seat Tube and Saddle Post naturally moves further behind the Bottom Bracket center-line.
Indoor Cycles use a similar Seat Tube Angle = similar results. Raising the saddle also moves it toward the rear ~ the same amount as you would experience with bicycle frames in various sizes.
————————————————————————
*Yes, of course you can find examples in the extreme (very tall or short) where this isn't the case. I'm trying to make the point that bicycle manufacturers (indoor and out) design their products to fit 90+% of the general public, and, with over 100 years of experience, do so very effectively.
** Which is what Keiser attempts to do on the M3's handlebars. They move farther away, as you raise them up.
*** Triathlon Bikes for example, use a steeper (more vertical) Seat Tube Angle.
Is it fair to call this the “Model T” of Indoor Cycling?
Myth: Indoor Cycles require a lot of Fore/Aft Saddle adjustment to accommodate the range of cyclists coming into your class.
Real bicycles only provide about 2″ of total saddle adjustment (through the saddle frame rails) to properly fit the owner with their knee over the pedal spindle… so why are many Indoor Cycles designed with up to 9″ of adjustment like the Spinner® NXT?
To make the riders comfortable, even if they ended up in a horribly wrong position, that's why.
This Myth goes all the way back to the very first Johnny G Spinners. Remember those?
The whole Spinning® thing was brand new. We were encouraging people who probably hadn't been on a bike for 20 years, to climb on and ride for 45 minutes. Many most didn't have the flexibility to ride comfortably in the proper position and wanted to ride bolt upright. In those days the handlebars only moved up and down – not in and out. Raising the bars helped some, but moving the seat forward helped a lot!
So that's what riders did and God help you if you suggested otherwise 🙁
I'm guessing that Johnny knew exactly how to properly fit a rider to a bicycle. But I also believe that he and his early partners understood that if people aren't comfortable, they won't come back = end of the program.
Notice how the original Johnny G Spinners above appears to have far less travel than the NXT below that offers a whopping 9″ (4 1/2″ either way of center)?
I need to credit Schwinn for being the first manufacture (that I'm aware of) with the courage rein in the amount of saddle travel (in part by offering handlebars with Fore/Aft adjustment. The AC Performance is limited to about an 1″ or so either way from center. The FreeMotion S11 series has a similar amount of travel because that's all they need 🙂