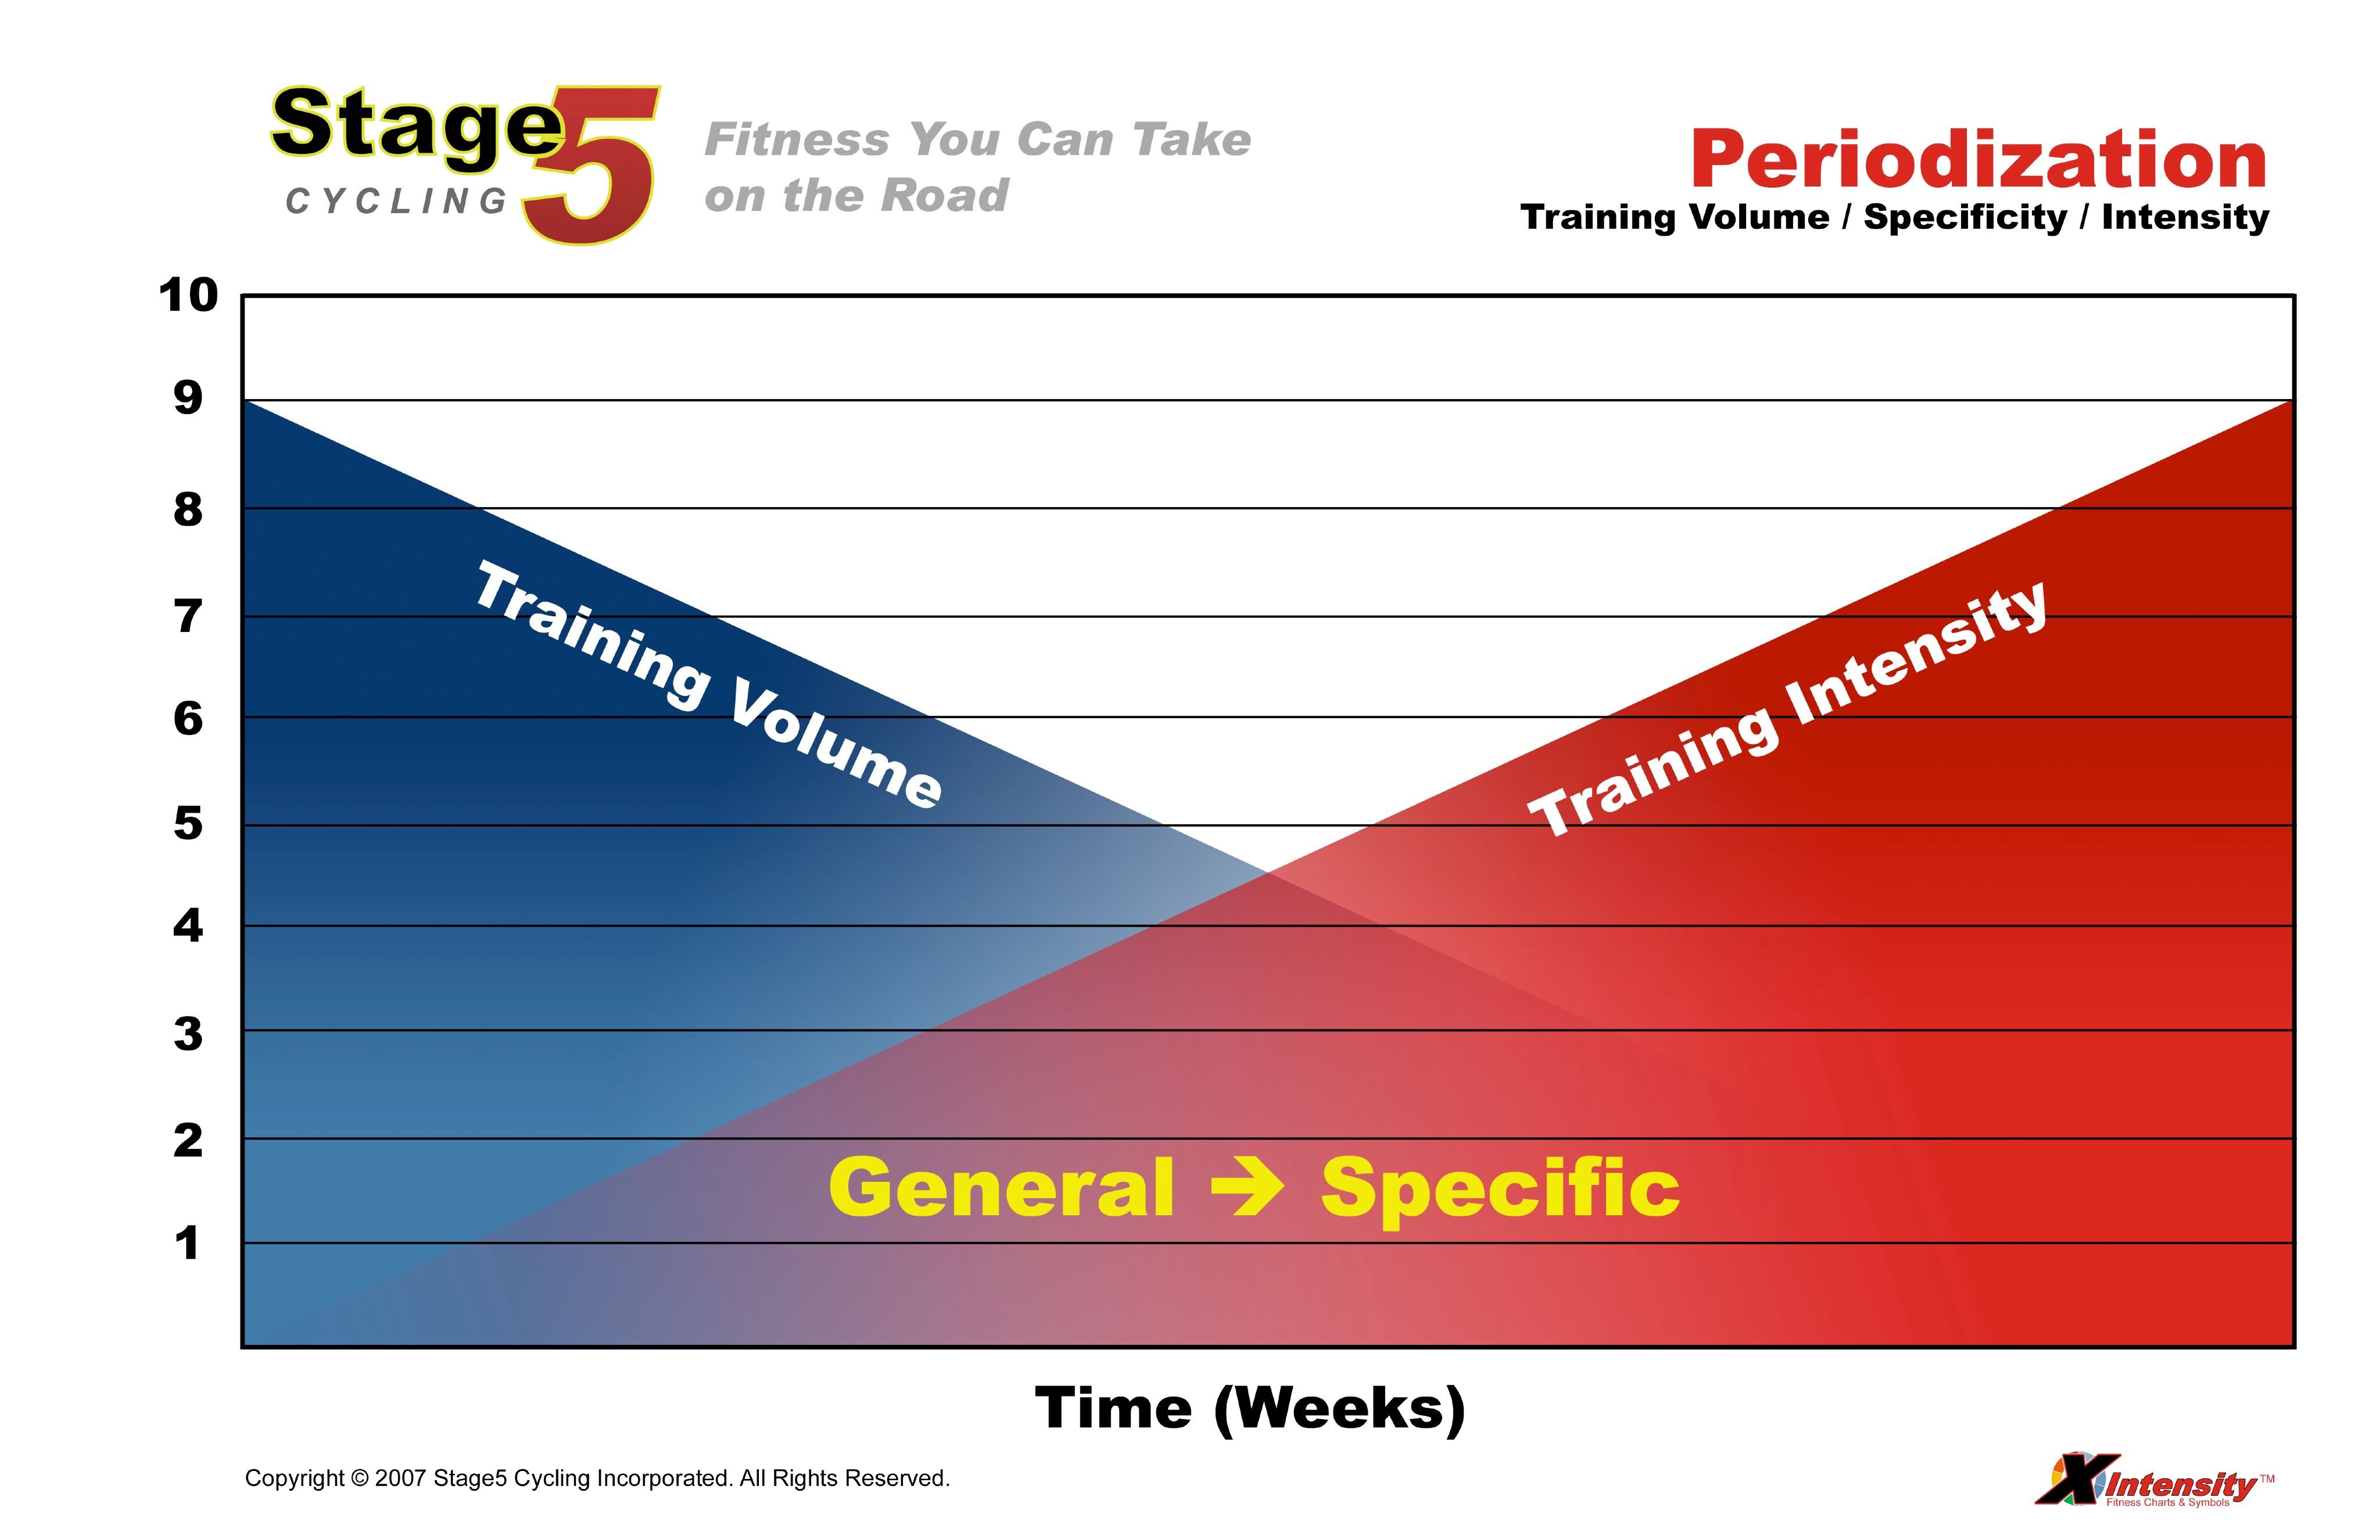
Periodization is the backbone of an instructor's success, and it can quickly become the key to your popularity as an instructor and it will become the foundation for your students to reach their goals. Periodization is the process of structuring training into progressive phases or blocks of time that are organized into Macro, Meso and Micro cycles. The outdoor cycling community uses periodization as a method to increase their strength and to peak for their target (or A) race.
One of the most important parts of periodization is the planning process where you will divide your an annual training plan into sensible blocks, where each block has a particular physiological adaptation and accordingly a specific dose of stress to elicit that adaptation. While I realize that you may not use an annual plan in your indoor classes, in a later article I will explain how to use the periodization concept in designing your rides. The planning and the journey is really the important part of this process; it gives you time to consider your goals and get focused.
In short, periodization allows you to organize your training into hard training periods and easier training periods to facilitate recovery. Periodization can also help to expose your riders to different aspects of cycling and it can allow you to work on both your cardiopulmonary system and your musculoskeletal system which will produce stronger riders with greater endurance.
The Macrocycle
The macrocycle is the longest of the three cycles and generally consists of a year or more. The macrocycle should include all of the areas of a complete training program including low zone endurance work, strength building, race ready maintenance and of course recovery. The macrocycle is your long term view of your training plan.
The Mesocycle
The second block of training is called a mesocycle. Your macrocycle will contain several mesocycles. While a macrocycle is a long term view of training, a mesocycle represents a specific block of training that is focused towards a particular physiological adaptation and usually not more than 3-6 weeks long. This could be endurance, strength or perhaps even recovery. Mesocycles are the true working phases of your training plan, and you will use these cycles as careful evaluation points to be sure that you are meeting your training objectives. It is not uncommon for there to be an intermetiate resting or recovery period between mesocycles.
The Microcyle
The smallest block of training is called a microcycle. The microcycle is the point at which you are considering and designing specific drills to meet the required stress to force your adaptation. An example of a microcycle is an endurance block where a you put together several long rides in a week to progressively overload the training volume and force an adaptation. Usually, you will have four or more microcycles within a mesocycle and then four or more mesocycles within a macrocycle.
This organizational approach is valuable in indoor cycling for 3 reasons:
1) It provides balance between the volume, intensity and specificity of training.
2) It provides a method for progressively increasing the amount of training or level of intensity as fitness increases.
3) It provides a connection with how the cycling community trains throughout the year; moving from the General to the Specific.
While an annual plan is not always practical for indoor cycling, in a future article I will discuss an approach to periodize your indoor classes over a much shorter time frame that will provide three main advantages for your classes:
1) Because of the changes in focus, you will provide varying stimulus to your participants, hopefully allowing them to continue without hitting a plateau.
2) Your rides will not just have separate playlists, but also separate focused training which will keep the classes interesting for the students.
3) By varying the classes you will be exposing your students to many different aspects of cycling and hopefully have them embrace the “Fusion” of the outside and inside rides.
The foot to pedal connection could be the single most important aspect of how the rider fits on the bike in addition to the safety aspects of a good connection. Due to the inertia and momentum that can be created by the weighted flywheel, it is necessary for riders to keep their feet secured to the bike at all times when riding.
Most indoor bikes are equipped with toe cages and straps to secure a rider’s foot to the pedal. The rider inserts their foot into the plastic or metal cage and tightens the attached strap to ensure their foot will not come out while pedaling.
Many indoor bikes now provide clipless pedals. Although this can appear to be an oxymoron, clipless pedals use a cleat that is attached to the bottom of a cycling shoe which then “clips” into the pedal. The cleats and pedals can come in various sizes depending on the make and model. Currently, the most common are SPD® (Shimano® Pedaling Dynamics) although a few facilities still use the older LOOK® (red cleat) pedals. Contact your facility to learn which pedal options are available for the bikes you are going to use.
There are large benefits of using clipless pedals over flat pedals in terms of comfort and efficiency. There are several good reasons to ride clipped in which include: 1) Riding clipped in allows you to recruit more of the muscles in your leg, more efficiently. While flat pedals tend to get the most drive when you push down, the clipless pedals also create forward movement when you pull up. 2) Provided your cleats are set up correctly and your saddle height and fore/aft position is right, you’ll be clipping yourself into the optimum position — limiting the chance of injury and improving efficacy. 3) Your feet won’t slide around like they can do on flat pedals.
To get clipped in, start with one foot already attached, and at the top of the pedal stroke. Push down with the clipped-in foot, and sit on the saddle. When the unattached pedal comes to meet your foot, rest the cleat attached to your shoe over the top of the pedal, and apply pressure. To release yourself from clipless pedals, you simply need to twist your ankle outwards.
If you have never used clipless pedals before, we strongly recommend that you take a few moments to practice getting in and out of the pedals when not in front of the class.
Cycle science (As printed in Mountain Bike Rider)
“According to sports scientist Will Harrison, “The type of pedal we use will alter technique and the lines we choose. Clipless can knock our confidence at first, however they can help us with better power, control and efficiency”.
That’s exactly what we wanted to test- do clipless really affect power that much? We jumped onto the Wattbike and found a big difference.”
Let's talk a little bit about resistance today. While I do not want to get into the “how much should I add” debate, there certainly is a minimum amount of resistance that every rider should
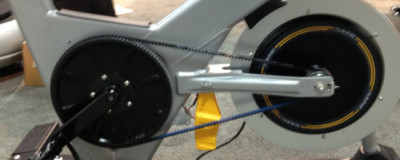
Big drive gear x small driven gear = very fast flywheel RPM
have on their bike. The true importance of resistance comes about due to the existance of a flywheel on an IC Bike.
Most indoor bikes have a weighted wheel (called a flywheel) to provide inertia and simulate the feel of riding a bicycle outdoors. It is important that riders remain in control of the flywheel at all times, particularly at higher RPMs, and not let the flywheel control them. Indoor bikes are designed with a knob, or lever, for controlling the amount of resistance placed on the flywheel which consequently affects how hard a rider will have to work in order to pedal the bike. This resistance can be either mechanical (the traditional friction pad) or it can be magnetic. The primary advantage of magnetic resistance is that it does not wear down over time, so it should provide a more consistent resistance over the life of the IC Bike. It should be noted that even with the last of friction and wear, magnetic resistance should be routinely calibrated due to operation cable stretching and general wear. This can be especially important on IC Bikes where the wattage is calculated (usually using the distance of the magnet from the wheel) rather than measured with a strain gauge.
Generally, I start my riders off at enough resistance to produce 25% to 50% of their bodyweight in pounds in watts (Watts/LB = 0.25) which generally is enough to keep them settle in the saddle and provides a good starting point. Riders should NOT pedal the bike without resistance at any time and should be encouraged to use the appropriate amount of resistance at all speeds and effort levels. Lack of appropriate resistance is the primary cause of “Hip Popping” in riders which is where the hips bounce quickly on the seat as the rpms are increased. There should be at least enough resistance on the bike to keep the hips settled and smooth in the saddle.
Please look for the next section of this series for the continued conversation and some safety specifics.
The overall concern of any fitness professional should be safety. We must always make every effort to provide a safe environment for those taking our classes. Health clubs and fitness studios are responsible for providing a safe environment and equipment for their members and staff. As instructors, our responsibility is to ensure that every aspect of our indoor cycling class, from specific training concepts to the use of the bikes, is conducted using safety guidelines.
Currently, there is a vast amount of discussion in the indoor cycling industry over what truly represents safe practices. On one side of the debate is the “Keep it real” faction. Their side of the safety story is that instructors should not do anything on an inside bike that they would not do on their bicycle. They consider anything outside of their limited movements on the indoor bike as dangerous and harmful to the students. This stance always evokes some debate in itself as there are many movements and riding styles that are done on bicycles that certainly even the boldest of instructors would never attempt on an indoor bike. For example, jumping on mountain and bmx bicycles, hopping over potholes or curbs on a road bicycle and many other necessary elements of outdoor riding that should never make their way into the studio. Generally, the rides from this group of instructors focus on a training objective and the music is considered secondary. This group considers themselves the traditional or pure indoor cycling instructors.
The other side of the debate is held by the “Rhythm” indoor cycling instructors. This group seemingly has a most things go approach to indoor cycling and often their rides include the use of small hand weights, quickly cycling jumps (or tap backs) and other non-traditional movements on the indoor bike. They contend that there is no scientific, or medical, evidence that would suggest that the movements they perform on the indoor bike are actually dangerous or cause injury to the students. Generally, the rides from this group of instructors focus on the music and the dancing on the bike and the clear training objective is considered secondary.
We look at this debate from a wider perspective. As a group exercise professional, we believe that your job is to get people off of the couch and entice them to join in an active lifestyle. We like to take the middle road on teaching styles: all rides should contain sound and clear training principles, but we also realize that music is perhaps the most important aspect of the ride construction. While delivering a quality class that gives the rider’s results is important, people with not continue to train with you unless the music is something they like and most importantly fits the work being performed in BPM, emotion and intensity.
Please look for the next section of this series for the continued conversation and some safety specifics.
After interviewing representatives from both Saris and Keiser, I have watched the debate about Indoor Cycling Bikes with power readings i.e. Keiser M3 vs. CycleOps Pro 300PT, with great interest. The CycleOps Pro 300PT IC Bike uses a version of their “Powertap” hub to sense torque. The Keiser M3's method of sensing torque isn't obvious so I decided to dig a little deeper and get some answers. I sent the following email to Darrin Pelkey, the VP Sales & Marketing at Keiser.Hi Darrin,
I didn't dig deep enough into this question during my interview with Suzette O'Byrne
How is the wattage computed on the M3? There is a lot of discussion / confusion on the forums as to how Keiser measures force without using a strain gauge in the pedal crank or wheel hub. Is it an estimate or actual power reading? Is there a calibration process?
See this thread – http://innercycling.com/f/showthread.php?t=8542I understand the basic physics and I'm an engine guy so I understand that most dyno's use eddy currents to load and measure power but I don't understand how you get your power readings on the M3.
I would love to inform my readers & listeners if possible.Here is Darrin's response:John,
First and foremost the M3 is not a ergometer nor is it priced like one. Power is an estimate. The price and our maximum usage (group exercise) dictate that it is not for testing and it cannot be calibrated. Though we do have some people that have used it with an IMET test when a bike is more preferential than a treadmill. One thing not mentioned below is magnet strength, they are consistent and do not weaken over the life of the bike.
To answer the question:Watts are calculated from the gear setting. A potentiometer is attached to the magnet holder (the round cone shaped disc at the end of the shifter cable). As the shifter is moved, the cable rotates the magnet holder. A potentiometer is rotated by the rotation of the magnet holder, thus feeding information to the computer on the position of the magnet holder. The rotation of the potentiometer is broken down into 24 gear settings. A dynamometer was used to test and develop a table of wattage at various gear settings and speeds. The speed of the crank is determined by a magnet attached to the large pulley on the right crank arm and a magnetic switch attached to the circuit board in the magnet holder assembly. Each time the magnet on the pulley passes by the magnetic switch, a signal is sent to the computer to compute the RPM's of the crank arm. Power equals force times velocity. The force is determined by the magnet position and the speed by the crank speed. The lookup table is programmed into the computer and the computer simply looks at the gear setting and speed and goes to the lookup table to find and display the Watts for those two settings.
Darrin Pelkey
VP Sales & Marketing at Keiser
The Power in Human PerformanceNow my two-cents as to Actual or Estimated — does it mater? Short answer — No. My feeling is that any bike that displays consistent and repeatable power readings is a vast improvement over any non-power based IC bike.
There are many ways that you can pick both bikes apart; CycleOps has actual power readings yet the M3 has (in my opinion) a vastly superior system for creating load/resistance. The heaver flywheel on the CycleOps causes inaccuracies in power readings — in their words: Why are there discrepancies between my PowerTap numbers and my Indoor Cycle numbers? Due to the external factors of riding a bike outside vs. riding a solid indoor cycle, you may experience different values on your PowerTap. Also, with the special design of the flywheel, inertia plays a much bigger role in your workout on the Indoor Cycle vs. riding your bike on the road. For instance, a larger effort is required to get your Indoor Cycle flywheel up to a certain speed, but due to inertia, the flywheel will spin much longer than a regular bicycle wheel, resulting in less work being required to maintain that predesignated speed.
For personal use, I'd say it's a wash… or more of a Ford vs. Chevy argument.If I was a club owner I would pick the M3. Less capital cost, it appears to need much less maintenance (calibrate 50 bikes each day? I don't think so) and how many of our members have a road bike with power?
This Podcast is was originally published on September 28, 2008, I have updated it with our new Podcast host information and I am representing it now. I hope you enjoy it, Joey
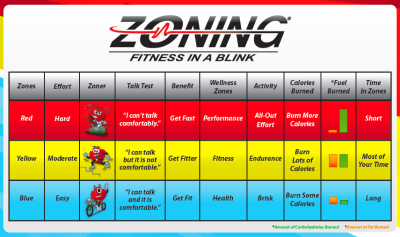
Sally Edwards, the originator of Heart Zones Training, and I discuss the origin of Zone based Heart Rate Training. Sally explains its importance to conducting an effective Indoor Cycling Class and the fallacy of using age based Max Heart Rate charts and formulas.
Listen to the show below or subscribe with iTunes with the link on the right.
 eriodization is the backbone of an instructor's success, and it can quickly become the key to your popularity as an instructor and it will become the foundation for your students to reach their goals. Periodization is the process of structuring training into progressive phases or blocks of time that are organized into Macro, Meso and Micro cycles. The outdoor cycling community uses periodization as a method to increase their strength and to peak for their target (or A) race.
 The foot to pedal connection could be the single most important aspect of how the rider fits on the bike in addition to the safety aspects of a good connection. Due to the inertia and momentum that can be created by the weighted flywheel, it is necessary for riders to keep their feet secured to the bike at all times when riding.
 re responsible for providing a safe environment and equipment for their members and staff. As instructors, our responsibility is to ensure that every aspect of our indoor cycling class, from specific training concepts to the use of the bikes, is conducted using safety guidelines.