NOTE: I'll be publishing what I believe are the 10 Myths of Indoor Cycle Rider Setup / Bike Fit on Wednesdays each week, starting today with:
Myth #1 – It's proper, for you the instructor, to cue people to draw in their knees.
I cringe whenever I hear; “OK people, now I want everyone to bring in your knees!” because, for most of the riders in class, everyone's knees are already where they need to be. Please note that I didn't say where they should be, but where they need to be based on a number of different factors. Some are based on how the rider is fitted to the cycle and some are because…
Indoor Cycles are perfectly symmetrical – Humans, not so much…
You can find dozens of books and multiple business who focus on the art of fitting an imperfect cyclist to a perfect bicycle. Discussions of Leg Length Discrepancies, Feet Pronation, Q Factor and Cycling Shoe Cleat Wedges are beyond the scope of an Indoor Cycle Instructor helping a student with setup.
But there is one aspect of Indoor Cycle setup that has a huge influence on knee position, and yet is universally ignored*- foot alignment.
Take a minute and try his test on yourself: Stand on a smooth floor wearing your socks. Feet shoulder width apart, with a soft bend in your knees (like you should have on the bike). Now transfer the majority of your weight to the balls of your feet (like you're standing on the pedals) and rotate your heels inward. Notice where your knees go?
For most of us they move out, did they for you [wlm_firstname]?
Now let's see what happens when you arbitrarily decide; “my knees are sticking out, I need to bring them in.” Go to the same position as before; soft bend, heels in, but now bring some of your weight back to your heels which will prevent your feet from moving (similar to how the pedal cages or cleats fix the position of your feet) and try to bring your knees in. What happened?
Because everything is connected (you remember the song; foot bone's connected to the ankle bone, the ankle bone's connected to the thigh bone, the thigh bone's connected to the knee bone, etc…) the position of your knee is exactly where it needs to be, based on your position on the cycle. If you have a student with improperly adjusted shoe cleats (or too low a saddle) and you tell them in your BIG INSTRUCTOR VOICE; “I want everyone to bring in your knees during this crushing 11 minute climb!” you could potentially hurt them over time. Worse, cause them to ignore the true reason their knees are out which for many people is simply having their heels rotated inward – like my buddy Randy demonstrates below.
Heels rotated in forces knees out
Feet aligned forward bring knees over pedal 🙂
There's actually a Sub- Myth here; the objective of proper bike fit isn't to just “bring in your knees”. The objective is to get your knee pushing directly down on your pedal = the most efficient transfer of power with the least amount of stress on the most vulnerable joint in the system – your knees. We live in a three dimensional world, not two 🙁 So when while helping a student get set up, be sure to observe them from the front, as well as from the side.
So what to do and/or cue as the Instructor?
Jim Karanas gave us a beautiful cue during a class I took last week in San Francisco. He had us down in the drops (I realize your cycle may not have drops – Spinning Instructors can read this as comfortably in position 2) and asked that we look down and we should see our knees in the space between our arms. Nothing more. He was simply suggesting that we observe what was happening.
You haven't heard it yet, but I will be publishing an interview with Jay Blahnik in December where he makes a similar point about suggesting your students observe something and then let them act on it.
You may also pay attention to what you see in your students and identify excessive foot rotation. But be careful – some people are naturally very duck footed (or whatever the opposite of pigeon toed is where you live) so my suggestion is to ask “did you have someone set up your cleats? This may give you a clue to if they put any thought or care into attaching their cleats. You could also have them stand naturally in their socks on a smooth floor to see if there's anything weird and refer them to your local bike fit expert if necessary.
*There are 100's of YouTube videos explaining a multitude of different ways to properly fit someone to an Indoor Cycle, but not one that I'm aware of makes any comment or suggestions as to foot position and it's effect on knee position / alignment. Even the Spinning® Fit System ignores this topic beyond “… the cleats must be adjusted properly on the shoe. A good bike shop or bike fit specialist can help with this if needed.” What “adjusted properly” means remains a mystery.
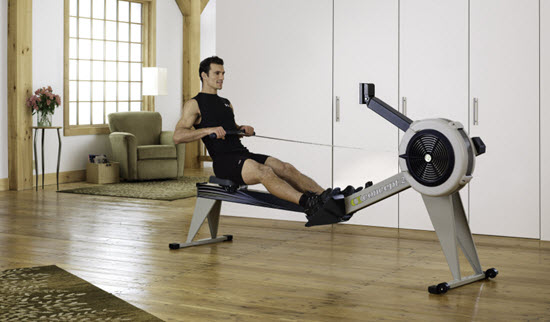
What do you do when you want to train but need a break from cycling? Indoor rowing is an excellent alternative. If you’re into power training, this is for you.
Most of my teaching of indoor cycling was done in Performance Max, a program that included both cycling and indoor rowing. I took the program as a participant for 14 years and taught it in a different location for 12. This post covers the basics of starting to row.
Truly, the only indoor rowing machine worth using is the Concept 2 Rowing Ergometer (“erg” for short). Yes, other rowing machines exist, but no one who rows takes them seriously. The Concept 2 is the gold standard. The current models are the D and the E (slightly higher off the floor). The longest-standing model is the C, which was the one-and-only for many, many years. (I have one, love it, and wouldn’t trade it for a D for anything!)
If you have access to a Concept 2 erg and are new to rowing, learn correct technique from the start. It’s easier to learn it the right way than to unlearn the mistakes that people commonly make when trying to row on their own. If you teach at a gym with an instructor who really knows rowing, that’s ideal because you’ll get good instruction and correction. Years of teaching rowing have shown me that correction is essential.
If you don’t have either an erg or personal instruction, visit the superb Concept 2 website (concept2.com). This 5-minute video teaches rowing technique step by step and repeats the steps clearly and slowly.
There’s also an “erg finder”. Enter your location, the type of facility you want (e.g., health & fitness club), and the distance you’re willing to travel. You’ll get a list of clubs with addresses and the number of available ergs there. You might want to call to verify the info. (When I looked for ergs in San Francisco, the club I taught at for years was listed as having only 1 erg; that was wrong. Farther down the list, though, the same club was listed again, accurately, with 17.)
Once you’ve learned to row, you can take advantage of Concept 2’s Workout of the Day. You can choose short (30 minutes), medium (40-45 minutes), or long (60+ minutes). It’s available on the website daily — or can even be delivered to your inbox.
A few points to keep in mind:
– Rowing is not an upper-body activity. It’s a full-body activity that centers on leg power. Sliding seats were added to rowing shells in the 1870s to optimize the superior power of the lower body. The best training I’ve heard on this came from a Performance Max instructor who rowed on the U.S. National team: “The arms are an afterthought.”
– Rowing has a definite learning curve. In the beginning, it may feel frustrating not to have sufficient power in your stroke to reach a high heart rate. That will change with practice. Believe me, rowing heart rates can go very high, typically higher than in cycling.
– Because of the learning curve, novices often use a higher damper setting than necessary. The damper opens the drum to let in more air, increasing the resistance. Skilled rowers, however, use a moderate setting and create effort by accelerating quickly at the start of the stroke (the catch).
– The most common mistake is bending the knees too soon after you finish the stroke. (This will make sense once you’ve watched the video or gotten some instruction.) It’s almost instinctive and can be difficult to correct. One effective correction is to stop rowing and hold for 2 seconds after you’ve extended the arms before letting your knees bend. Repeat with each stroke for a few minutes.
– Rowing should NOT be done with a straight back. Curving the shoulders slightly forward will engage your core and protect your back. A straight back is more likely to be injured.
Holding an even and consistent pace can be difficult to learn. Jim Karanas, who created the PMax program, always said rowing builds character: With every stroke, the computer tells you you’re a failure [i.e., your pace is off], but you have to keep going.
Working on pace feels like moving meditation. Skilled rowers doing sustained efforts even look relaxed and meditative.
So here’s to a character-building, meditative yet exciting alternative to cycling. I think you’ll like it. You might even find yourself adding it to your training on a regular basis.
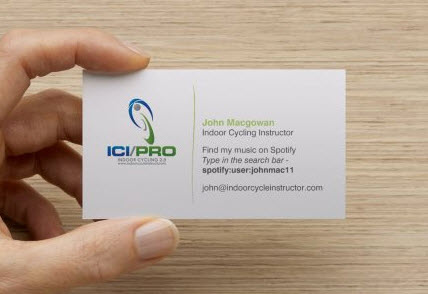
Make sure you add the – spotify:user:__________ part or it doesn't work
She was close to yelling when I walked into the studio. “I'm so excited you came back John!” “I haven't been able to find you on Facebook or Spotify, so I wasn't able to find the playlist you used the last time you were here…”
I subbed last night at the Life Time Fitness corporate HQ club. This participant was there the last time I had covered this class for a friend. I remembered her instantly and how she had approached me after class, asking for the names of two of the tracks I had used. “Are you a Spotify user?” I had asked her. She responded that she was just getting started with Spotify, so I suggested to friend me on facebook and I would show up on her Spotify.
Perfect plan… until she remembered my name as John McCowan and couldn't find me on Facebook 🙁
Which got me to think about an old post I wrote back in 2008. In it, I suggested that Instructors carry and handout a business card (I called it a class promotion card) and showed the card that Amy and printed online. They included our email addresses and class schedules. They worked like a charm, until our classes changed that is.
There are a bunch of websites online where you could quickly create a simple Spotify/Promotional card that you could have available to hand out. I ordered mine through www.vistaprint.com and paid $15.95 with shipping. Because my schedule changes so often, I choose not to include it – but you could easily add yours to the back.
ICI/PRO member Zack, a Cycling Fusion Master Instructor and routine contributor to The Weekly Ride on ICI/PRO, delivers a ride. THIS IS THE COMBINED FILE THAT INCLUDES THE MUSIC AND THE VOICE. IT IS NOT AVAILABLE ON ITUNES.
“I am very excited to be releasing an audio version with my ride this week. You get to really feel how i intended the song to be felt then. Notice the shorter than usual notes this week to really make you listen to the delivery. As always my rides can suit all riders and ill be sure to highlight that verbally. So listen up and enjoy!” Zack
Whenever I solve a problem for myself I stop and think, “I wonder of other Indoor Cycling Instructors have this same problem”. So I make a video to show you what I've done. Let me know in the comments if this was helpful to you. Here is the link to the free online calculator.
I love having a full class of students. But first they need to know my class exists. I'm continuously frustrated with how poorly my own club promotes the Indoor Cycling classes we offer. Based on comments offering similar frustrations, I'm guessing that I'm not the only one.
So why not take a few minutes to do a little self-promotion?
The other day a received a request from an ICI/PRO member to join FourSquare, the social media site where you can check in, so other people know where to find you. Like Yelp, FourSquare acts as a search engine to find where there friends are, in the hope to meet up with them. You can also leave and read reviews there. I hadn't spent any time there so I decided to check it out to see what I could do with it to promote my class. At first I thought that only actual businesses could create a listing. Instead I discovered you can create a listing for anything that is an actual place, even if you don't technically own or manage the facility. I saw listings for specific seat rows at a concert, events in a local park and even a listing for a specific airline flight to Europe – maybe they were interested in who they would be sitting next to for eight hours.
In the name field I suggest; Your Name, Time/Date and theKey Words that describe your class.
In the address field; Club Name and address.
Then fill out the other fields – you may want to use the club's phone number.
Click save when completed.
You will then see your new listing. Check that the marker on the map is in the correct place. If it's not you can click and drag it to the proper location.
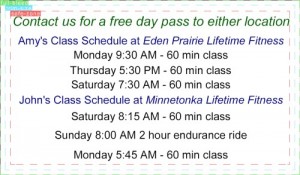
Now when anyone searches for a Spin class near Minnetonka, MN they will find:


 ICI/PRO member Zack, a Cycling Fusion Master Instructor and routine contributor to The Weekly Ride on ICI/PRO, delivers a ride. THIS IS THE COMBINED FILE THAT INCLUDES THE MUSIC AND THE VOICE. IT IS NOT AVAILABLE ON ITUNES.

