I coach a four month long winter training camp that offers 14 indoor cycles and 6 bicycle trainers. This allows participants to bring their own bikes, mount them on the trainers and ride alongside the stationary bikes. Everyone gets a fantastic experience with this mix. But there are a few things to know about mixing trainers and spinners.
Why offer Road Bike Trainers? Having bike trainers as part of your program will expand your market, increase your class capacity with a small budget, and give new interest and challenge for instructors and riders alike.
There are three important things to consider if you are mixing spinners and trainers in the same room: Why BYOBike, Location/Set-Up/Noise, and Cueing for Instruction. 1.) Why BYOBike?
Why would someone want to bring their own bike in the first place? For a number of reasons, using your bike on a trainer is a more realistic experience.
It’s About Fit.
The fit is just better on a “real” bike. Owners of bikes have the seat/handle bar location adjusted, a saddle that they are accustomed to, and crank positions that fit their body. If not, this is a great opportunity to help your riders with a proper bike fit.
Vital to fit is that the spread of the pedals on your own bike is the right width. I find that on some brands of spinners, the pedals are set much wider apart than you’d find on a road bike. This can cause knee pain. We tested the Kaiser M3 bikes at my Club and several riders (me included) experienced knee pain. While I like many features on the Keiser M3, I discovered that the pedals are set 1” wider than the Lemond Revmaster. This can be a make or break in comfort and dissuaded us from purchasing the bikes.
Practice with Changing Gears
While it is not quite like riding outside, riding your own bike on a trainer does give you practice in shifting gears and learning your own gear ratios related to work effort. We’ve had many riders who bring in a new bike and want to try it out to “learn the bike” before taking it outside.
It’s a Harder Ride
On your own bike, there is no help from a weighted flywheel. If you are not pedaling on a bike, the wheel stops going around. That means every pedal stroke counts a little bit more. It is 100% your own effort.
Spinning bikes are a “fixed gear” with a weighted fly wheel that retains energy which means you are getting assistance with every pedal stroke from the momentum of the flywheel, especially at high RPM.
Trainers are 20% the Price
Bicycle trainers are about $350 compared to a spinning bike at $1800 (of course, prices vary wildly for both of these options). If you want to add more bikes to a room, you could add 5 trainers for the price of one Spinning® bike.
I use Kurt Kinetic Fluid trainers because they are fairly indestructible and give a very smooth, quiet ride. All you need is the trainer, a mat, and the front wheel cup. When you mount a bike to a trainer, the rear wheel has now been lifted off the floor by several inches. To avoid feeling like you are riding “downhill” (since the front wheel is lower than the back), you need to raise the front wheel. Most brands of trainers come with a front wheel support. I like the supports that offer a variety of tire sizes and heights — sometimes you may want to even raise the front tire higher than the rear if you are going to focus on a hill climbing workout. This will help to put the rider’s body in a more realistic climbing position.
In a pinch, if I don’t have a front wheel support, I’ll use a riser from a step aerobics bench. They are about the right height to level the bike.
Who you Attract
You want your program to meet the needs of a variety of participants. With trainers, you will attract riders who may otherwise never consider a “spinning” class. The cyclists who want to go through the trouble of bringing their own bikes to a class are usually the ones who are avid outdoor riders. This will expand your market — with a low cost – to a whole new group of cycling enthusiasts. Of course it will be up to you, as an instructor, to make it worth their while. And your spinning participants may see the bikes on trainers and develop the interest to take up biking outdoors. This makes your members much more likely to continue with bike related fitness programs.
2.) Location, Set-up, and Noise
OK, let’s say you are going for the mix of indoor cycles and trainers in you class. What can you expect?
Location
Where, oh where, do you put the BYOBers? Near the entry door.
With years of experimentation on where to physically put them in the room, I have found that it is simplest to group them nearest to the entry door. This makes it easier for navigating the bikes in and out of the room. Plus you want all the trainers in one area. Close proximity makes it easier to give specific cues to the trainers vs. the others. I can look at the group on trainers, give the cue, and know they are staying on track with the rest of the group.
Dirt
Bikes can be dirty. We require that the riders bring clean bikes and clean shoes to class. Plus we always have them wipe down their mats after class. This helps everything stay clean. If you can set up a bike cleaning station outside of your facility, you will win the hearts and admiration of cyclists.
Set-Up
We provide the trainer, on a mat, with a front wheel cup. A bike on a trainer takes up about 30% more length than the foot print of a spinning bike. I usually set the trainer off the back of a typical bike mat with the front wheel cup at the front of the mat. This way the sweat from the rider still falls on the mat.
As an instructor, you need to know how to attach the bike to the trainer. There are several steps to be aware of. I usually let the rider set up their own bike, but if they haven’t done it before, you’ll need to give them help. We always have a floor tire pump on hand because tires should be filled to the correct pressure to have the best ride on a trainer.
1. Rear Skewer
Most trainers have some sort of screw on cup that attaches to the rear wheel skewer on the bike. Some bikes have skewers that will not fit in these attachment points. It is a good idea to have loaner skewers on hand (Kurt Kinetic Trainers come with a skewer that will fit the trainer) and you can swap it out for the rider. It is simple to do, but you should be confident in what you are doing. If you have any questions about how to swap out a skewer, go to your local bike shop and have them show you how before you do it on someone else’s bike. Chances are that your rider will know how to do this.
2. Jiggle Test
Once the bike is mounted to the trainer and before you add the tension to the rear wheel, make sure the bike is stable. I simply grab the frame and give it a jiggle. If the bike seems a little wiggly, increase the tension on the axel mount. If the bike is stable, you are good to go.
3. Skid Test
After adding tension with the resistance roller to the rear wheel, grab the wheel and give it a tug to spin the wheel. Does it skid on the resistance roller? If it does, then apply more resistance to the rear tire. Tug it again. When there is no skidding or squealing, you are ready.
Before class starts, it is a good idea as an instructor to give each bike the jiggle and skid test.
Noise
Yes, bikes on trainers are louder than the stationary bikes. That sound, the revving of the bike tires on the trainers, gives added “feel and fuel” for everyone as you increase/decrease speeds through your workout. If you aren’t used to wearing a microphone when you teach, you may want to start.
The noise level of the trainer will depend on two things: the trainer model and the tread on the bike wheel. Some models of trainers are simply noisier. That is why I like the fluid trainers — they tend to be quieter.
More tread (and wider tire) = more friction = more noise. A smooth tire will be much quieter than a knobby one. If you notice a rider with a noisy tire, suggest for the purposes of the class that they switch out their tire to a narrow smooth one. This will also reduce the wear and tear on their regular tire.
I'll follow up next week with how I actually teach one of my BYOB (Bring your Own Bike) Indoor Cycling Classes.
John's note: We're excited to have Coach Robin (AKA CycleMole) on the ICI/PRO Team and I can't wait for her to share her story about where the name CycleMole came from and I'm super interested in learning exactly what it takes to ride around the world on a bicycle!
Robin Robertson
Creator of Cycle Moles: Indoor Cycling for Outdoor Adventure
USAC Level 2 Coach, ACE Personal Trainer www.cyclemoles.com www.powertopedal.com
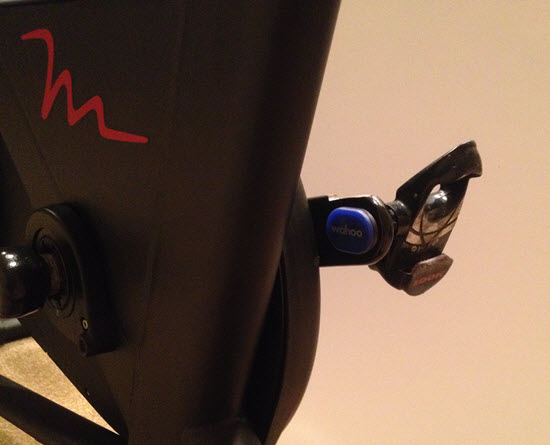
Wahoo BLE & ANT+ cadence sensor easily attaches to either crank arm and doesn't require any magnet or second sensor.
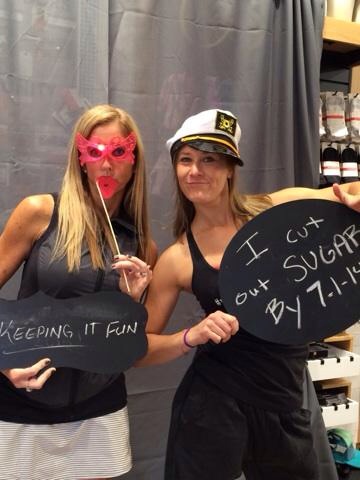
We talk a lot about the new Indoor Cycles with consoles that display a rider's performance data; Power /watts, RPM, distance, calories. Training with Power is fabulous if your club or studio as invested bikes recently. It's even more fabulous when all of that data is connected to a display training system like what's offered from Performance IQ or Spivi. Either system really adds to the fun factor, while delivering true performance data directly into each participant's email box – an awesome convergence of Keeping It Fun & Indoor Cycling 2.0 🙂
But is there an option to bringing big screen display training to your club or studio using conventional Indoor Cycles?
Absolutely and around 90% of the investment you'll make today will carry over to when you do finally upgrade to Power bikes – assuming you do of course.
My assumption is based on the fact that if you are riding a conventional Indoor Cycle, with no computer/console, there's a good chance you're on Star Trac Spinner® NXT's and Spinner® Pro's. Star Trac owned the market for indoor cycles back in the 2000's and sold thousands of both models. To my knowledge, back then nearly all of the Big Box clubs were riding Star Trac's – the one exception being LA Fitness.
So if your NXT's or Pro's are in relatively good nick and you would like to add technology so everyone knows how fast they're pedalling, you have a couple of options.
NOTE: I haven't seen a studio adapt a bicycle computer successfully and don't recommend wasting your time trying.
The most common solution is to install a Spinning® computer. These consoles will display cadence, distance (wildly inaccurate) time and HR if you're wearing an analog HR strap. A few words of caution:
The Spinning computer has no option for connection (BLE or ANT+) to a display training system = they won't connect with Performance IQ or Spivi.
These computers are designed to fit multiple models of Spinners®. There is a setting (you use a magnet to get into the option screen) you need to make to adjust the computer to your model of bike – to have RPM displayed correctly.
They're pricey at $167.00 each and I'm not aware of any bulk discounts.
The alternative for studios not ready to replace their bikes, but do want to begin offering performance metrics (even RPM & HR can make a huge impression on clients) and possibly a bike reservation system, I recommend the new Wahoo RPM cadence sensor.
The $39.99 Wahoo sensor is about the size of a quarter and attaches easily to one of the crank arms. That's it. There's no second magnet or parts needed. The package comes with a number of attachment methods – I'm showing it simply stuck on using some incredibly sticky double sided tape.
Battery life (replaceable coin cell) is supposed to be a year or more with it's auto-on feature. The sensor transmits in both BLE and ANT+ with great range so you could have a large studio with 40 or more NXT's wirelessly connected to Performance IQ or Spivi. Let the fun begin 🙂
The other option would be for participants to bring in their personal portable device; iPhone, iPad or Android phone. There are multiple Apps that will receive the sensor's BLE signal (all phones have BLE) and the free Wahoo Fitness App would be my choice. It's super easy to use and paring is very intuitive.
Yes this sensor will work with the Spinning App – only after you purchase additional sensor options.
AFS – The Association of Fitness Studios – is the organization for small/boutique studios and it's my recommendation that Indoor Cycling Studio owners become members.
It's free to join as a basic member – register here.
In this episode of the Podcast, AFS founder Josh Leve and I discuss the many benefits of AFS membership. Learn why I feel joining the Association of Fitness Studios (AFS) is an important step for all Indoor cycling studio owners.
Here's Josh giving a short pitch on the benefits of membership.
Well we made it. One hundred and fifty miles, most of it sitting up front pulling our team. Amy and I have a new appreciation for what battling a continuous 20 mile an hour headwind feels like, over 70 miles – exhausting!
In past years, it was always our objective to get out as early as possible. Much of the first day is on paved railroad bike path, which can get pretty crowded. For some reason on Saturday the team decided to take a more leisurely time getting ready. Instead of our typical 6 AM start, we rolled out a little after 7:00. Not a good idea, especially when you tend to ride much faster than 80%-90% of everyone else on the ride. So we passed a lot of people and observed hundreds of bad bike fittings – some appearing to be incredibly inefficient and painful, which led to this idea…
Missed marketing opportunity for studio owners!
I've commented in the past how I see large charity cycling events as the perfect place to be promoting your Indoor Cycling studio. The MN event had over 3,500 participants and everyone is a potential customer. With over 100 Bike MS events scattered around the United States there's bound to be one near you.
I appears that the MS Society accepts two types of sponsors; paid promotional partners and in-kind sponsors. If you have a very well-funded indoor cycling studio it may make sense for you to investigate sponsoring a rest stop or a booth at one of the and points. The other way to get yourself in front of the 3,500 cyclists is to provide an in-kind service of some type. The best example would be the bike shops that provide maintenance and repairs at each of the rest stops. At the end of day-one there are a number of massage therapists and chiropractors offering their services to tired, but grateful, participants.
“But I'm an Indoor Cycling Instructor John… I can't fix bikes or massage tired muscles… what else could I do?”
Provide complementary bike fittings 🙂
Now this is just me thinking here, but if I owned a studio I'd look into providing complimentary bike fit services at the end of the first day. Trust me. there are hundreds and hundreds of clueless people, who would benefit dramatically in some simple adjustments to seat height. That might be all I would offer. If you found someone with a horribly wrong seat fore and aft position you may offer to change it or you may make some cleat adjustments. But with hundreds of potential fittings, I would be focused on quantity rather than quality. You may want to bring along a few turbo trainers to hold each bike while you check seat height. A few end wrenches, bicycle multitool and a small level + a few assistants to help would be all you need.
Your target would be the occasional rider. This event is probably the single largest ride they may ever do in their lifetime and they will appreciate any help that will improve their experience. Your service would not be directed toward the typical road bike rider who has the experience to recognize the importance of proper bike fit. You may want to set up a booth at registration with some simple signage explaining the service you provide. My guess is that you wouldn't get a lot of takers until after that first 80 mile day 🙂
Think Burma Shave signage.
You have a captive audience riding this paved trail
A series of inexpensive yard signs, positioned along the last 10 or 15 miles, with some clever verbiage that communicates how much more comfortable you would be properly fitted to your bicycle. You would have literally thousands of suffering people open to your promised relief. After all, they have tomorrow to think about… And many are dreading the thought of day two.
Leverage the event
The local TV stations love these active, feel-good events. Before I left for my class Monday morning, our local station ran a long segment about this past weekend's event. Reporters loved to be tipped off about interesting things they can talk about. If you called and pitched them about the importance of proper bike fit and how it makes for a more enjoyable long distance ride, there's a good chance they might bite on it. Your pitch is nothing about you or your studio, only about the service that you're providing to others. TV reporters know the game and it's natural for them to want to plug you and your studio in their report. With any luck you may end up on television and get the opportunity to invite tens of thousands of people to come and ride indoors with you!
Congratulations! You have decided to take the leap and open an Indoor Cycling studio…you're not alone.
Dedicated Indoor Cycling studios are growing in popularity and numbers. Owning an Indoor Cycling studio is FUN and like any other new small business adventure, not without obstacles.
Let’s assume that you've done all your research, found the perfect location, pulled permits, hired an architect, created a logo, chosen your bikes, learned new software, stayed true to your vision and spend 3X your budget. You are fully prepared to greet the new generation of Indoor Cyclists armed with state of the art equipment, and a team of instructors eager to show it all off.
Are you really ready?
Do you have what it takes to navigate “old school” customer service firedrills like a clogged toilet with a smile, as well as modern day stereo/microphone issues, also with a smile?
Are you prepared for the technology based firedrills of tomorrow that accompany power measurement, real time leader-boards, data tracking, and wireless internet? Indoor Cycling Technology(ICT) issues are common in a brand new studio. It's not a matter of if they are going to pop up. It's a matter of when.
My name is Karen and I am the self proclaimed spokesperson for Keeping It FUN Indoor Cycling. I'm excited to share my Keeping It FUN approach to ICT firefighting while never losing sight of the customer and of course, always having FUN.
1. View every issue as a challenge … never a problem.
Each issue that crosses your path is nothing more than a “First World Problem,” for which you are grateful. and therefore, not a real problem at all. challenge is an opportunity for you to learn and grow. You have the power, as a studio owner, to turn any negative into a positive by how you choose to fight the fire. You also have the ability to turn a frustrated, perhaps angry customer into a lifetime customer.
2. Never let them see you sweat in a world of sweat…
In the event of a fire, customers are more likely to remember how you handled the situation and how you made them feel rather than the problem itself. View every customer complaint as an opportunity to EARN a rider's business. Upset customers need to be listened to and often become your most loyal clients.
3. In the event of a customer complaint, stick with… Keeping It FUN's 10 Commandments Of Customer Care…
Apologize
Say “Thank You” for bringing up the concern
Ask the customer to explain the issue in their own words
Listen to the customer through their eyes
Empathize…”I completely understand why you feel this way.”
Acknowledge the concern (big or small) as a legitimate concern
Explain how the issue will be resolved/handled
Assume full responsibility for the issue
Apologize (again) with sincerity
Thank the customer (again)
4. Recognize that the power may be in the palm of someone else's hand…
Be prepared for ICT issues, software glitches, and unsolved mysteries that you have no control over. Accept the fact that you are at the mercy of someone else's schedule.
5. Document, document, document…
When something breaks…document it every time.
6. Treat your ICT PowerPartners as part of your team…because they are…
It is what it is. ICT issues are likely to require third party involvement. In order to find the quickest resolution, you must be allies with your ICT PowerPartners. Provide the team with as much detailed information as possible regarding your issue. Be prepared to help them troubleshoot and provide them with well documented information. Show them respect and gratitude.
7. Adopt the Keeping it FUN Worry Scale of 1-10
Starting with 10 rate all real or hypothetical issues/problems on a scale of 1-10.
Below is an example:
10. Catastrophic loss of multiple family members
9. Loss of a child
8. Loss of spouse/family member
7. A life altering accident
6. Fill In
5. Your
4. Own
3. Blanks
2. ICT Firedrills
1. Which lululemon Pace Setter skirt will I wear, today?
The Keeping It FUN Worry Scale is fool proof and guaranteed to help you catch any ICT curveball that gets thrown your way!
I had the honor and privilege of working for, training under, and calling friend Mad Dogg Master Instructor_____________. In 2002, she taught me the power of words.
SB, from my heart to yours,
Thank you for sometimes telling me I had to do it your
way and supporting when I wanted to do things my way.
But, most of all, Thank You for teaching me to choose the
Word “resistance” over tension. Because of you, I may
Cue a Steep hill something like this…
“I invite you to let all your tension go.
Tension, weighs us down, holds us back, and makes it harder to breathe.
Resistance, both in life and on this hill makes us stronger. Close your eyes.
Relax your shoulders. Heart center forward and climb. Without changing
cadence, add reistance that makes you push back and fight harder.”
Today, 12 years later and 1500 miles away, her voice is heard in the words I choose when I teach. It’s a powerful lesson that extends beyond Indoor Cycling. The words we choose are more powerful than any ICT malfunction.
There will always be resistance, but you don’t have to have tension. Your customer’s response mirrors your response. If you smile and have FUN going over new studio speed bumps, they will too.
Hi, my name is Kathy Helmuth and I am excited to share a wonderful new program called Parkinson’s Indoor Cycling.
UPDATE September 25, 2014:
We are now offering an ACE approved Parkinson’s Cycling Coach training program. To learn if you qualify click here.
As group cycling instructors, we try to educate and encourage success in our indoor group cycling classes. We see those moments of achievement and we are excited for the participants who have reached their goals. In the Parkinson’s Cycling Coach classes, those moments of achievement are multiplied by 10.
Parkinson’s Disease can rob a person of smell, facial expression, movement, and flexibility.
Imagine this…. A person with Parkinson’s Disease comes into your indoor cycling class using a cane or a walker. He or she registers for the program, completes the necessary paperwork, and goes through the initial testing. You notice that this individual shows very little expression on their face.
After riding a few classes being coached at the proper intensity and cadence, that individual no longer needs a cane or walker. That person is walking with an improved gait and has better balance and flexibility. They have a smile and some expression back on their face!
Or imagine this…. a person diagnosed with Parkinson’s Disease not being able to smell the aroma of chocolate chip cookies baking in the oven. After a few Parkinson’s Cycling classes, that individual can now able to smell and taste those delicious cookies.
I have really enjoyed the opportunity to help these Parkinson’s individuals feel better and move through their daily activities with greater ease.
“Feeling normal” is the way one of our riders describes why she loves this program. In my interview with Sharon in the video above, she says that the pedaling class makes her “feel normal….like everyone else”.
I hope this helps ignite the compassion you have for helping others. Seven to ten million people have been diagnosed with Parkinson’s Disease around the world.
If we could provide you with the training you needed, would you be willing join us as a Parkinson's Cycling Coach?
We'll be offering a coaching certification in early October.

 magnet or parts needed. The package comes with a number of attachment methods – I'm showing it simply stuck on using some incredibly sticky double sided tape.