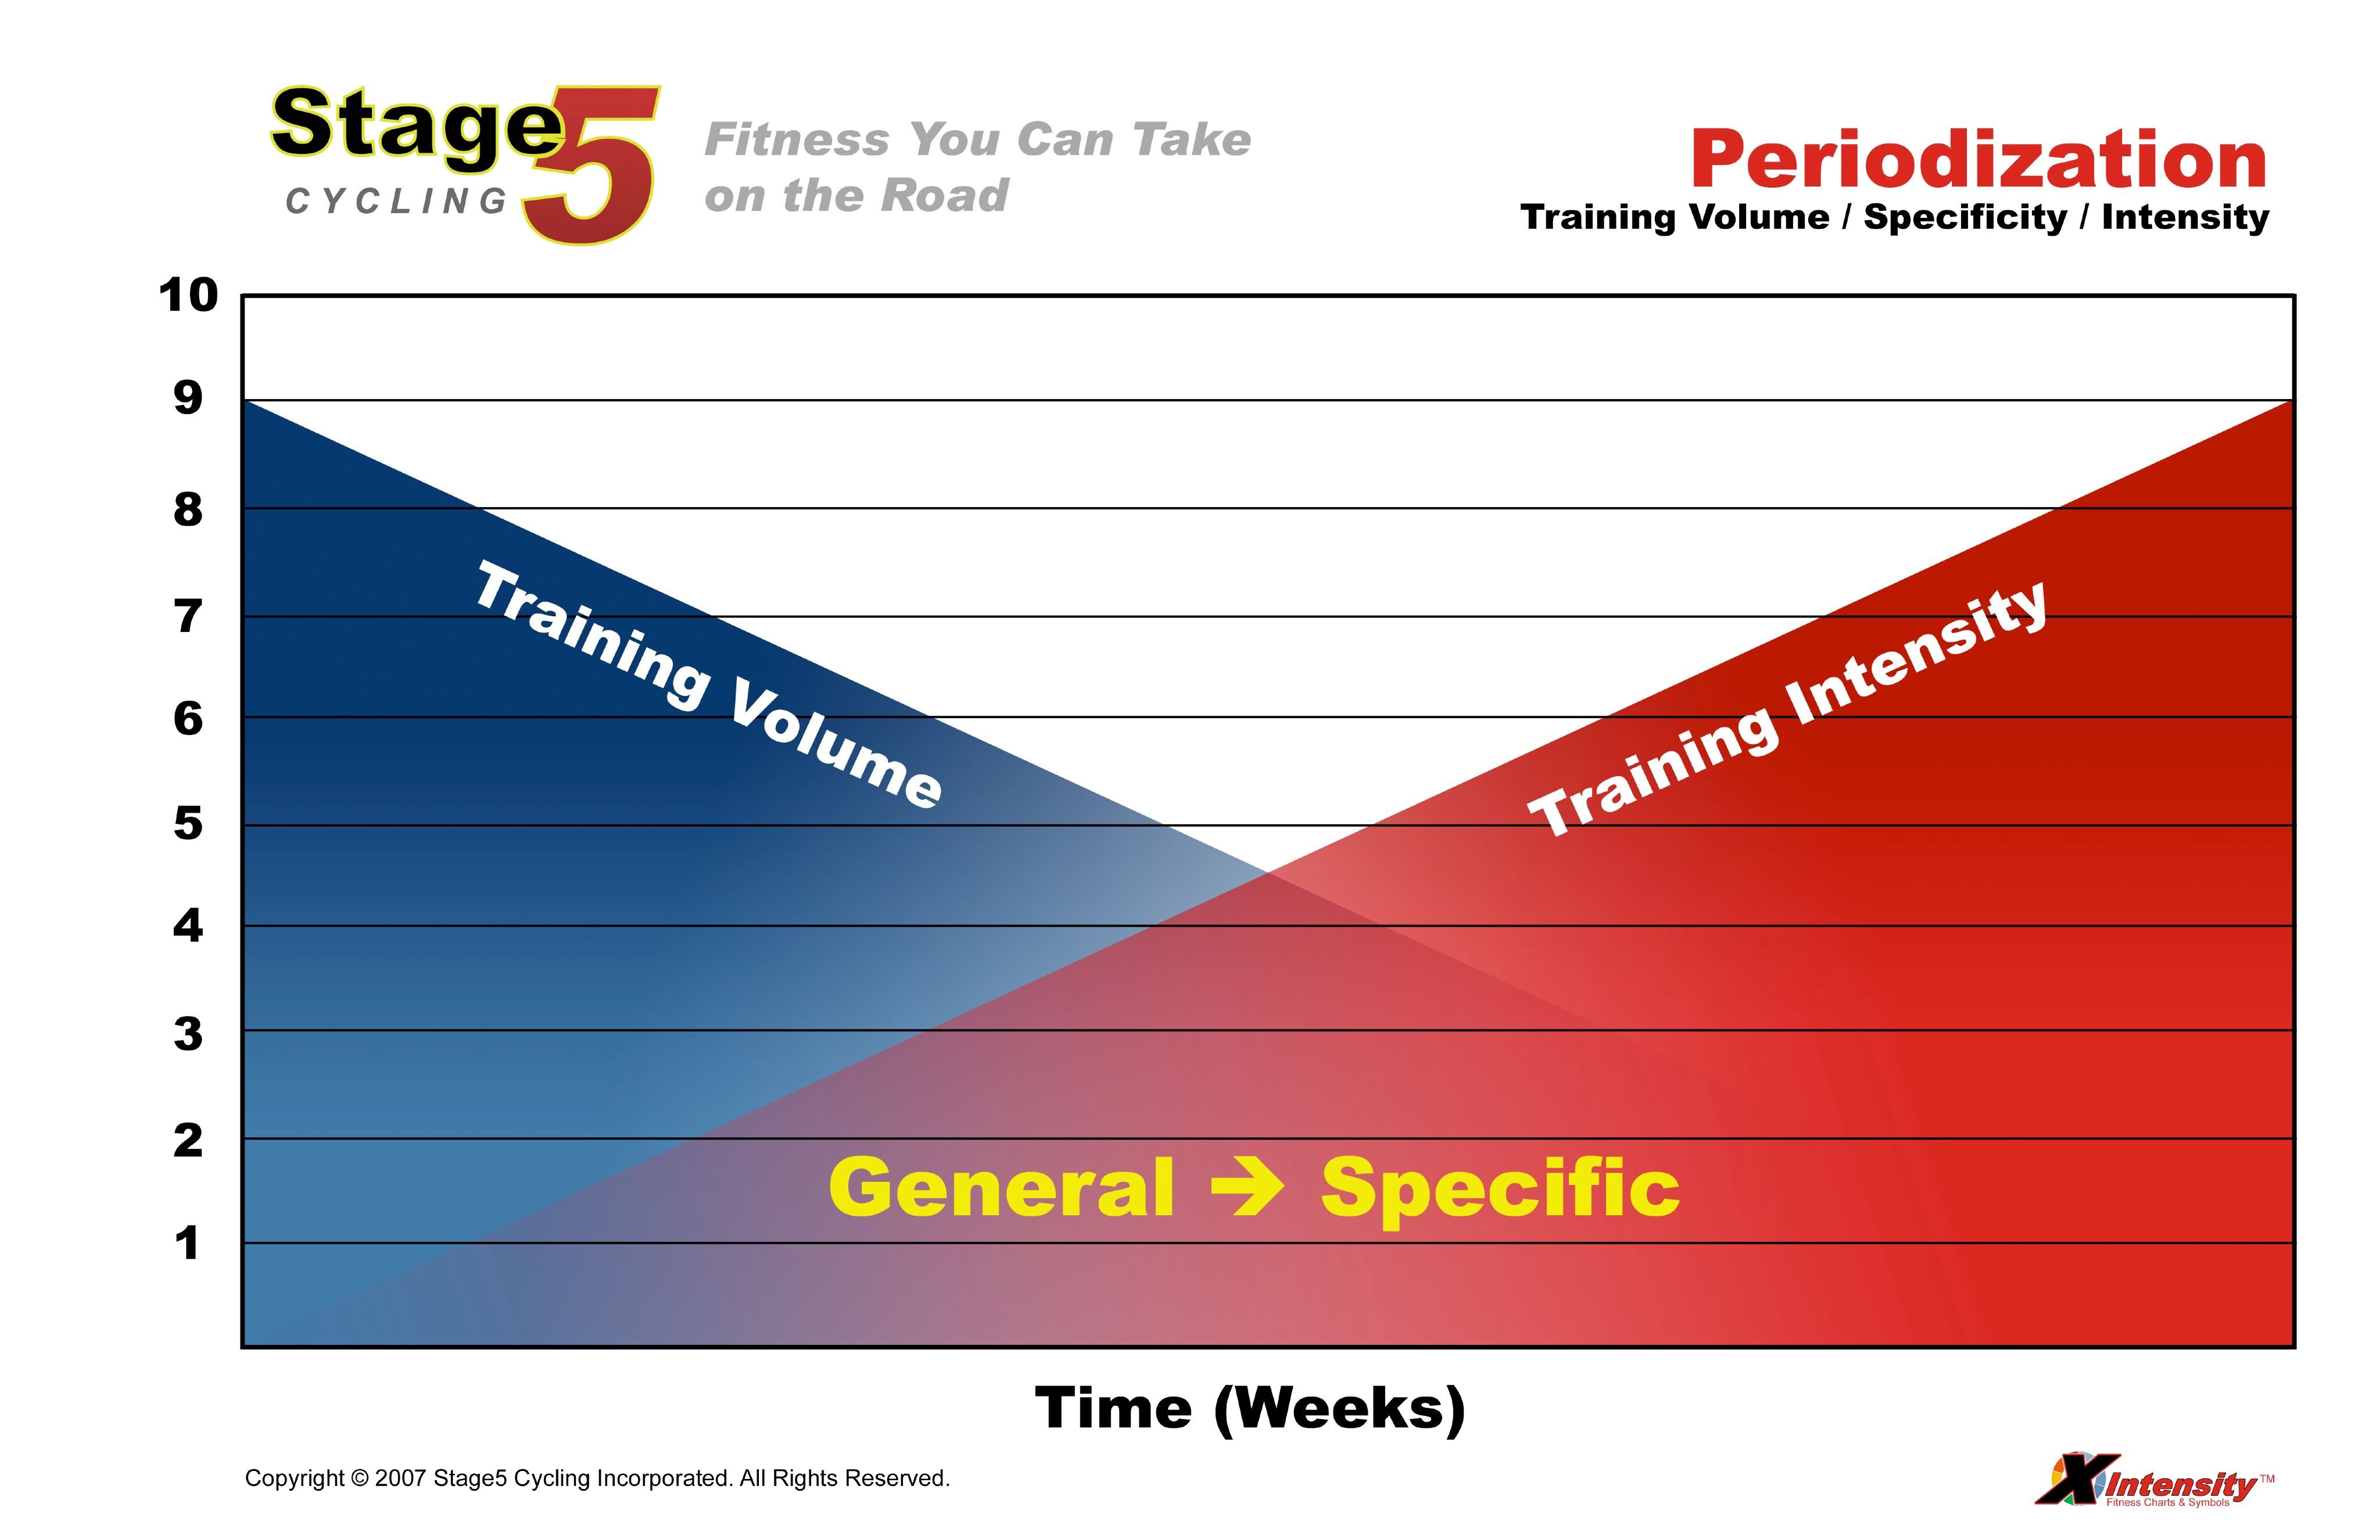
Periodization is the backbone of an instructor's success, and it can quickly become the key to your popularity as an instructor and it will become the foundation for your students to reach their goals. Periodization is the process of structuring training into progressive phases or blocks of time that are organized into Macro, Meso and Micro cycles. The outdoor cycling community uses periodization as a method to increase their strength and to peak for their target (or A) race.
One of the most important parts of periodization is the planning process where you will divide your an annual training plan into sensible blocks, where each block has a particular physiological adaptation and accordingly a specific dose of stress to elicit that adaptation. While I realize that you may not use an annual plan in your indoor classes, in a later article I will explain how to use the periodization concept in designing your rides. The planning and the journey is really the important part of this process; it gives you time to consider your goals and get focused.
In short, periodization allows you to organize your training into hard training periods and easier training periods to facilitate recovery. Periodization can also help to expose your riders to different aspects of cycling and it can allow you to work on both your cardiopulmonary system and your musculoskeletal system which will produce stronger riders with greater endurance.
The Macrocycle
The macrocycle is the longest of the three cycles and generally consists of a year or more. The macrocycle should include all of the areas of a complete training program including low zone endurance work, strength building, race ready maintenance and of course recovery. The macrocycle is your long term view of your training plan.
The Mesocycle
The second block of training is called a mesocycle. Your macrocycle will contain several mesocycles. While a macrocycle is a long term view of training, a mesocycle represents a specific block of training that is focused towards a particular physiological adaptation and usually not more than 3-6 weeks long. This could be endurance, strength or perhaps even recovery. Mesocycles are the true working phases of your training plan, and you will use these cycles as careful evaluation points to be sure that you are meeting your training objectives. It is not uncommon for there to be an intermetiate resting or recovery period between mesocycles.
The Microcyle
The smallest block of training is called a microcycle. The microcycle is the point at which you are considering and designing specific drills to meet the required stress to force your adaptation. An example of a microcycle is an endurance block where a you put together several long rides in a week to progressively overload the training volume and force an adaptation. Usually, you will have four or more microcycles within a mesocycle and then four or more mesocycles within a macrocycle.
This organizational approach is valuable in indoor cycling for 3 reasons:
1) It provides balance between the volume, intensity and specificity of training.
2) It provides a method for progressively increasing the amount of training or level of intensity as fitness increases.
3) It provides a connection with how the cycling community trains throughout the year; moving from the General to the Specific.
While an annual plan is not always practical for indoor cycling, in a future article I will discuss an approach to periodize your indoor classes over a much shorter time frame that will provide three main advantages for your classes:
1) Because of the changes in focus, you will provide varying stimulus to your participants, hopefully allowing them to continue without hitting a plateau.
2) Your rides will not just have separate playlists, but also separate focused training which will keep the classes interesting for the students.
3) By varying the classes you will be exposing your students to many different aspects of cycling and hopefully have them embrace the “Fusion” of the outside and inside rides.
The foot to pedal connection could be the single most important aspect of how the rider fits on the bike in addition to the safety aspects of a good connection. Due to the inertia and momentum that can be created by the weighted flywheel, it is necessary for riders to keep their feet secured to the bike at all times when riding.
Most indoor bikes are equipped with toe cages and straps to secure a rider’s foot to the pedal. The rider inserts their foot into the plastic or metal cage and tightens the attached strap to ensure their foot will not come out while pedaling.
Many indoor bikes now provide clipless pedals. Although this can appear to be an oxymoron, clipless pedals use a cleat that is attached to the bottom of a cycling shoe which then “clips” into the pedal. The cleats and pedals can come in various sizes depending on the make and model. Currently, the most common are SPD® (Shimano® Pedaling Dynamics) although a few facilities still use the older LOOK® (red cleat) pedals. Contact your facility to learn which pedal options are available for the bikes you are going to use.
There are large benefits of using clipless pedals over flat pedals in terms of comfort and efficiency. There are several good reasons to ride clipped in which include: 1) Riding clipped in allows you to recruit more of the muscles in your leg, more efficiently. While flat pedals tend to get the most drive when you push down, the clipless pedals also create forward movement when you pull up. 2) Provided your cleats are set up correctly and your saddle height and fore/aft position is right, you’ll be clipping yourself into the optimum position — limiting the chance of injury and improving efficacy. 3) Your feet won’t slide around like they can do on flat pedals.
To get clipped in, start with one foot already attached, and at the top of the pedal stroke. Push down with the clipped-in foot, and sit on the saddle. When the unattached pedal comes to meet your foot, rest the cleat attached to your shoe over the top of the pedal, and apply pressure. To release yourself from clipless pedals, you simply need to twist your ankle outwards.
If you have never used clipless pedals before, we strongly recommend that you take a few moments to practice getting in and out of the pedals when not in front of the class.
Cycle science (As printed in Mountain Bike Rider)
“According to sports scientist Will Harrison, “The type of pedal we use will alter technique and the lines we choose. Clipless can knock our confidence at first, however they can help us with better power, control and efficiency”.
That’s exactly what we wanted to test- do clipless really affect power that much? We jumped onto the Wattbike and found a big difference.”
Let's talk a little bit about resistance today. While I do not want to get into the “how much should I add” debate, there certainly is a minimum amount of resistance that every rider should
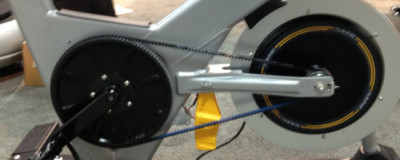
Big drive gear x small driven gear = very fast flywheel RPM
have on their bike. The true importance of resistance comes about due to the existance of a flywheel on an IC Bike.
Most indoor bikes have a weighted wheel (called a flywheel) to provide inertia and simulate the feel of riding a bicycle outdoors. It is important that riders remain in control of the flywheel at all times, particularly at higher RPMs, and not let the flywheel control them. Indoor bikes are designed with a knob, or lever, for controlling the amount of resistance placed on the flywheel which consequently affects how hard a rider will have to work in order to pedal the bike. This resistance can be either mechanical (the traditional friction pad) or it can be magnetic. The primary advantage of magnetic resistance is that it does not wear down over time, so it should provide a more consistent resistance over the life of the IC Bike. It should be noted that even with the last of friction and wear, magnetic resistance should be routinely calibrated due to operation cable stretching and general wear. This can be especially important on IC Bikes where the wattage is calculated (usually using the distance of the magnet from the wheel) rather than measured with a strain gauge.
Generally, I start my riders off at enough resistance to produce 25% to 50% of their bodyweight in pounds in watts (Watts/LB = 0.25) which generally is enough to keep them settle in the saddle and provides a good starting point. Riders should NOT pedal the bike without resistance at any time and should be encouraged to use the appropriate amount of resistance at all speeds and effort levels. Lack of appropriate resistance is the primary cause of “Hip Popping” in riders which is where the hips bounce quickly on the seat as the rpms are increased. There should be at least enough resistance on the bike to keep the hips settled and smooth in the saddle.
Please look for the next section of this series for the continued conversation and some safety specifics.
Boomer Rose is a BeatBoss & Schwinn® trained indoor cycling instructor with an AMAZING story. From the moment he first clipped in, Boomer knew his life changed. The ambience, atmosphere, and camaraderie of indoor cycling introduced the fact that a healthy high does exist. If you were to ask Boomer, he'll tell you it's hard to believe or even imagine the life from which he came. Here's WHY…
Boomer used to weigh over 300 pounds. He had a history of drug/alcohol abuse, homelessness, had been to jail twice, and had never held a real job. But … that was then and this is now … today, Boomer is a full time Crunch Fitness employee and teaches 3-8 cycle classes a week. He is adulting on the daily, has formed healthy relationships, and is an inspiration to anyone who struggles with anything. Most importantly, Boomer is happy, healthy, and strong!!! Indoor Cycling literally changed his life. Watch and listen as Boomer tells a little bit of his story here …….
Tonight, Boomer teaches a special and sold out indoor cycling class celebrating his 2 year milestone and it's going to be LIT!!! RockOn, Boomer Rose … ROCK ON!!!
After an exhausting but exhilarating week of grand opening festivities, I’m thrilled to unveil the new Spinning® studio at Lipscomb University in Nashville, TN.
Transforming a basketball gym into an indoor cycling studio was challenging, but with the help of a passionate Student Activities Staff and talented Theater Department, the facility unfolded on schedule, came in under budget, and the final result was simply breathtaking. Students and faculty members were thrilled to return to campus to discover indoor cycling had arrived!
Kick off week included team teaching with five classes daily, self-guided scenic rides projected on a large movie screen, interviews with local newspapers, and best of all – athletic coaches began their spring training in the new Spinning® studio!
If you’d like to spice up your health club’s indoor cycling studio and create a wave of fresh excitement, try a few of these simple design elements I implemented at Lipscomb University.
 eriodization is the backbone of an instructor's success, and it can quickly become the key to your popularity as an instructor and it will become the foundation for your students to reach their goals. Periodization is the process of structuring training into progressive phases or blocks of time that are organized into Macro, Meso and Micro cycles. The outdoor cycling community uses periodization as a method to increase their strength and to peak for their target (or A) race.
 The foot to pedal connection could be the single most important aspect of how the rider fits on the bike in addition to the safety aspects of a good connection. Due to the inertia and momentum that can be created by the weighted flywheel, it is necessary for riders to keep their feet secured to the bike at all times when riding.


 After an exhausting but exhilarating week of grand opening festivities, I’m thrilled to unveil the new Spinning® studio at Lipscomb University in Nashville, TN.