If you're sad you couldn't make it to Boston to ride with Tom Scotto – be happy – he's presenting at the Heart Zones To The Max Conference in Seattle WA on November 4th – 6th 2011.
Club ZUM Fitness
1813 7th Avenue (at Olive Street)
Seattle, WA 98101
Tom will be presenting along side Gene Nacey, Sally Edwards, Chuck Cali and the rest of the Heart Zones Cardio Training Experts!
The Conference: Attending the high energy Heart Zones USA's Conference 2011 will get you to a healthier and fitter YOU. Learn NEW ways to train. Meet the experts. Discover the latest in scientific-based cardiovascular training. Take any of our 40 different workshops and workouts of your choice or stay “In the Track”. You choose. Attend the social and networking activities.
Two Options: Your two options for course work is either a (1) Tracks – stay within your track and learn everything or (2) Mix and Match – you pick and choose the workouts and workshops that you want to take. Read on:
Tracks: Choose one of the following tracks but first click on complete Conference course schedule to read about the 40 different workshops and workouts:
Sessions, Presenters, Location and Hotel info is available here.
Contact:
John Urys, Event Manager
The Heart Zones Company staff@heartzones.com
916-481-7283 ext 112
While it may seem redundant to say, most indoor bikes do not move. Please, stop and think about that for a moment. We are not talking about forward motion or distance, of course an indoor bike (or an outdoor bike on a trainer) does not move forward. But what about the other motions that are involved in cycling.
When a rider is out of the saddle, most riders sway the bike from side to side a bit. Why does this happen? Generally, it is the mechanical reality of the situation due to applying extreme power to each pedal. Since the pedals are not on the centerline of the bike, applying a large force to the right pedal will, physically speaking, apply a rotational force that pushes the top of the bike to the right and the bottom of the bike to the left. Without this counterbalancing motion, the wheel would kick out to the side. By swaying the bike in the opposite direction, the amount of force that can be applied to the pedals is increased without crashing.
The second primary aspect of swaying the bike is that it allows the rider to engage their upper body (especially core and arms) into the movement which increases power.
Take a moment and watch some of the pros race, they only have about a 12 degree sway; less than most avid riders. This is due to their efficiency and power.
The second motion that we want to consider is the flexibility of the bike frame. I learned a great deal about this from Kirk Frameworks Co. (http://kirkframeworks.com). There are three basic types of frame flex: Vertical, Torsional and Bottom Bracket/Drivetrain. It is important to understand that these different types of frame flex are more or less related to each other.
Vertical Flex
A frame with the proper amount of vertical flex will have a very smooth ride. More importantly, it also offers better control and handling.
Lateral/Torsional Flex
Torsional flex is when the head tube and seat tube are twisted relative to each other, and thus are no longer in the same plane. All frames, regardless of material or quality have a good deal of torsional flex. Try this sometime — sit on your bike with it pointed straight at a mirror. With your butt on the saddle and your hands on the brake hoods, push your hands to the left and your butt to the right. Watch the frame twist.
Bottom Bracket/Drivetrain
When a rider pushes down on the pedal he also, for better or worse, pushes sideways. This is because the pedal is off to the side of the bike and is not in the bike’s centerline.
When the rider pushes down with the right foot the bottom bracket flexes to the left. When the bottom bracket is pushed to the side, it stays there until the force that was holding it there is released. So at the top of the pedal stroke the bottom bracket starts its sideways move and at the bottom of the stroke it returns to neutral. In returning to neutral it applies that returned energy to the drive train and then to the road. This flex and return smoothes out our power transmission to the ground, making acceleration smoother and optimizing traction.
With the exception of a few new bikes on the market, most indoor bikes do not provide movement side-to-side. Because of this limitation, riders must emphasize relaxation when riding and allow gentle upper-body movement. Attempting to maintain a still upper body can place the spine and surrounding muscles at risk from the forces being generated by the legs.
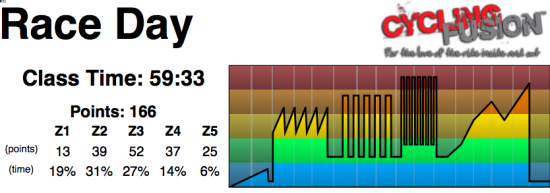
RACE DAY was another winner of our Ultimate Instructor Class Profile contest from Instructor Mark Peterson!
For the love of the Road Race! The inspiration for this ride was the recent Pro Cycling Challenge in Colorado but the ride is generic in the sense that you could do this ride as a stage of any Cycling Race. The objective of the ride is to educate my students on the sport of Bike Racing, entertain and to provide some of those moments of lung splitting, leg busting intensity that is Road Racing!
Mark is a detail guy and what made his contest submission unique is that he created it using the ClassBuilder iPad/iPhone App from Cycling Fusion.
The graphic at the top displays during the entire class. A marker moves along on the screen, helping everyone understand where they are and more importantly, what's coming next.
This was Mark's second visit to the Podcast. You can listen to ICI Podcast #190 — Virtual Class Ride Prep to learn his tips and trick to effectively using video in your class.
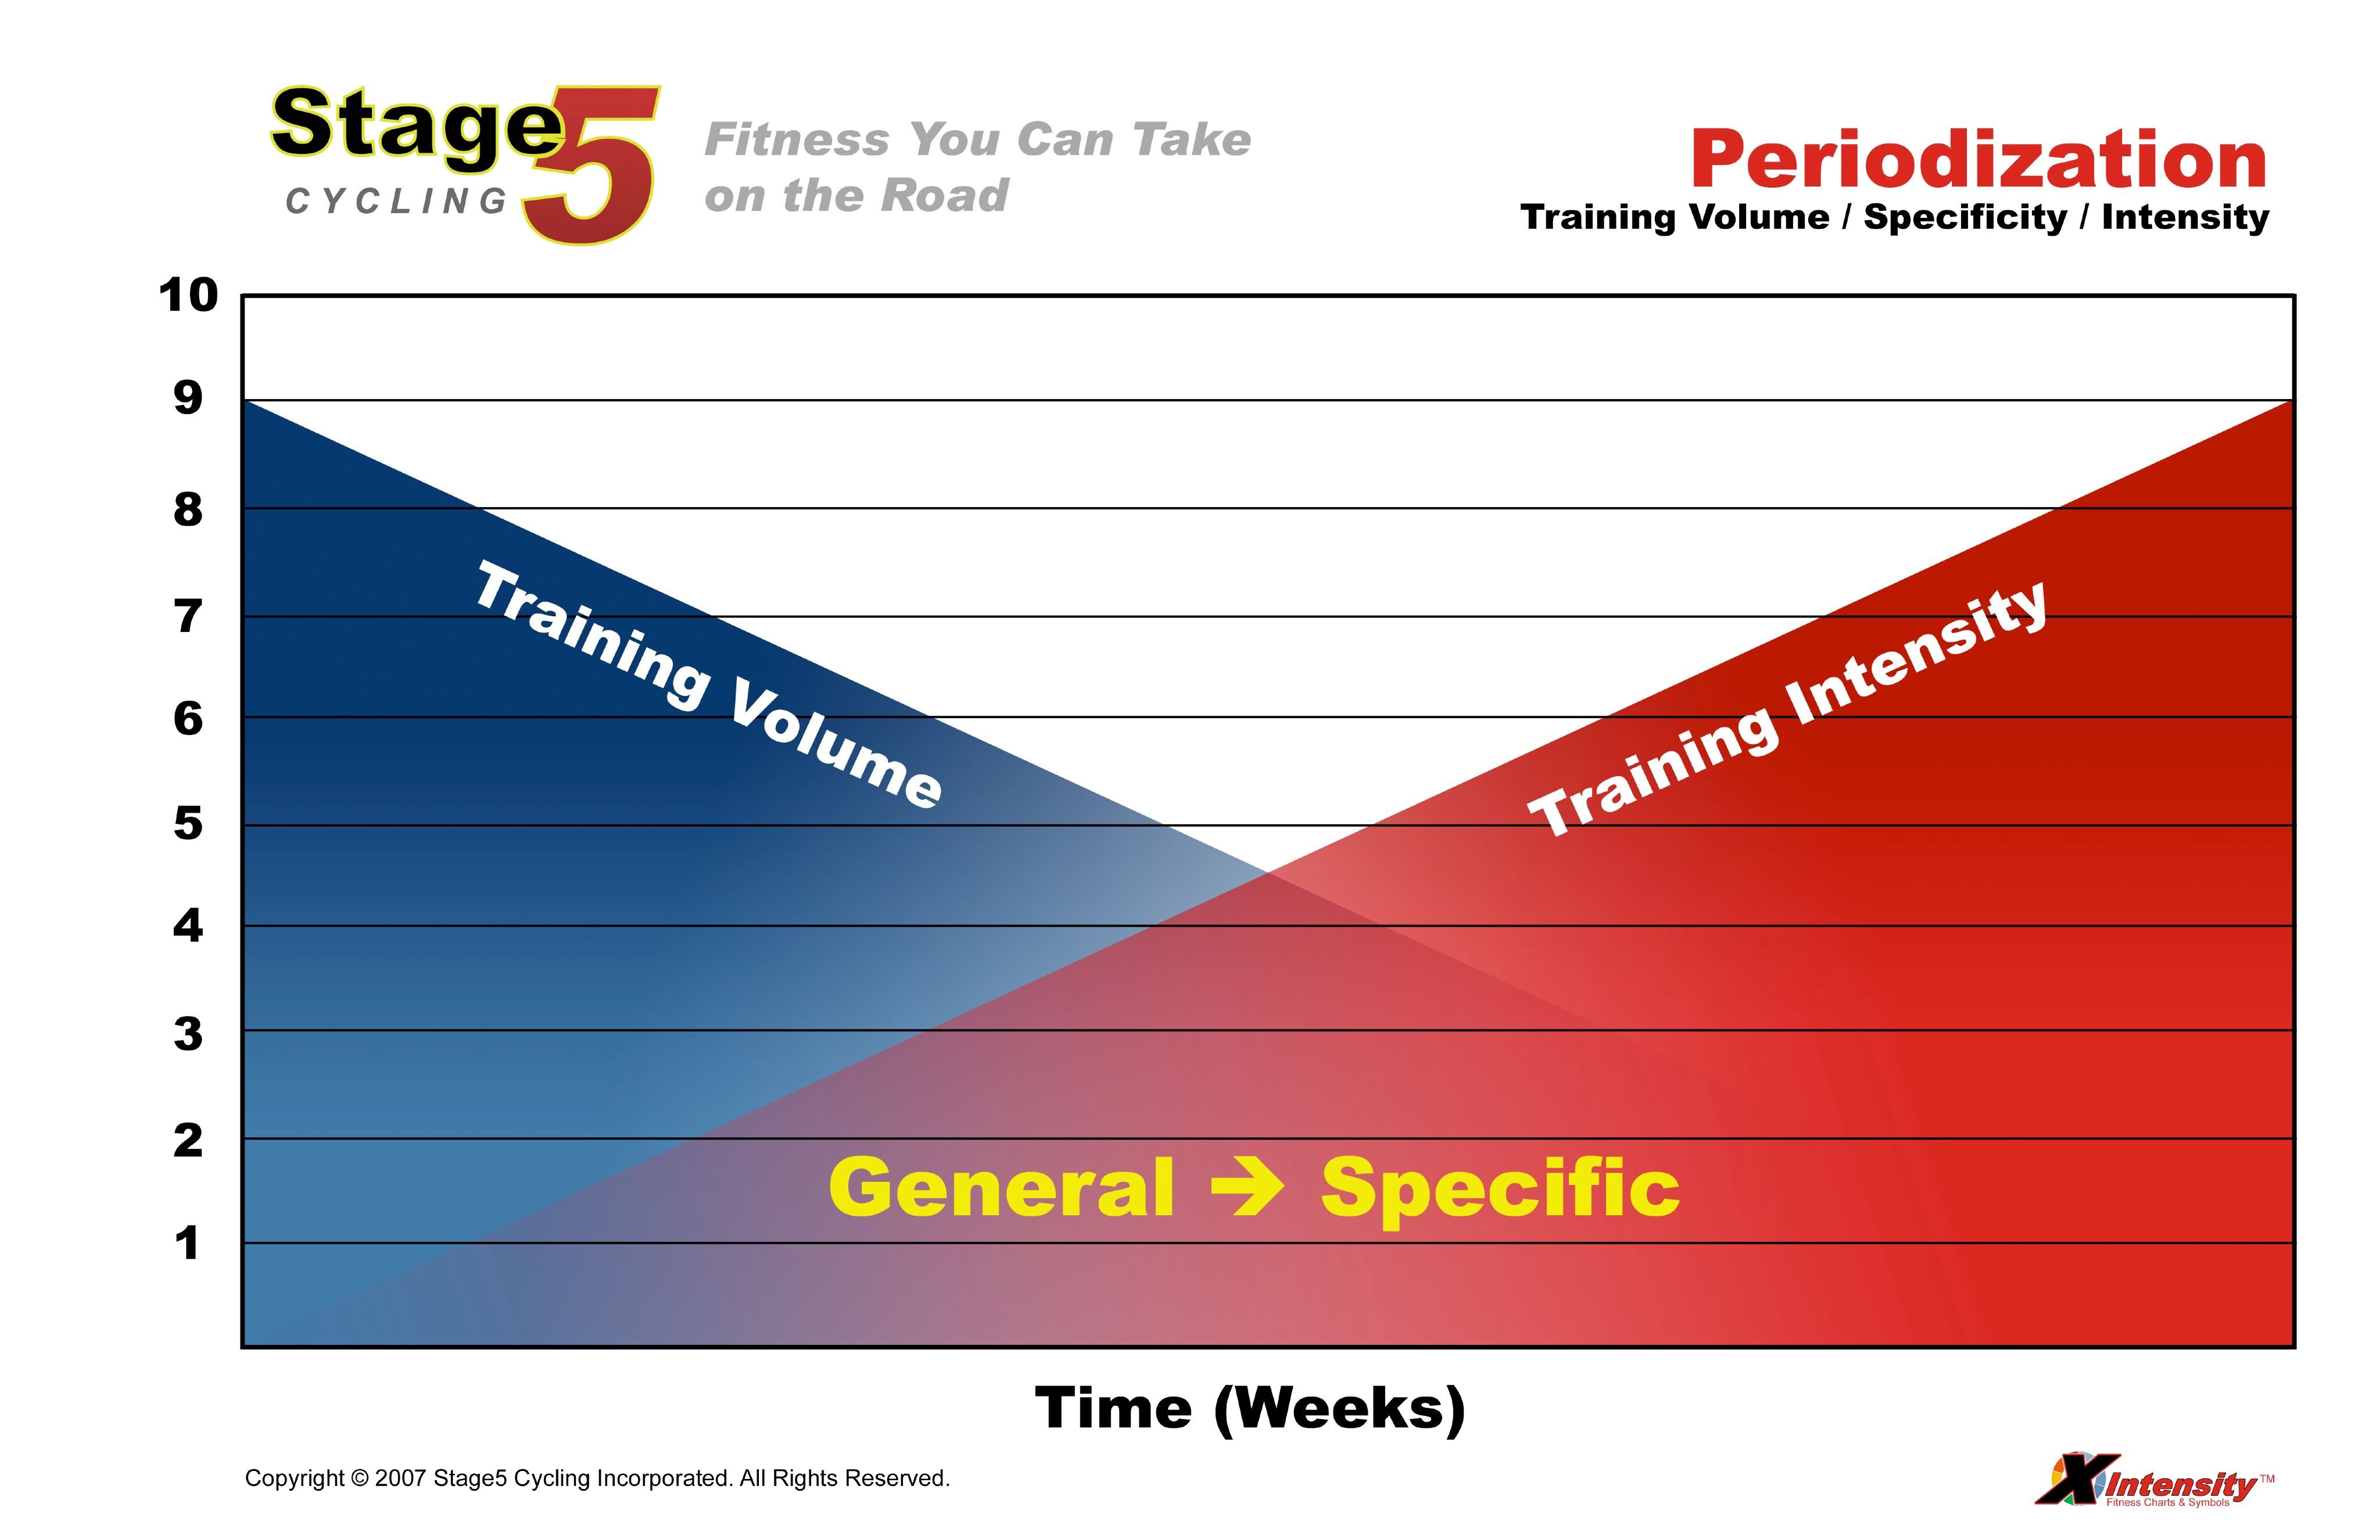
Periodization is the backbone of an instructor's success, and it can quickly become the key to your popularity as an instructor and it will become the foundation for your students to reach their goals. Periodization is the process of structuring training into progressive phases or blocks of time that are organized into Macro, Meso and Micro cycles. The outdoor cycling community uses periodization as a method to increase their strength and to peak for their target (or A) race.
One of the most important parts of periodization is the planning process where you will divide your an annual training plan into sensible blocks, where each block has a particular physiological adaptation and accordingly a specific dose of stress to elicit that adaptation. While I realize that you may not use an annual plan in your indoor classes, in a later article I will explain how to use the periodization concept in designing your rides. The planning and the journey is really the important part of this process; it gives you time to consider your goals and get focused.
In short, periodization allows you to organize your training into hard training periods and easier training periods to facilitate recovery. Periodization can also help to expose your riders to different aspects of cycling and it can allow you to work on both your cardiopulmonary system and your musculoskeletal system which will produce stronger riders with greater endurance.
The Macrocycle
The macrocycle is the longest of the three cycles and generally consists of a year or more. The macrocycle should include all of the areas of a complete training program including low zone endurance work, strength building, race ready maintenance and of course recovery. The macrocycle is your long term view of your training plan.
The Mesocycle
The second block of training is called a mesocycle. Your macrocycle will contain several mesocycles. While a macrocycle is a long term view of training, a mesocycle represents a specific block of training that is focused towards a particular physiological adaptation and usually not more than 3-6 weeks long. This could be endurance, strength or perhaps even recovery. Mesocycles are the true working phases of your training plan, and you will use these cycles as careful evaluation points to be sure that you are meeting your training objectives. It is not uncommon for there to be an intermetiate resting or recovery period between mesocycles.
The Microcyle
The smallest block of training is called a microcycle. The microcycle is the point at which you are considering and designing specific drills to meet the required stress to force your adaptation. An example of a microcycle is an endurance block where a you put together several long rides in a week to progressively overload the training volume and force an adaptation. Usually, you will have four or more microcycles within a mesocycle and then four or more mesocycles within a macrocycle.
This organizational approach is valuable in indoor cycling for 3 reasons:
1) It provides balance between the volume, intensity and specificity of training.
2) It provides a method for progressively increasing the amount of training or level of intensity as fitness increases.
3) It provides a connection with how the cycling community trains throughout the year; moving from the General to the Specific.
While an annual plan is not always practical for indoor cycling, in a future article I will discuss an approach to periodize your indoor classes over a much shorter time frame that will provide three main advantages for your classes:
1) Because of the changes in focus, you will provide varying stimulus to your participants, hopefully allowing them to continue without hitting a plateau.
2) Your rides will not just have separate playlists, but also separate focused training which will keep the classes interesting for the students.
3) By varying the classes you will be exposing your students to many different aspects of cycling and hopefully have them embrace the “Fusion” of the outside and inside rides.
The foot to pedal connection could be the single most important aspect of how the rider fits on the bike in addition to the safety aspects of a good connection. Due to the inertia and momentum that can be created by the weighted flywheel, it is necessary for riders to keep their feet secured to the bike at all times when riding.
Most indoor bikes are equipped with toe cages and straps to secure a rider’s foot to the pedal. The rider inserts their foot into the plastic or metal cage and tightens the attached strap to ensure their foot will not come out while pedaling.
Many indoor bikes now provide clipless pedals. Although this can appear to be an oxymoron, clipless pedals use a cleat that is attached to the bottom of a cycling shoe which then “clips” into the pedal. The cleats and pedals can come in various sizes depending on the make and model. Currently, the most common are SPD® (Shimano® Pedaling Dynamics) although a few facilities still use the older LOOK® (red cleat) pedals. Contact your facility to learn which pedal options are available for the bikes you are going to use.
There are large benefits of using clipless pedals over flat pedals in terms of comfort and efficiency. There are several good reasons to ride clipped in which include: 1) Riding clipped in allows you to recruit more of the muscles in your leg, more efficiently. While flat pedals tend to get the most drive when you push down, the clipless pedals also create forward movement when you pull up. 2) Provided your cleats are set up correctly and your saddle height and fore/aft position is right, you’ll be clipping yourself into the optimum position — limiting the chance of injury and improving efficacy. 3) Your feet won’t slide around like they can do on flat pedals.
To get clipped in, start with one foot already attached, and at the top of the pedal stroke. Push down with the clipped-in foot, and sit on the saddle. When the unattached pedal comes to meet your foot, rest the cleat attached to your shoe over the top of the pedal, and apply pressure. To release yourself from clipless pedals, you simply need to twist your ankle outwards.
If you have never used clipless pedals before, we strongly recommend that you take a few moments to practice getting in and out of the pedals when not in front of the class.
Cycle science (As printed in Mountain Bike Rider)
“According to sports scientist Will Harrison, “The type of pedal we use will alter technique and the lines we choose. Clipless can knock our confidence at first, however they can help us with better power, control and efficiency”.
That’s exactly what we wanted to test- do clipless really affect power that much? We jumped onto the Wattbike and found a big difference.”
Let's talk a little bit about resistance today. While I do not want to get into the “how much should I add” debate, there certainly is a minimum amount of resistance that every rider should
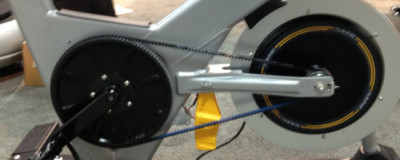
Big drive gear x small driven gear = very fast flywheel RPM
have on their bike. The true importance of resistance comes about due to the existance of a flywheel on an IC Bike.
Most indoor bikes have a weighted wheel (called a flywheel) to provide inertia and simulate the feel of riding a bicycle outdoors. It is important that riders remain in control of the flywheel at all times, particularly at higher RPMs, and not let the flywheel control them. Indoor bikes are designed with a knob, or lever, for controlling the amount of resistance placed on the flywheel which consequently affects how hard a rider will have to work in order to pedal the bike. This resistance can be either mechanical (the traditional friction pad) or it can be magnetic. The primary advantage of magnetic resistance is that it does not wear down over time, so it should provide a more consistent resistance over the life of the IC Bike. It should be noted that even with the last of friction and wear, magnetic resistance should be routinely calibrated due to operation cable stretching and general wear. This can be especially important on IC Bikes where the wattage is calculated (usually using the distance of the magnet from the wheel) rather than measured with a strain gauge.
Generally, I start my riders off at enough resistance to produce 25% to 50% of their bodyweight in pounds in watts (Watts/LB = 0.25) which generally is enough to keep them settle in the saddle and provides a good starting point. Riders should NOT pedal the bike without resistance at any time and should be encouraged to use the appropriate amount of resistance at all speeds and effort levels. Lack of appropriate resistance is the primary cause of “Hip Popping” in riders which is where the hips bounce quickly on the seat as the rpms are increased. There should be at least enough resistance on the bike to keep the hips settled and smooth in the saddle.
Please look for the next section of this series for the continued conversation and some safety specifics.


 eriodization is the backbone of an instructor's success, and it can quickly become the key to your popularity as an instructor and it will become the foundation for your students to reach their goals. Periodization is the process of structuring training into progressive phases or blocks of time that are organized into Macro, Meso and Micro cycles. The outdoor cycling community uses periodization as a method to increase their strength and to peak for their target (or A) race.
 The foot to pedal connection could be the single most important aspect of how the rider fits on the bike in addition to the safety aspects of a good connection. Due to the inertia and momentum that can be created by the weighted flywheel, it is necessary for riders to keep their feet secured to the bike at all times when riding.