When I heard about a SPINNING® Certification Workshop being offered just minutes from my home-base in Eden Prairie, Minnesota, I jumped at the opportunity to sign up. Believe it or not, I have been teaching indoor cycling for nearly four years, but never received formal training on the bike. The workshop I attended was held in Minnetonka, Minnesota, on July 23rd, 2011, and was led by Seth Dedmon, from Tennessee. Seth epitomizes what it means to be a great workshop facilitator. His energy, sense of humor, and thick Tennessee accent made me want to listen, and his knowledge base from years of experience had me jotting down notes and quotes almost non-stop.
The nine-hour event was broken down into four sections:
– Bike Setup/Safety
– Form
– Heart Rate Training
– Class Design
Bike Setup/Safety
We spent the early part of the workshop learning how to properly set someone up on the bike. Because I had never been formally trained to teach indoor cycling; I knew that the bend in the knee should not be more than 25 degrees, but not much else. After completing this portion of the workshop, I now have a systematic approach to bike setup and feel completely confident with the entire process.
Form
Second on the agenda was form. During this part of the workshop, we were on the bikes for over an hour with absolutely no music (Imagine that!) and Seth led us through a series of drills while teaching us proper form for seated and standing flats, climbs, jumps, sprints, and running with resistance. Many of the participants — including me — realized form is something even we need help with from time-to-time.
Heart Rate Training
As someone who does not own a heart rate monitor, this was the time of the day when Seth convinced me to buy one. Additionally, he discussed the five types of cycling workouts — recovery, endurance, strength, interval, and race day — and their corresponding heart rates. Seth’s instruction helped me understand the benefit of workout periodization and encouraged me to make certain each class has a specific purpose.
Class Design
Finally, we learned about class design. As a team, we worked together to build unique profiles (workout routines) and also talked about the importance of using music to create feeling and emotion in class. It has always been a personal priority of mine to consistently create new playlists, but Seth encouraged me to broaden my horizons and search for songs from a wider spectrum of genres — from reggae and classical to tribal and alternative.
Sample Class
To top off the day’s experience, Seth had us get back on the bikes for a sample class, and he actually instructed off the bike. To our surprise, he encouraged us to do the same from time-to-time, as it allows the instructor to give riders personal attention, correct form when necessary, and check in on participant heart rates. Quite honestly, his brief, 30 minute class was one of, if not the best, cycling experiences I have ever had because of the ambience he created in the room. It motivated me to become a better instructor.
The Takeaway
In addition to what I learned about bike setup/safety, form, heart rate training, and class design, I learned two things. First, I discovered that indoor cycling is very much a mind/body form of exercise and have a stronger desire to encourage visualization through music, class design, and my words. Additionally, I realized that instructors reach plateaus in their teaching just as the everyday exerciser reaches ruts in their training. The entire day left me feeling empowered to continually improve my teaching so that participants — our number one priority — remain excited about their health and fitness.
*Jennifer Lintz is a Nutritionist, AFAA Certified Group Exercise Instructor, Certified SPINNING® Instructor, and ACE Certified Personal Trainer. Visit her web site at www.wellnessbyjennifer.com.
Hello, I really enjoy your podcast, thank you for the production. I listen to them on my way to teach. It makes me feel motivated and often gives me items to share and use with my participants.
I wanted to follow up to this one podcast in particular. Our club got these bikes in the spring this year. The members are saying the gear tension varies among the bikes. I was pleased to hear Dennis talk of this issue and he suggested a way to remedy it by moving the gear handle up and down five times etc. Upon arriving at the club, I tried it and was disappointed it did not work. The numbers flashed zero and not the number “five “ I believe he suggested. Maybe he is talking about another version of the M3 Computer? Just an FYI. Maybe he could follow up again with additional information.
Dennis Keiser offered this response:
Hi Tara,
John forwarded me your email so that I could hopefully help you with your concern. (more…)
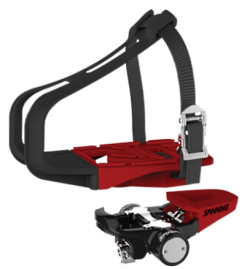
Josh Taylor had told me last year about a new pedal Spinning® was designing that would have the same versatility as the Schwinn Triple Link pedal; accepts LOOK, SPD and fitness shoes + they include the new Morse Taper pedal spindle (vs. a conventional threaded spindle) they're using on the new Spinner® NXT and Blade Indoor Cycles.
I see now that they've introduced the new pedal in two versions; the TRIO™ and TRIO QR™ – QR refer's to Quick Release.
My understanding is that even with dozens of different competing pedal types available, LOOK (who was the first mass-marketed clip-less pedal) is still the market leader in road bike pedals. So it makes good sense to offer these types of pedals to keep many of your cyclists participants happy 🙂
The two pedals appear identical except for:
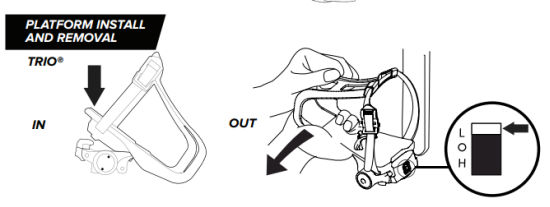
Patented “Quick Release” lever allows for simple one-handed platform removal.
They may want to reword this as the owner's manual clearly shows you need two hands to remove the cage.
One hand or two, my hat's off to whomever designed the nifty Quick Release feature on the TRIO QR!
Fun Fact
You may or may not be aware that indoorcycleinstructor.com, the Podcast, ICI/PRO… everything began with my desire to market my Red Pedal Tool. After years of fighting with the shoe baskets on these pedals I created this tool which is designed to safely and easily remove the shoe basket from Schwinn Triple Link pedals.
I'll need to talk with Josh about why they have also chosen to manufacture a version without the quick release… The diagram below illustrates the very same removal issue Schwinn has with their Triple Link.
I have always been a fan of cycling videos in my Indoor Cycling classes. I tend to do a fair amount of my low zone work inside, even during the summer months, on various indoor bikes or trainers and I totally love the distraction. Bike-O-Vision was a fresh new take for me in that the videos do not have cyclists or any type of dashboard. This is truly just eye candy to get your mind off of the hours of work that you have ahead. The creative inspiration of Jan Hunter is evident in the videos that he produces and they have over 71 titles.
Additionally, Bike-O-Vision has recently release their streaming service on Vimeo which is an amazing way to try their products and always have fresh scenary on hand.
The following post is Adapted from the June 20, 2019 article by Joe Hamilton on TrainingPeaks
As a previously coached athlete (and that is what we are as instructors) and a coach myself, the nebulous “listen to your body” mandate once perplexed me. What exactly does listening to your body mean? And does everybody listen to their body the same way? As I have trained and coached, I have gained perspective on how and when to listen to your body to help achieve your goals. As indoor cycling instructors, this can be very important as many of us teach upwards of five classes a week in addition to other workouts that we may do for our own health.
While it can be tempting to focus only on the physiological aspects: Training Stress Score (TSS), heart rate and intensity factor (IF), we need to look at one of the most important (yet overlooked) metrics: how you feel when you wake up in the morning.
For example, there are days when I wake up, measure my morning heart rate, and crawl to the shower. As I make my way out the door, I feel agitated and grouchy. At work, I find that climbing the two flights of stairs is difficult. If I look at my Performance Management Chart, it will usually confirm what I’m feeling: my Training Stress Balance (TSB) is negative and/or my ramp rate is high. All of these indicators will help confirm what my body and mind are already telling me: to adjust my workout or rest for the day. But, that can be extremely tough if you have two classes to lead this afternoon.
For this reason I encourage all of my athletes to record their morning metrics daily, including their morning heart rate, Heart Rate Variability (HRV), and general sense of wellbeing. With the Performance Management Chart, it’s easier than ever to match an athlete’s “morning indicators” with training stress balance (TSB) and ramp rates to help decide whether or not to adjust a workout.
Of course, many athletes, including myself, either misinterpret or ignore their morning indicators in fear they will lose fitness or not gain results. But I would rather my athletes be rested for a hard workout than to go into that workout fatigued, which will ultimately negate the effect of the training stimulus and response. Learning to be honest with yourself and your coach about how you’re feeling will make you a happier and often stronger and faster athlete.
How to Track Morning Metrics Each and every morning I have the athlete go into TrainingPeaks and input their morning metrics. I then compare this to their post-workout comments. Things I consider when reviewing morning metrics include resting heart rate variability, motivation to train, mood, sleep, appetite, and current stressors that the athlete faces during the day. I then compare the performance management chart in TrainingPeaks. If trends in the metrics charts show high stress and fatigue, TSB is negative, and post workout activity comments are negative, I then consider whether the next day’s workout is substituted for a rest day or adjusted to an easier workout. Here are some tips for logging your morning metrics:
Don’t think too hard or overanalyze your morning metrics. When recording morning metrics, include what and how you immediately feel. Overanalyzing can make recording morning metrics more a chore and more likely inaccurate. For example, if you feel fatigued, click fatigued and in the comments explain to your coach what fatigued means for you.
When in doubt leave it out. (“It” being your workout.) If all the signs indicate you are stressed and fatigued, then don’t push it. Either adjust your workout or take a recovery day. Most athletes are afraid to lose fitness if they miss a workout, but you can look at it as an opportunity to put your best foot forward for your next workout. Think long term. As an instructor, this means you may have to back off a bit during a class, or even teach off of the bike.
Training and stress can and will impact your sleep. That’s why it is important to monitor how your sleep was the night before. Trends of sleepless nights not only add to daily stress, but can create a negative cumulative effect.
Record your morning heart rate every morning in the pulse field. Do this right when you get out of bed. Heart rate variability can tell a coach or athlete a lot about how the athlete is doing in adapting and responding to training.
Record and pay attention to your day-to-day psychology or sense of wellbeing. Record your moods, motivation, concentration, focus, even how agitated you are. Your mood is often the first indicator that rest and recovery are needed.
Consider Physical Stress These are the demands we place on our body through workouts, mowing the lawn, cleaning the house, going to the grocery store, hiking with the family, even taking the dogs on a walk or short ride.
On a bike it’s easy to measure training stress through power and heart rate–but the stress we accumulate every day is less measurable. There are no TSS scores for mowing your lawn or repairing that deck–but that doesn’t mean you can ignore the physical stress these activities place on your body.
Mental Stress Training for any sport does not happen in a vacuum. As an athlete and a coach, you have to be able to effectively manage your psychological stress with physical stress, because the two act in tandem.
Any athlete knows the psychological demand of completing high-intensity intervals after a very stressful workday, or even worse, a job loss, any other life set back.
Managing your training stress in relation to your existing physical and mental stress is the key to knowing how much you can handle before becoming overtrained or start logging counterproductive workouts. Remember, give yourself a break and understand that all stress plays into your capacity to train.
Managing Stress and Training I have heard it said, and truly believe, that amateur athletes have the toughest jobs in the world. They don’t have the luxury of centering their lives around their athletic careers, so they have to have the ability to juggle the demands of training with their lifestyle, kids, jobs, marriage, travel, and finances. The athlete who can manage all of that is a superhero in my mind–but they’re also often the most stressed.
The key to managing that stress is to strike a balance between work and recovery. When it comes to that balance, the body never lies. It is perhaps the best tool we have to tell us when we move from overreaching to overtraining. Ignoring these critical signals from our bodies (which I often have) can lead to illness, injury, or just total burnout.
Remember, training and competing in your sport are (most likely) not what you do for a living. You train because you love it, it’s your passion, and you want to get better at something you love and that makes you a better and healthier person. So, listen to your body and mind and let it serve as just one tool of many tools available to help you effectively and efficiently train.
The information below is from my upcoming book Ride Inside which will be published by VeloPress and Available on shelves in late November 2019
The Power Meter
When looking at the intensity of exercise, especially in the world of cycling, power is the ultimate metric. As we will explain later in Chapter 9, there are times where heart rate is a better metric to use, but overall all, cyclists must train using power to get better, faster and stronger. As we said above, the heart rate’s biggest downside can be it greatest advantage. Conversely, power’s biggest advantage can be it largest downside. Power is an absolute number, unchanging due to external factors that affect your life (sleep, stress, diet, emotional stability and more).
While many view this as a plus, it can be all too easy to
implode during a race or very hard ride because you are trying to maintain a
power number that your body is physiologically not able to maintain that
particular day, regardless of your training.
So, what is power? Power is simply how much work you are
doing on the bike. Power is measured in watts. The definition of a watt, from https://www.merriam-webster.com, is “the
absolute meter-kilogram-second unit of power equal to the work done at the rate
of one joule per second or to the power produced by a current of one ampere
across a potential difference of one volt : ¹/₇₄₆ horsepower.”
Most of the tools we have looked at in writing this guide
can provide you with power numbers, or have the capability to do so: trainers,
indoor bikes and outdoor bicycles. Before we look at how those devices generate
that data, you need to understand that most power numbers are an estimated
value. This is a large area of contention currently in the indoor cycling market:
if the power number on the bike is calculated or measured, but please know that
all power displays on indoor bikes, and the power meters on outdoor bikes, estimate
the data based on measurements and algorithms. What this means to you, the
rider, is that you should attempt to use the same equipment each time that you train
so that your data is consistent. The more serious you are about measuring your
gains the more important this becomes.
How is Power Calculated
As mentioned above, power is the
amount of work or energy that is being produced. The only true way to measure power
is through the use of a dynamometer, or "dyno" for short. A dyno
itself actually calculates the power data by simultaneously measuring torque
and rotational speed (rpm). This is the type of measurement that most sports
science labs utilize and this is the measurement that most bicycle power meters
use to calibrate and rate their performance.
Most indoor bikes and outdoor bicycles
use power meters that are constructed utilizing one or more strain gauges or
load cells. In short, from https://www.merriam-webster.com, “a
strain gauge is a device that consists
of a fine wire firmly bonded to thin paper and that when attached to an object
subjected to stress indicates minute changes in strain by corresponding changes
in electrical resistance of the wire as it is likewise elongated.” To truly understand
a strain gauge, we looked to Omega Engineering (https://www.omegaeng.cz/prodinfo/straingages.html):
A Strain gage (sometimes refered
to as a Strain Gauge) is a sensor whose resistance varies with applied force;
It converts force, pressure, tension, weight, etc., into a change in electrical
resistance which can then be measured. Stress is defined as the object's
internal resisting forces, and strain is defined as the displacement and
deformation that occur.
For a more indepth explanaition
we look to Omega Engineering (https://www.omegaeng.cz/prodinfo/straingages.html):
Today, the typical power meter uses metal-foil strain gages. The metallic
foil-type strain gage consists of a grid of wire filament (a resistor) bonded
directly to the strained surface by a thin layer of epoxy resin. When a load is
applied to the surface, the resulting change in surface length is communicated
to the resistor and the corresponding strain is measured in terms of the
electrical resistance of the foil wire, which varies linearly with strain. Interestingly,
the most desirable strain gage materials are also sensitive to temperature
variations and tend to change resistance as they age. So the power meters should
be re-calibrated every so often to remain accurate, or at least as accurate as
they were designed.
In order to measure strain with a
bonded resistance strain gage, it must be connected to an electric circuit that
is capable of measuring the minute changes in resistance corresponding to
strain. Strain gage transducers usually employ four strain gage elements that
are electrically connected to form a Wheatstone bridge circuit. The output
voltage of the Wheatstone bridge is expressed in millivolts output per volt
input.
Wow, that is a lot of technical
knowledge. The most important take-away from all of this is that the power
meters that you find on bicycles, both indoor and outdoor, calculate power.
While you will use the power data to determine your training zones, and to
perform your actual training, what is actually important about that data is the
change in your numbers over the course of your training. What we mean by that
is that if you begin your indoor training cycle with an FTP of 230w and end the
cycle with an FTP of 260w you have gained strength, efficiency and endurance
over the cycle provided that you have used the same power meter (or indoor
bike) over that period and especially for starting and ending testing. While
there are libraries of information on power meter and indoor bike accuracy, the
delta in power from start to end is the bottom line. It is for this reason that
we advocate the use of a bicycle equipped with a power meter, which can be
paired with a Kinetic or Bkool trainer for E-Racing, for indoor training if you
are serious about continuing your power when you return to outdoor riding in
the spring.
Power Meter Features
We will take a look at the power applications
in Chapter 6, but for now, let’s look at the features that many power meters have.
In general, power meters are a measurement tool. That tool then needs to send the
data it calculates to some type of computer for storage and analysis. In most
cases, that computer is in the form of a cycling computer, such as a Garmin
Edge, Polar V650 or Wahoo Elemnt, or a sport (maybe multi-sport) watch such as
the Garmin Forerunner, Polar Vantage or Suunto Spartan. All of these computer
options have an amazing array of features and the ability to export or download
the training data to other programs that can sort and analyze that data to give
you unparalleled insight into your training and more importantly your strengths
and weaknesses. This data can be paired with heart rate data for a complete
view of your fitness level and progression.