by John | Feb 10, 2020 | Instructor Tips and Tricks, Instructor Training, Master Instructor Blog, Promote and Build Your Class

“Because that's where the money is…” was famous American bank robber Willie Sutton's reported answer to the question; “Willie why do you rob banks?”
I can imagine a similar conversation with an upscale restaurant owner; “so why do you cater to business people?” “Because they regularly entertain important clients and pay with expense accounts!”
Now that business people (and their prospective clients) are moving away from the two-martini lunch and adopting a more healthful lifestyle, expense accounts are paying for fitness classes.
Sweaty Wall Streeters Skip Booze for Spin-Class Meetings
Wall Street’s salesmen and dealmakers, whose expense accounts help fill downtown chophouses and box seats at ballparks, are now treating clients to a different kind of entertainment: high-end workouts.
Pre-dawn and afternoon classes at Manhattan fitness studios SoulCycle, Barry’s Bootcamp and Flywheel Sports are growing popular with bankers who want to bond without loading up on liquor and fatty foods, according to traders and salesmen. John Abularrage, head of Tullett Prebon Plc’s Americas unit, takes clients to 5 a.m. sessions at Barry’s Bootcamp in Tribeca, where they run on treadmills and lift weights to thumping dance music.
…
Bankers who sell stocks or bonds have long plied mutual-fund traders and hedge-fund managers with tickets, meals and drinks in the hopes that friendship — or at least familiarity – – will lead to more trades. Health-conscious clients increasingly view steak dinners as “three-hour ordeals,” said Chelsea Kocis, a 26-year-old former equity saleswoman.
“‘Let’s meet at 5 for a workout,’” she said, describing the way she’d invite out traders. “‘You can be home before your kids go to bed.’ That’s an enticing thing for a lot of people.”
They're calling it sweat-working
New Yorkers have been wooing clients and forging business relationships in yoga classes and locker rooms for more than a minute, but after the New York Times introduced the term “sweatworking” to the public at the end of last year, the concept entered the serious spotlight.
And at the center of it all was Sarah Siciliano, an advertising production executive who has turned sweat-working into a branded business. Siciliano now has a website and a group of clients who work out with her two or more times a week. They spin, stretch, and make business deals.
CREATING BUSINESS CONNECTIONS OUTSIDE OF THE OFFICE HAVE BECOME TOO MUCH ABOUT EATING AND DRINKING, OFTEN TO EXCESS. THE CONCEPT OF SWEAT-WORKING IS THAT EVEN BETTER, MORE MEANINGFUL CONNECTIONS CAN BE FORGED WHEN A GROUP OF LIKE-MINDED PEOPLE WORK TOGETHER TO IMPROVE THEIR MINDS AND BODIES. IMAGINE IF ALL THE TIME WE INVESTED IN NOISY, CALORIE-LADEN, ALCOHOL-SOAKED NETWORKING EVENTS WERE PUT TOWARDS INVIGORATING, CLARIFYING, ENERGIZING ATHLETIC CLASSES AND EXCURSIONS.
Now you don't have to wait for someone like Sarah to organize a group of like minded people and have them meet regularly at your club. You could do it yourself by using a free service like www.meetup.com.
I encourage you to visit meetup.com, search by your studio's Zip Code and scroll through all of the results. I did a quick check for groups located within 5 miles of ICI/PRO member Joe Ducosin's CycleQuest studio and found these groups…
Would any of these groups be interested in holding a meeting at your studio? I have no idea, but the group leaders are easy to contact.
Another option would be for you to form your own networking group that meets after your class for coffee. What types of business are prominent nearby? Who's already in your class that would benefit from meeting more people?
Joe has a huge (6,000 employees) new health care provider moving in just up the road. I'll bet there will be a steady stream of sales people visiting who may appreciate a sweat-working opportunity at his studio – and will pay for the privilege with an expense account 🙂
Originally posted 2017-12-28 09:00:58.
by Joey Stabile | Jan 22, 2020 | Best Practices, Class Work-Sets, Creativity Indoor Classes, Instructor Training, KEEPING IT FUN, Master Instructor Blog, Training With Power
Welcome to the The Weekly Ride by Cycling Fusion:
No more hunting for new music or counting out cues. Here is your ready to ride document, that can be displayed from your phone, or printed out onto cue cards. This ride is timed out, down to the second, to make your life as easy as possible!
(more…)
Originally posted 2018-01-30 09:00:13.
by Tom Scotto | Jan 3, 2020 | Master Instructor Blog
 Before we talk about how to get a beginner class started, the first question you need to answer is why? Not, why does my club need a beginner class, but why do YOU want to lead one (if this is your plan)? As an instructor starting a beginner class you need 3 main criteria: (1) The absolute desire to work with new riders, (2) the ability to teach appropriate classes for beginners and (3) excellent foundational knowledge of bike setup and form and technique.
Working with beginners is very gratifying but it does take a special individual to have the patience to work with those who may not have the conditioning or who arrive needing all kinds of help and have tons of (basic) questions. Many people never enter indoor cycling classes because they are intimidated by what they’ve witness through the class door of the studio (instructor yelling, riders sweating profusely and everyone limping out of the room). You will need to help beginners feel comfortable and confident that they will not only survive the class, but actually enjoy it. These classes REALLY need to be designed for beginners. This does not mean we do the same drills as our regular classes, just at a lower intensity. Some riders may have trouble (or are not confident) standing, while others may find pedaling above 60 RPM a challenge. Many beginner riders I’ve witness struggle to remain comfortable on the bike regardless of how hard they are working.
One of my biggest pet peeves is bike setup, particularly when working with beginners. This is often their first experience on the bike and it should be positive and pain-free. A few months ago a new rider entered my class (not a beginner class). I asked if she needed help with her setup because I saw her sitting in a very odd position. She told me she was experiencing some knee pain after a few classes. Once I corrected her position and gave her some pointers on proper posture, she confessed that she had taken 2 other classes earlier in the week and those instructors setup her bike in a much different position. She was also given some incorrect instruction on form, including straddling the stem of the handlebars when standing (she used a blunt sexual reference inappropriate for most audiences). So whether you are a fitness director recruiting an instructor for a beginner class or THE instructor, please make sure you are grounded in the fundamentals so we start our aspiring riders the right way and the safe way.
So now that we’ve got that off the table, what is the best way to start a beginner class at your club? I’m going to present a few tips to put you on the road to success, but also look forward to our indoor cycling community (YOU) to share experiences.
(1) What I the best time of day?
I’ve seen late morning indoor classes (9 — 10am) receive good attendance. However those who attend at this timeslot are often stay-at-home parents that do not have a desire to join the primetime classes. The best conversion rate (beginners who become indoor cycling enthusiasts) has been seen from classes that are offered just before the primetime class. For example, a 6:00am beginner class before the regular 6:30am class or a 5:30pm beginner class just before the 6:00pm evening class. The back-to-back beginner to regular class combo has proven successful for a number of reasons: (1) most do not require a separate instructor since the instructor for the regular class is often able to arrive early (for some extra $$ as well), (2) beginners who become confident and conditioned can stay and try to take the regular class and (3) “advanced” riders can take the beginner class as a warm-up and for more saddle time. NOTE: please advice advanced riders (especially those who dress in full pro-team clothing) to sit in the back so they don’t intimidate the newbies.
(2) Advertise with the Right Words
When you promote these beginner classes, it is important not to insult nor frighten people. Make sure you don’t advertise the class as “for those people that can handle a regular class”. Instead focus on what they will learn and/or experience. Also, don’t send them running in fear because the flyer posted at the club lists “Threshold Management” and “Anaerobic Capacity” as some of the benefits they will get from this neuromuscular, cardiovascular class. What da….?? Yeah, those training terms may arouse us, but a beginner will assume that if they don’t understand the description of the class, they will certainly not understand what is going on once they get their. Use general fitness and cycling terms. Keep it simple.
(3) Dress Down. Make sure the photos and advertising you use to promote the beginner class is not littered with pro cyclists or riders digging into “the suitcase of pain”. It doesn’t need to include pictures of people in lawn chairs on the deck of a cruise ship either, but just take time to consider the apprehension people can have to the perceived intensity of a class and lean towards a “fun workout”. On a side note, the instructor teaching the class should also dress down. I do recommended cycling shorts, but maybe a non-cycling top (but still athletic) to put new riders at ease.
(4) At Cycling Fusion, we have found that 30 minutes is the perfect amount of time for a beginner class. 30 minutes is long enough for those without the conditioning to feel like they’ve received a good workout while keeping them from fatiguing (physically or mentally) in a position they are not yet used to.
So, go and start that beginner class. Give them a good workout, start them off the right way and have fun!
Originally posted 2011-07-15 07:00:00.
by Joey Stabile | Dec 26, 2019 | Audio PROfiles, Best Practices, Class Work-Sets, Creativity Indoor Classes, Instructor Training, KEEPING IT FUN, Master Instructor Blog, PRO/Playlists, Training With Power
Welcome to the The Weekly Ride by Cycling Fusion
Welcome to our new era of The Weekly Ride, you get:
- Full Ride PDF
- Apple Music Playlist
- Spotify Playlist
- File to Download the Ride directly into My Fitness DJ (Yes, no Programming)
- The Ride will be available for purchase in the iClass Builder Store (No Programming)
- A Podcast of the ride being delivered by a master instructor.
(more…)
Originally posted 2018-12-17 20:25:24.
by Tom Scotto | Dec 6, 2019 | Master Instructor Blog
 Short of provoking a sexual harassment suit, this maybe the best way to get your class excited about what you have in store for them.
I’m grateful because my riders often take the time to leave comment cards at the club’s front desk after class and my group fitness directors continually share the feedback with me. One “positive” comment that has been consistent is that members feels that I “set them up for success” from the start. When pushed further, they said, “Tom always tells us what his goal for us is and then how we are going to accomplish it”.
I — MUST — HAVE — AN – OBJECTIVE
As an indoor cycling instructor, I’m a slave to my coaching tendencies. Simply put, I can’t design a ride unless I have a clear objective. Because of my cyclist tunnel vision, I consider indoor classes either a training session or event (something we have trained for). So before I start selecting drills or music, I first determine my overall goal for the ride. Am I trying to help them develop some aspect of their fitness (if so, what is it)? Is the goal to climb to the top of a feared moutain? Are we racing in a stage of the Tour de France or a local criterium? I can’t help myself — I MUST HAVE A PURPOSE! Fortunately, this seems to be viewed as a positive.
Do You Have An Objective For Your Class?
Instructors often mistake all of the tedious work that goes into a profile as the objective. I do not doubt that a tremendous amount of time was invested in creating our ride profile, but more specifically, was the class designed around an objective. To find out, ask yourself, “What is the purpose of this ride? What does it produce or help my riders achieve?” Unfortunately, an answer of “to develop general fitness” usually doesn’t cut it.
Do You Explain the Objective To Your Class?
I proctor numerous auditions for instructors and sometimes sit in on classes (usually spying). In most cases, I’ll take a moment to talk with the instructor afterwards to introduce myself and ask a few questions about the ride. I’ve been pleasantly surprised to discover that many instructors have some cool objectives for their ride, but never told the class. They were equally surprised that riders would be interested in that level of detail. “Absolutely, it demonstrates not only a purpose for the ride, but the amount of thought and planning that went into designing it. Your class wants to know what to expect (physical demands), as well as, what (long-term) value it will provide.”
A Sample From This Week’s Ride
Here is the objective I communicated to my class for this weeks leg speed development ride:
“One key element of cycling fitness is steady, fast and powerful leg speed. Since we are in our base training mode, this is a perfect time to focus on it. We are going to approach this by first performing a drill that helps engage more muscle followed by a series of drills that trains the brain to send the signal to the muscle quicker so we can pedal faster and stronger.
Keep in mind, as you look at today’s profile (I hang an 11”x17” color laminated chart for each class) you will see a number of consecutive drills before we receive more substantial recovery. So pace yourself. Finally, remember that leg speed is a skill that must be trained. Be patient as you develop your own leg speed. It takes time.”
———————————
If you are in the habit of creating classes with a specific focus or training objective, make it known to your riders AND reiterate after class the value they received. If you have not been approaching your rides with a specific purpose, I want to encourage you to start. You don’t have to be “Joe Coach”, but it should be something that can be explained to your riders. Practice saying your objective out-loud and to yourself. If you are finding it difficult to come up with an objective for an existing class, well…. you may want to revisit the profile and tweak it until you can explain its purpose.
Just to clarify, “fun” is not a purpose, but rather how you deliver it. So Have fun! Really!
Originally posted 2012-01-19 14:19:42.
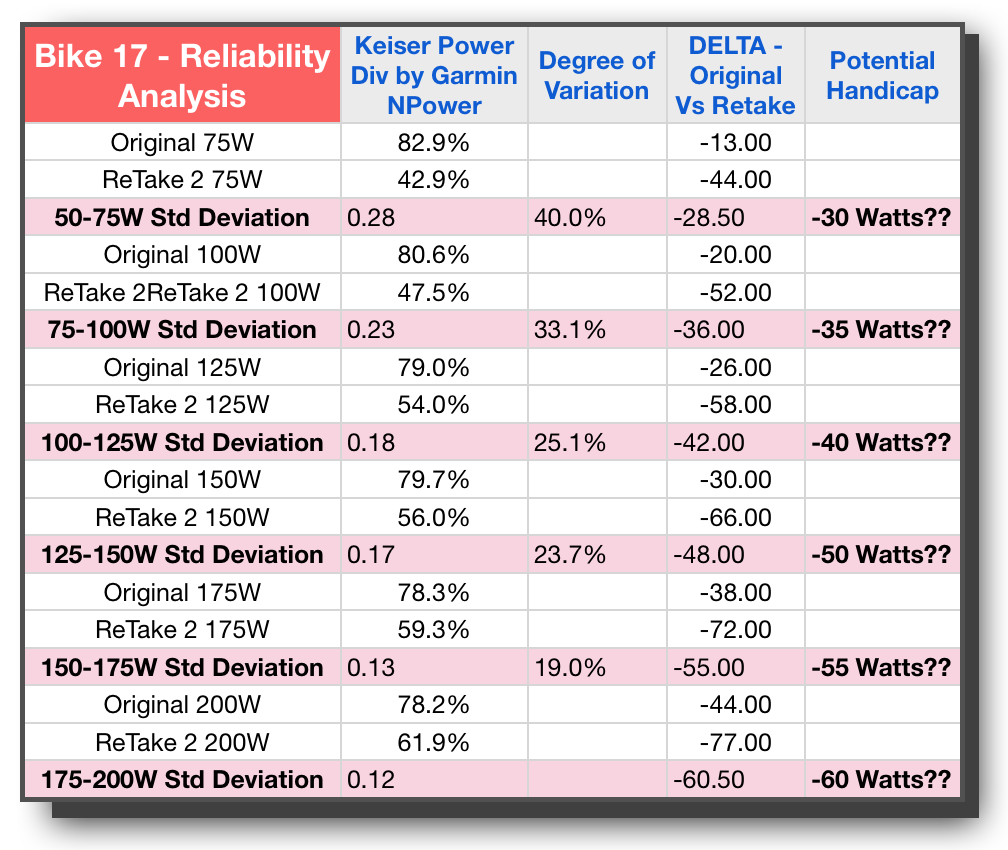
by Gino | Nov 22, 2019 | Instructor Training, Master Instructor Blog, Training With Power

Coach Gino gets an assist from a professional statistician.
Let’s Try This Another Way
After testing 14 different bikes, with 6 of them also being repeat tested at least twice, I was pretty disappointed to see the data I reported in our last blog. This was never meant to be just an academic exercise. This had pure practical motivation. I wanted to be able to do real and reasonable competition in class. I wanted to encourage more tantalizing trash talk among my most competitive riders. I wanted to let some of my “little old ladies” throw it down against some of the guys who think bigger is better. I needed the bikes to be on an even scale to do this in good conscience, and handicapping them against a reputable objectively measured power meter seemed like a no-brainer to do just that.
But alas, the numbers from my work up to this point lead me to a conclusion I simply had not anticipated; that each bike within itself may vary day to day with regards to what power it will display given the same force being applied. This was an assumption that myself and many other “defenders of calculated power” have held on to for these past 4 years or so – that it doesn't really matter if the power is accurate compared to what would be measured with a real power meter, as long as that power was consistent. In other words, we could know if our training was making us better or not by pre and post testing on the same bike. It would simply generate a relative value so we could know if we improved a lot, a little or not at all. Each year at Winter Training we would assign bikes so that we could be assured of this “fact”. This was indeed the fundamental assumption that prompted the entire notion that a handicap could indeed be created, if we had a objective way to get at power simultaneous to seeing the bike's power display.

Unfortunately, as you could see from the numbers reported the last time, they varied so much within the same bike, from one testing episode to the next (even despite painfully recreating the same circumstances of a consistent rider, environment, time of day, method of execution and all the like), that this assumption was not true for at least 50% of the bikes. Undaunted by this surprisingly sad turn of events, I started to ask around for an available statistician that might be interested in this research. I wanted a more experienced extra set of eyes and less personally invested perspective so that they could let me know if I am doing something wrong. Was I measuring the wrong way, perhaps working with false assumptions, not controlling enough variables, etc. I didn’t want to give up just yet — I had already invested too much time and energy.
3 More Bikes Tested, 3 Times Each
One of my regulars referred me to Sarah who is both a cyclist and teaches statistics at a nearby university. We met a couple of times to discuss what I had done so far, and she spent some time and thought on the issue, and created a new protocol. We would focus on just 3 bikes, took them out of commission so no one else would ride them, made sure she conducted/directed me as I rode/tested each bike. These trials would be done on three different days, in random order as generated from a random table of numbers. This video takes us through one of those three sessions.
In the next blog post, we will discuss the results of these 9 trials.
http://vimeo.com/82319421
Indoor Cycling Power Accuracy & Validation Research from Cycling Fusion on Vimeo.
Originally posted 2014-02-19 03:04:24.