
by Gino | Aug 5, 2021 | Master Instructor Blog
 Long climbs of modest grades are the ideal terrain for Muscular Endurance
Before we get to the fun of actually conducting our experiments (from a nearby but unknown location comes the sound… “Moo hoo hoo ha ha ha” said with a deep and ominous voice) — sorry about that — when we get close to actually conducting our experiments… well, you know — my lab assistants gets very excited. As I was saying, before we conduct our experiments, we must define the specific method of testing or measuring what we are studying.
To do this, we must think like a researcher. A good researcher wants a good definition of what we are studying, how we will study it, and specifically how we will know if there is a change as a result of our study’s inputs. Consequently, we need a way of “baselining” our subjects such that the way we measured their baseline can be easily repeated later to see if our hypothesis was valid or invalid.
Identify or Create the Drill That Reflects the Research Topic
To create a drill or performance test that can be conducted to reflect our research topic (in this case Muscular Endurance) I like to start with the science perspective — university, medical community, etc. I like to read the journals that the professional researchers read to get a solid foundation — to help me think the way they think. The first place I started was a position statement by the ACSM:
“Muscular strength and endurance are developed by the progressive overload principle, i.e., by increasing more than normal the resistance to movement or frequency and duration of activity. Muscular strength is best developed by using heavier weights (that require maximum or near maximum tension development) with few repetitions, and muscular endurance is best developed by using lighter weights with a greater number of repetitions (1).”
So first we have some confirmation of our approach in their statement that Muscular Endurance is best developed with lighter weights and higher repetitions (translating into a lower Heart Zones and a higher cadence). This answers the question of HOW we will execute the training, but we still need to know how they chose to measure Muscular Endurance.
Create the Performance Test To Measure Before & After
From the same study referenced above, we read this (paraphrased):
“At 0, 10, and 14 weeks, subjects performed maximal repetition tests; designed such that a similar number of repetitions were performed during each set, the second set to failure. “
While this is pretty easy to accomplish with weights and repetitions in a set, it takes a little bit of “translation” to apply this to cycling. As such, we will need to use heart rate and power as our gauges and metrics as we push our test subjects to “failure”. In our current study, failure will be defined by the point the rider goes above Zone 3 in Heart Rate and/or what power level they are not able to maintain for a full 10 minute stage.
For Example:
Subject A does a baseline test (the test at 0 weeks) where he holds cadence steady at 85 RPM, a heart rate in the middle of Zone 3, and power at 150 Watts for 10 min. We then increase his Power to 175 Watts, and he is told to keep his cadence and HR nearly the same. He does this by increasing his gear or resistance. He handles this without a problem, despite a slight increase in HR (but not over zone 4). We then increase his power in a similar fashion to 200Watts, and within the 4th minute he exceeds Zone 3 and thus reaches failure within our definition of Muscular Endurance.
Upon retesting at say week 8 or 10, he does the exact same test but this time he is able to go to 225 Watts before he reaches failure. Without getting into the concept of “statistical significance”, let’s just say that we could deduce that the training used had the effect of improving his Muscular Endurance.
Make It Fun:
The good thing about not being paid to do this research, and not being part of a university lab, is that we can actually have some fun doing this research. I always like to integrate Performance Tests into our training or even our Indoor Classes. In my next post, I will discuss just how you can do that and what other aspects need to be controlled as well.
[plulz_social_like width=”350″ send=”false” font=”arial” action=”like” layout=”standard” faces=”false” ]
Originally posted 2012-06-21 08:51:09.
by Gino | Mar 26, 2021 | Training With Power

Indoor Cycling 2.0 is about POWER
It’s Official.
With CEU credits being given, and accomplished indoor instructors being challenged, educated and motivated to train with power… I can confidently say we have the real deal. We spent 6 hours off the bike exploring the foundation, science and practical tools of Power Training, and 2 hrs on the bike putting theory into practice. Those that are fortunate enough to have power bikes to go back to, have not merely a few more arrows in their quiver, they have a whole new quiver. The others will have to do the work of change agents, and try to motivate their clubs to action, or find other places to train and/or teach.
With this post, I will begin a weekly posting of the bulk of what I covered in one intense day (as well as embellishments along the way). If you follow along, you’ll get “powerized” over time. As a member of ICI/PRO you will also be permitted to download a host of tools week to week, that I charge for on my Cycling Fusion site. This is part of the ICI/PRO pledge to provide value for your membership. As we move into the Winter months, we will switch to more Heart Zones training, but power will never be far behind.
Let’s start with the basics: What is Power, and Why Should I Care?
What is Power?
In cycling, (indoors or out) it is simply the product or combination of the torque applied to the crank arm, and the RPM or cadence of rotation; think resistance and cadence combined. It is measured in Watts, as the product is indeed energy, and it is manifested as speed — the more power you apply, the faster you will make the bike go. ICI/PRO Members continue reading here.
Originally posted 2009-11-10 13:06:54.
by Gino | Mar 26, 2021 | Training With Power

As is customary, I’ve opened my big mouth and am faced with the proverbial “put up or shut up”. Don’t get me wrong, I’m not one to trash talk and overstate my abilities. However, I am one that is always challenging others to accomplish things they think are bigger than themselves; to push past their own perceived limits and discover things about themselves they never knew. Sounds all good so far, but I have a basic life philosophy that tends to get me in trouble. To wit, I believe that whatever you teach, you should experience first. Consequently, all my challenges to others end up first putting me to the test.
Way back in January when our annual Winter Training Program kicked off, each participant was required to have a goal to train for. Goals ranged from doing a 50 mile charity ride to having 2 separate peaks during the race season. For me however, having just finished filming the Pittsburgh Dirty Dozen as a charity project for Livestrong, and watching some of the strongest riders I know struggle just to finish, that event seemed to be the logical choice. So I said it, I would train to complete – NOT COMPETE – in the Pittsburgh Dirty Dozen Race.
Starting this weekend, I will have exactly 12 weeks to prepare for The Pittsburgh Dirty Dozen. I’m going to post my training plan (both Heart Zones® as well as Power Training), and pre-ride schedule on this blog for others in the Pittsburgh area who would like to train along with me. The training plan will provide some structure to follow even though we will train in different areas. Every 2 weeks I will take on at least 2 (or more) of the 13 climbs as part of the overall training plan as well. Exact times and dates will also be posted here so riders who want to share the pain can join me if they like.
Point of fact is: this IS a race. Point of reality is: only about 10 to 15 of the 180 riders that rode last year were strong enough to garner any points at all. The format of this “race” is that the entire field is together at the bottom of every hill, and then the organizer, Danny Chew blows the whistle (by the way, someone needs to buy him a new whistle this year, it was sketchy at best last year), and the first 5 riders to the top get points.
While a few supermen and wonder women surge to the top like they have hidden motors in their bikes, the rest of the field climb at varying speeds, with an inevitable group on every hill pushing their way if they can’t maintain at least 4 to 5 mph. In surveying the group last year, it was clear that a lot of the field were experienced amateur racers, and that this was not bringing out the average casual rider. So when I say people were pushing, and there are always people pushing, it does not mean they were weak or inexperienced riders.
The graphic above is from the training DVD we created (Global Ride Productions) from last year’s race. It is slated to be released in 2 to 3 weeks, just in time to mix up some great indoor cycling with the outdoor application. Stay tuned, as I will endeavor to keep this updated once per week as we head towards this epic event.
Save
Save
Originally posted 2017-10-10 09:00:23.
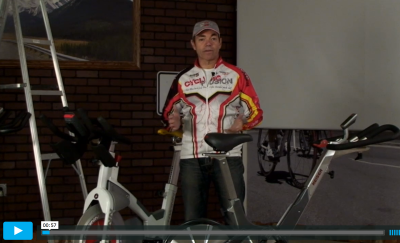
by Gino | Dec 15, 2020 | Instructor Training, Training With Power
Gino introduces the Power Pedals research study
My last blog post was ended with this statement: “This blog represents the first in a series that will be exploring power and how we can make it more accessible, more understandable, more reliable, and more straight forward to teach with.”
To live up to those lofty goals, as an outdoor coach, an indoor instructor, and in general a man dedicated to getting the science right, the only place I can start from is one of credibility and truth. In other words, however I am going to try and lead someone to apply power and ultimately teach with it, it must be done with reliable and repeatable techniques. This is my only hope of also producing reliable and repeatable results in both indoor cycling instructors as well as our students.
The variability of how the same power levels feel on different bikes (specifically the Keiser m3 that we have used predominantly for the last 5 years) is something that has actually prevented us from doing lots of more engaging and/or fun training in groups. I don’t want to push someone to work hard only to have the fact that they chose a “hard bike” today instead of the easy one be what determines their ultimate success in any competitive or group activity.
I knew that until there was a way to objectively verify what power I was pushing on the m3 I could not know what the truth was, and so I waited for an way to implement this objective measurement. It finally was made possible when the Garmin Vector power pedals were released. This video is the initial launch of this research study.
Video Agenda
After an initial introduction as to why I took on this huge research project, I show the details as to how the Vector Power Pedals were fit on each bike and the nitty gritty steps on calibrating these pedals before I could begin testing the bike. This calibration method had to be done for each bike, and repeated each time I repeated the test.
This video also is the first in a series of video blogs that will allow you to take this journey with me as I discover what is possible and what is not in the pursuit of establishing real power levels of the Keiser m3.
Watch the first video blog.
Indoor Cycling Power Accuracy Research from Cycling Fusion on Vimeo.
Originally posted 2014-01-14 04:25:50.
by Gino | Sep 16, 2020 | Training With Power
 So we’ve talked about why Indoor only riders will benefit from Power Training, and in the last post we reminded the avid outdoor cyclist just why Power is a must for their continued growth and improvement riding outside… but how to get started. That’s the question I’ve heard from a number of folks that have just gotten new Keiser M3 Power bikes (even though our Power Training system from Cycling Fusion works for all indoor bikes – it is what we use at Global Ride Training Center). The inevitable first question is like one from a new blogger sitting in front of a blank computer screen. Where do I start!?!
Introduce Power With Games
While most indoor cyclists still don’t wear heart monitors when they ride, most know what it is and why it is used. However, when it comes to training with Power, that’s a different matter altogether. Unfortunately, this is also why many clubs do not consider bikes with Power. Their ignorance leads them to feel it is too complicated or worse – intimidating. In this case ignorance isn’t bliss, it’s just plain ignorance. The goal here is to show that riding with Power is fun, interesting, and easy to do. This will help to beat back a consensus of complexity, which right now, threatens to slow the growth of Power bikes in our industry. Consequently, it’s best to just let students begin to play with Power before they really begin to train with it.
We do this by offering structured and methodical Power Games that make training with Power more fun. These are just a sample of Power Training games one can play. With feedback like Watts, Heart Rate and Cadence, (typical tools that come with any bike already equipped with Power) one is only limited by their own imagination. Here are some games that might help “break the ice” when it comes to training with Power.
Ten Songs To 10 Gears
Let your students warm up, encouraging them to increase their gears slightly as they “warm up with purpose”, but to keep it light and easy during the warmup. Once they have warmed up for at least 5 or 6 minutes, ask them to check their gear number, and the Watts they are genearting. This will represent their “baseline” or the bottom gear or Wattage for them today. This concept of establishing a Power “baseline” will apply to all of the games we discuss here, except for our last game; the 5 X 5.
Each of the next 9 songs then you should direct them to increase it 1 gear. The first 3 or 4 should be easily handled in the saddle. The final 3 or 4 may need to be out of the saddle, and some students might not be able to negotiate a gear much more than 7 or 8 above their warmup, depending on how high they start, and the type of Power indicator your bike uses.
Outside of the first couple and last couple, you should have plenty of leeway for what position to be in for all the other Power levels. Continue to work on form, and draw their attention to how each gear affects the Power, and how it probably also affects their cadence and certainly heart rate. This is a good exploratory exercise to help students see just how far they can go. Some may never go beyond a few gears without this slow and methodical increasing of Power. Others might find that they haven’t really stressed themselves, or at least not to the max. This is good too, as it helps to show your students a wide range of Power levels and helps them to understand what kind of Power range they have.
(more…)
Originally posted 2018-12-04 06:00:02.