by Chuck Cali | Dec 24, 2012 | Master Instructor Blog
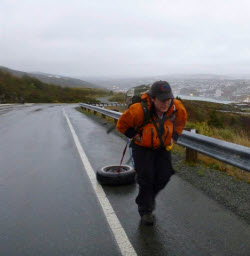
Image from http://taloeffler.com
By Team ICG® Master Trainer Chuck Cali
In the movie A League of Their Own, the coach, played by Tom Hanks, confronts player Geena Davis as she quits just before the World Series because, “It just got too hard.” The coach’s reply is a memorable rant that ends with, “The hard is what makes it great.”
For me, that means: The ultimate satisfaction with a job well done is directly proportional to how much effort it took to do it.
“The hard is what makes it great.” That line has stuck with me over the years, and I’ve used it often in coaching middle-school wrestling, girls’ fast-pitch softball, my own golf game, and of course cycling, indoor and out.
It came to me again recently as I worked out with Team ICG® Master Trainers at ICG Academy in San Francisco. This team does the hard. We’ve met to train more times in the six months I’ve been an ICG Master Trainer than Brand X has in the three years I’ve worked for them.
At ICG Academy, in my favorite west coast studio, OMpower, we work hard to help each other get better, deliver the full value of ICG education, and instill our zest for MyRide®+. Team ICG does the hard.
Does the cycling or group X team at your club do the hard? This sort of club-level teamwork seems rare. Am I wrong? Do your club’s cycle instructors meet and work toward a common goal? Does your club even separate cycling from group X? If so, I’d appreciate a comment on how your club does it.
In my experience, group X departments leave it in the hands of us instructors. If the hard is what makes it great, then doing the hard work will make your classes great. So, are you doing the hard, and what is that?
Top of the list, and, I suppose, the hardest: Change your style. I know the daggers are flying. Everyone says style makes one unique. I maintain it’s not your style your riders come back for, but you.
Treat them to something new, or at least different. No matter what we name our profiles, we’re doing cardiovascular training on an indoor cycle. The key is how you present and perform those ride profiles.
Doing the Hard #1: STOP SCREAMING!
This sort of teaching was the norm years ago (and still is fun from time to time), but I suggest doing the hard. Stop screaming. Start teaching.
Screaming over the music is the screamers’ comfort zone. They coach high-intensity classes to loud, driving music and somehow believe their classes won’t have impact unless they scream. A headset mic doesn’t work for them. They scream into it, causing over-modulation. They finish totally wiped and would find it difficult to teach another class without rest.
Do the hard. Learn to use the headset microphone and the audio mixer — that panel with the knobs labeled mic, iPod, CD, treble, base. Give yourself time to set it up properly for the effect you want. You may be a bit uncomfortable the first couple of classes, but it’s powerful when done well.
Make sure you can be heard without overpowering the music. Vary your voice and tone. Be upbeat and happy during warm-up as you explain the ride. Use your best coaching voice during the intense moments, friendly banter during recovery. Soften as you cue the cool-down. Don’t compete with lyrics.
Now that you’re not screaming:
Vocabulary. On outdoor bikes, we ride on a combination of flat roads, uphill and downhill. We gear up or down, depending on terrain. Stay true to the bike; say “gear”. Use words that describe riding a real bike over real terrain. If you don’t ride outside or are unsure of correct terms, comment on this post and I’ll help you.
Define the terms you use, especially for new riders. Also, consider the class. A group doing advanced heart rate or power training needs different cues from a beginner class.
Talking. What and how much is said separates great from good. Talking too much is common. We all need to work on that, but we at ICG suggest always wearing a headset microphone.
Doing the Hard #2: Continuing Education.
When you talk, is there a message? You read ICI/PRO, a good start, but it’s not everything. There’s direction to further education on this site, so use it.
Continuing education can come from online sources, workshops at your facility, or specialty certifications. I recommend all three. But I draw the line with this: Whatever the continuing education, it must apply to indoor cycling or cardiovascular training. A kettle bell certification is cool but won’t add value to your skills as an indoor cycle instructor.
Try the other guy’s certification. How many of you have not added another certification since your original? Go to conferences; see what other instructors are doing with new bikes, video and great sound systems.
If getting out of the house is inconvenient or too expensive, create your new self by implementing some of the esoteric posts on ICI.
Joan Kent’s recent post on Focus with the Zen Triangle image was powerful for me. That message is different from what one hears in a typical cycle class. It truly helped me solidify the verbal descriptors I use to help my riders reach that state of liberating the body from the mind.
Or Jim Karanas on Flow, or Effortless Power. John Macgowan on being a celebrity. Cameron Chinatti on “true RPE”. Yours truly on connecting.
“The hard is what makes it great.” Doing any or all of these isn’t really that hard. Maybe the hard is just deciding to do something different.
by | Dec 21, 2012 | Music

[Important Note for ICI/PRO Members: As the world is scheduled to end sometime today, this (unfortunately) will be our last Free Music Friday. John][Update – the world didn't end so you can look forward to Free Music Friday's for years to come.]
Hard to believe the holidays are almost here and so is the end of 2012 and of course who is stressed about all of that!
This is the time of year when a six minute dose of beach chill is just what your riders need in the form of ‘
These Dream‘ by
Chris Malinchak perfect to warm them up after coming in from the cold, or use it as an easy flat road.
The one thing I like to do is use a songs lyrics and play with them during the ride. In this case try using the segment “I'll take my time, won't stop, until I get it right.”
Ask your riders to decide what they need to perfect in their form?
Could it simply be getting their shoulders out of their ear canals and allowing themselves to relax a bit more?
Maybe smoothing out their pedal stroke, focusing on finding and keeping the perfect breath to control their heart during a recovery?
by Jim Karanas | Dec 17, 2012 | Engage Your Students, Master Instructor Blog
Does hosting an Indoor Century appeal to you?
By Team ICG® Master Trainer Jim Karanas
Using power/watts conventionally in indoor cycling improves students’ fitness. But it’s the tip of the iceberg, a small projection of the immense power below the surface. Consider, instead, introducing the concept of effortless power in your classes.
Without the inner aspect, indoor cycling can limit students’ imagination, causing confusion and disappointment when progress wanes. The inner factors — center and intrinsic energy — provide controlled determination, calm, clarity, and an extraordinary source of power.
To get students to look at power abstractly takes patience. Pursuit of an ideal may not lead to measurable results, but enhances understanding and engages you for life.
Experiencing effortless power is possible, albeit challenging, in daily classes. Students won’t prepare adequately because outside preparation is necessary. An in-house event enables you to coach outside aspects of their lives. I like to use a 5-hour indoor century, during which the students must maintain a certain power output to cover 100 miles in 5 hours. If they don’t complete it in 5 hours, they keep riding until the odometer displays 100 miles.
During the event, minimize time off the bike. No breaks are scheduled; the goal is continuous effort. The event can be a fundraiser, but focus on preparing the riders to maintain a specified power output the entire time.
Some students will consider 5 hours impossible. Others will gear up and train for competition. Both perspectives miss the point. It needs to be viewed as a training session that reveals potential that’s difficult to realize in daily classes riddled with schedules, distractions and unconsciousness. Five hours allows students to detach from what they think is (im)possible.
A key to experiencing effortless power is being centered. Finding center requires Life Balance, which is coached pre-event. It has little to do with training.
Life Balance
Many of us experience life as hectic and frenzied. The experience of effortless power isn’t possible unless chaos becomes order, and motion comes from stillness. When coaching this, one-to-one conversations may be necessary, as individual circumstances vary. Balance needs to start with Lifestyle, then move to Nutrition, and finally to Training.
Your Lifestyle must be in order as you approach the event. Does your spouse support the time you need to train properly? Does your job allow for adequate recovery? Does your schedule permit adequate sleep? Do you have time to sit quietly and contemplate?
Nutrition follows Lifestyle. Do you have time to prepare healthful meals? Are you able and willing to remove alcohol, caffeine and sugar from your diet?
Last is Training. Is your training schedule regimented? Have you made time for ancillary training off the bike, including necessary recovery therapies?
Effortless power comes from balancing and coordinating intrinsic energy, not from endless training. On average, students won’t make all the necessary concessions, but a coach needs to move them toward simplicity and order. My experience has been: the greater the sacrifice to bring balance, the greater the experience of effortlessness.
Coordinating Intrinsic Energy
Daily workouts prepare the body for the rigors of the event. They’re also what the students are used to doing. Below are six effective trainings to help students achieve effortless power while riding. Introduce them sparingly and practice them yourself, so you can teach from experience. Some may resemble exercises you currently use. The shift lies in the intent behind the exercise and what you want the students to accomplish. Build in more of these concepts as you approach the event.
1. Ride position. Grace always accompanies effortless power. Whichever ride and hand positions you use, emphasize the discipline of maintaining proper position and transitioning fluidly. Coach conscious awareness of riding technique: Straight back. Soft elbows. No sitting up or standing unless coached. One hand on the handlebars when drinking water. Fluid transitions from one position to the next. Seated Flat Road at 90 rpm for 32 counts (use Beatmatch: match cadence to the music); 32 counts of Seated Climb at ~75 rpm (use Freestyle); 32 counts of Standing Climb at ~60 rpm (use Freestyle); 32 counts of Standing Jog at 90 rpm (use Beatmatch). Find a 90-rpm song that’s about 10 minutes long. M’Bali Jo by Pili Pili works well.
2. Pedaling technique. To promote awareness, start each class with 10 minutes of soft-pedaling at <50 rpm, with light resistance. Use ambient music to avoid emphasizing the downbeat, such as The Flow of Let Go by Anugama. Independent crank arms work wonders on technique but aren’t available on indoor cycles. The KRANKcycle by Matrix is an effective substitute. Through kinesthetic awareness, you’ll develop leg control by training your arms with independent crank arms. Master and perfect smooth rotations by using the Split, hands exactly 180 degrees apart. Rotations (arms or legs) must be slow (<50 rpm), with little to no resistance. Most students will become frustrated with this exercise.
3. Cadence and power ladder. 20-minute ladders (80, 90, 100, 110 rpm), 5 minutes at each cadence. Power output ladders up, as well. Identify the specific power output (or HR) for each cadence and keep it constant. Intensity is easy to moderate. Use four songs, and Beatmatch each cadence. The following playlist works well: Salt Water Sound by Zero 7 (80 rpm), Whole Lotta Love by Vitamin Dub (90 rpm), When You’re Falling by Afro Celt Sound System (100 rpm), and Reckoner by Radiohead (110 rpm). Cadences don’t need to be exact but should show a definite progression in speed.
4. Breath/cadence integration. After warm-up, perform 20 minutes of one ride movement and hand position (Seated Flat Road is best) at easy-to-moderate intensity. Don’t change position for 20 minutes. Keep power output (or HR) constant. Keep the diaphragmatic breathing pattern (number of pedal revolutions between exhalations) constant. Keep one hand on the handlebars when drinking water. Kanga by Professor Trance (80 rpm) is perfect for this exercise. Use fast, forceful exhalations, pulling the navel to the spine, and relax the abdominals while inhaling every 4 beats. You’ll breathe 20 times per minute for 20 minutes. 400 conscious breaths is a powerful meditation. Students who stay engaged could well experience effortless power during this exercise.
5. All-terrain cruise. After warm-up, vary ride and hand positions for 20 minutes. Change cadences while maintaining a consistent power output (or HR). Select easy-to-moderate wattage or HR and keep it constant, regardless of the terrain changes. Any combination of songs is appropriate for this exercise. Don’t allow students to fall into a rhythm. Use Freestyle more than Beatmatch.
6. Limited recovery with breath/cadence integration. 30 minutes in the saddle at a constant cadence (80, 90 or 100 rpm), using two distinct power outputs or HRs (upper threshold and slightly below). Alternate 5 minutes at each power output. This is a high-intensity effort. The limited recovery should enable students to repeat the high threshold effort. Specify a breathing pattern (number of revolutions per exhale) for each effort level. You’ll need six 5-minute songs at the selected cadence (Beatmatch works best). The cadence need not be exact, but keep it the same throughout. The breath integration described above is necessary, although the rhythm might be different at this higher intensity.
Special trainings help to move students toward effortless power during the 5-hour event. One example is “90 at 90”: 90 minutes at 90 rpm at one specific, moderate power output, using integrated breathing. The discipline is not to change ride or hand positions. Drink water with one hand on the handlebars. The students’ breathing pattern, coordinated with their pedaling, will get them through this exercise with minimal adjustments. Although not mandatory, it will help students to realize effortless power on the day of the event.
The Event
Divide the 5 hours into ten 30-minute segments. Have only one instructor. Each segment should have a beginning, a close, and a defined playlist. Don’t actually break between segments, but allow students to sit up and relax, without disengaging. Quickly bring them into the next 30-minute sequence.
Video
The benefit of Forward Motion Video in this event can’t be overstated. The sensation of forward movement will better enable students to channel their intrinsic energy. That, accompanied by a change of location every 30 minutes (e.g., World-Tour Challenge videos on Myride®+), will dramatically impact students’ sense of effortless power.
This 3-part article challenges conventional thought on power in indoor cycling. Its current use solely for measurable fitness results is not sustainable long-term. Power measurement can instead develop inner balance and the awareness, and coordinated extension, of intrinsic energy, resulting in effortless power.
To learn more, read Flow: The Psychology of Optimal Experience and Zendurance: A Spiritual Fitness Guide for Endurance Athletes
 – both cited in earlier posts.
by John | Dec 16, 2012 | Instructor Training, Latest News

I know that we have thousands of visitors from around the world who access the site using an iPhone or iPad. So if you don't own either device this will be of no interest.
On the other hand, if you do own an Apple device and use it to help navigate through life, this may be like an early Christmas present – it was for me!
Google Maps are back!
When I updated to OS6 last summer the little Google Maps icon was gone – replaced by Apple's new mapping application. No big deal, I thought… it's an Apple product, so I'm sure it's as good, if not better than what it replaced.
Boy was I wrong 🙁
If you search around you can find that the whole world thinks Apple's map sucks. I couldn't find anything with it. Type in simple search terms like “Chinese food” or “auto parts” would typically return “no results found”. Really?
I often needed to humble myself and ask if I could use Amy's Droid to look up an address, then hear about it for the rest of the day.
Just in time for Christmas I saw that Apple has finally approved the new Google Maps App! So I downloaded it, turned it on… and it didn't work.
Apple wasn't going to let me make the move easily. When I first clicked the little “where am I?” arrow at the bottom I got this error message saying I needed to turn on my Location Services.
But they are on you stupid phone – I use them all of the time.
I wouldn't have even considered creating this post until I spend 10 minutes trying to find how to turn on something that appeared to be on everywhere else. So I thought you might appreciate not having to fight through this yourself.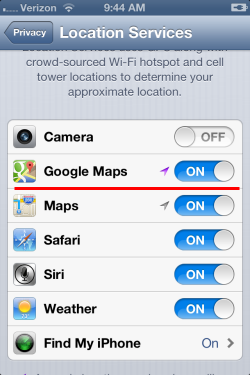
Each application has it's own toggle. Google Maps has one as well that you can find under:
Settings > Privacy > Location Services 🙂
(The old OS version had an easy to find toggle on the main setting screen)
It is of course free and after a short time playing with it, I really like it.
by John | Dec 15, 2012 | Correcting Form, Instructor Training
Comment from Myth #4 Indoor Cycles require a lot of Fore/Aft Saddle adjustment to accommodate the range of cyclists coming into your class.
Well… the difference between real bikes and an IC bikes is that real bikes come in many frame sizes/geometries. They don’t need much room for saddle fore/aft positioning because if you have the right size frame, you don’t need that much fore/aft movement to find the right fit.
I should have anticipated this response and addressed it in my original post.
Changes in saddle Fore/Aft on an Indoor Cycle replicate the similar movement you would experience on various sizes of a typical road bicycle.
Let me explain…
I found this frame sizing chart at ribblecycles.co.uk and it's typical of most any modern road bicycle frame design sold in stock sizes.

Areas in yellow don't change, regardless of frame size
Certain dimensions* at the rear of a bicycle do not change with frame size:
- Dimension [B] is Bottom Bracket Height = how far the horizontal center-line of the Bottom Bracket is off the ground.
- Chain Stay length [I] sets the distance the rear wheel axle is from the vertical center-line of the Bottom Bracket
Changes in frame sizes come primarily from:
- Seat Tube length [A] affects saddle / stand-over height and is the most common method of sizing bicycles
- Top Tube length [C] changes the reach to the handlebars.
So with the back of the bicycle essentially unchangeable, if you want to increase the frame size you're limited to; make it taller or longer… but only through increasing the length of the Top Tube.**
Notice that there's no dimension for Saddle Post position Fore/Aft. That's because it's controlled by the Seat Tube Angle [E] which is near universally @ ~ 73° plus/minus on Road Bikes.*** Lengthen the Seat Tube and Saddle Post naturally moves further behind the Bottom Bracket center-line.
Indoor Cycles use a similar Seat Tube Angle = similar results. Raising the saddle also moves it toward the rear ~ the same amount as you would experience with bicycle frames in various sizes.
————————————————————————
*Yes, of course you can find examples in the extreme (very tall or short) where this isn't the case. I'm trying to make the point that bicycle manufacturers (indoor and out) design their products to fit 90+% of the general public, and, with over 100 years of experience, do so very effectively.
** Which is what Keiser attempts to do on the M3's handlebars. They move farther away, as you raise them up.
*** Triathlon Bikes for example, use a steeper (more vertical) Seat Tube Angle.
by | Dec 14, 2012 | Music
At a 120 bpm this is one of those 5 min tracks that you can toss into a profile when you get stuck as it fits a variety of applications.
Will you use Off My Mind by Rogue Vogue for a recovery, climbing or flat?
If I'm using this in a climb this is one of those tracks where I like to let my riders go with what feels right for them, those who love being in the saddle can hook onto the beat and pound out the perfect cadence. While those who just love to dance on the pedals will feel right at home getting a booty break. And I love it's easy rhythm that makes Jump junkies happy as well
Now if I'm using it for a flat road I'm tempted to use it for some speed work having the riders do short little surges 15-30 second surges with a corresponding break at a slightly reduced cadence or maybe just doing a couple 60 second pushes it all depends on what sort of energy vibe I'm getting from folks.
For you
MixMeister addicts out there it's steady beat makes coming up with your own custom mixes a cinch.
Download your free track here.
Or get it on Spotify
Moon Boots — Off My Mind – Rogue Vogue Mix
Looking for a new sound? One of my professionally mixed class playlists maybe just what you need.
Podcast: Play in new window | Download