PRO member Kay asked a very good question about ANT+
… I’m also wondering about Heart Rate. If the bikes are ANT+, will they only pick up ANT+ Heart Rate Monitors? I noticed that the new Schwinn did not pick up my Polar HRM
Thank you for your comments!
Kay
The short answer is; No. Indoor Cycles with or without ANT+ consoles will detect and display most Heart Rate straps.
It all comes down to the type of HR strap you are using, but it can get confusing. I’ll try to explain.
First let’s identify the three players:
Analog (Low Frequency) HR Monitor straps
Digital/ANT+ (High Frequency) HR Monitor straps
Hybrid HR Straps that offer both High and Low Frequencies
Analog HR straps & monitors have been around for years. I guess you could say they are the generic version and any inexpensive HR monitor is Analog. For many people they work just fine but they have two problems:
They will “Cross Talk” with other monitors as they are indiscriminate in which signal they will choose to display.
Battery life of the strap can be relatively short (measured in months of use) due to the amount of power they consume broadcasting their low frequency (5000Hz) signal. It takes comparably more energy to generate low frequencies vs. high frequencies – think how much work a Tuba Player expends vs. the Piccolo Player in a marching band and I’m not referring to the weight of the instrument.
To solve these two problems HR manufactures introduced Digital HR straps and monitors using a very high frequency 2.4gHz or 2,400,000,000Hz which is what is referred to as ANT+ or some like Polar describe it as “Coded”.
ANT+ receivers will lock onto the source – commonly known as “Pairing”, they will reject other competing signals once they have been successfully paired.
Battery life is measured in years – Garmin says their strap’s battery will last over 5 years, operating one hour a day.
ANT+ has another ability that Analog doesn’t, the ability to transmit and receive multiple data sets over multiple channels. Where your Analog monitor can only understand; Beat…Beat…Beat, ANT+ can transmit an incredible amount of information that’s really limited to the engineer’s imagination. I’ll bet that that CycleOps PowerCal Power Meter that uses only heart rate data from the users chest strap to estimate Power Output is transmitting a lot more than just Beat…Beat…Beat
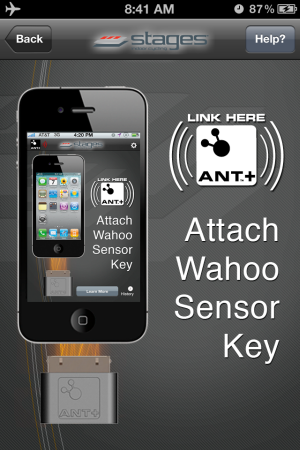
The Spinning Fitness Tracker uses a Garmin ANT+ strap and ANT+ iPhone Dongle
So ANT+ looks like the perfect solution, except for one little problem… every piece of fitness equipment on the planet is designed to receive and display Analog signals. But this is changing and Garmin as an article here that lists the change with more and more pieces of equipment adding ANT+ technology.
Enter Hybrid HR straps that transmit in both the high ANT+ and Low Analog frequencies. This give the user the option to display their HR on a club’s treadmill, while at the same time only pairing with a compatible ANT+ device.
So back to your question about not being able to see your HR on the Schwinn AC, Kay. Either the Schwinn AC MPower Console or FreeMotion’s should display your HR, regardless of what strap you were wearing. I have a Hybrid Polar strap which works just fine on the Schwinn, but not an exclusively ANT+ strap – so I don’t have first hand experience.
I’ve asked the question to both companies and will update this post when I know more.
UPDATE: Schwinn Master Instructor Julz Arney got back to me with:
Yes, the wireless technology used by the MPower console is ANT+ (owned by Garmin.) Any HR strap using ANT+ should connect. There are a few hints to make it easier:
-Have HR strap on and functioning before turning on console
-Be on the bike saddle (i.e. in close range of the console)
The console looks for a HR signal for approximately 30 seconds from when it’s turned on. If it doesn’t find a signal it will stop looking. The rider will then need to turn off the console and turn it back on.)
I hope this helps!
Both the Schwinn AC and FreeMotion have a limited time for the rider to pair to the console. The S1.9 will only connect during when the console shows Warm Up.
When I’m asked to review a product or service that includes new technology, I’m always a bit hesitant. You see I like simple and I tend to see many new products trying to solve a problem that really doesn’t need to be solved or will add another (needless) layer of complexity/frustration/distraction to the lives of Instructors and/or their students.
Power indication in our classes is a perfect example. Seeing our watts is a huge step for many of us and equally so for our students. We see the value of all this information (metrics) about the amount of work we’re doing in class. Many of us are excited to use that data as the basis for improving our fitness.
But what do we do with all this new information?
Collecting your data is a good place to begin. Both the FreeMotion and Schwinn Power Meter consoles offer the option to plug in a USB flash drive. After your training session you can download the ride to your computer to see what you’ve done. Which is interesting, about two times. Then you realize that looking at a snapshot of a single day isn’t really telling you anything of value. If you’re an Excel expert you can build a fancy spreadsheet to show graphs where you can see trends. Or you can subscribe to an online service like Training Peaks ($20 a month if you want the graphing features), upload your results and track your fitness. I see online services as an excellent choice for a committed athlete, but a bit over-the-top for the Club Athletes that make up the majority of our classes.
When Cameron Chinatti from Stages Indoor Cycling explained their new iPhone App, which is designed for use with the FreeMotion console, I saw it as a potentially useful tool that could benefit both you and your students.
So I agreed to give it a try to see if it was in fact useful and not needlessly complex or distracting.
I have a “Is it intuitive and easy to use?” test, which is simply; “do you turn it on and it works… Yes or No?
The App passed – and as long as I followed the proper procedure, every time I turned it on it worked.
The console is designed to “Pair” fancy word for connecting to both a Heart Rate strap and/or your iPhone during “Warm Up” mode. Once you advance to Stage 1 Pairing is no longer available. With the Stages App turned on, pedaling the bike and the console in Warm Up you will see:
Pressing the Stage button brings you to the main screen.
My second test is; “what value does this product provide, beyond some fancy graphics?”
Something we all need to know.
The Stages App will calculate your FTP (Functional Threshold Power) and your Heart Rate at FTP over a series of rides. Understanding your FTP is as important as knowing your Threshold Heart Rate. With both these metabolic markers you can create specific training zones. Once your student’s know their Power Zones your class will be a whole lot easier to teach for you and more understandable (and beneficial) for them 🙂
Here’s the setup screen where you can select to App to calculate your FTP or you can manually add it if known.
Auto-Calculate FTP is HUGE
I talked to Cameron about the auto-calculate feature because after three rides it was showing my FTP as 186 Watts vs. ~240 watts which I’m normally seeing during a long hard effort. Her response was; “how hard did you ride during those classes?” I admitted that I hadn’t worked as hard as I could have. Cameron explained that App is looking for your best 20 minute average wattage and if I don’t provide a hard/long effort the App doesn’t have the necessary data to work from. It didn’t have any trouble calculating my FTHR 🙂
There’s much more to this App and I am planning a Podcast with Cameron to explore all it’s functionality in more detail. For more now please check out this Quick Start video and if you are teaching or training on a FreeMotion S11 series Indoor Cycle I highly recommend that you start using this App – ASAP. Order your Freemotion S11.0 Indoor Cycle – with Power Sensor Console
You don’t find opportunities to ride and learn from the experts everyday, let alone for FREE!
Join Stages Indoor Cycling, Director of Education, Cameron Chinatti and Master Educator, Dennis Mellon and learn…
Best Power Practices
Video Rides to remember
Stages Special Edition of Performance IQ
Power zone training
and more!
Here are the descriptions and form links to register for each:
–
8:30-10:00 – Oh no! Not the Power Police – Led by Cameron Chinatti: It’s official: consoles and power measurement for indoor cycling are here to stay. But with every new piece of equipment comes ‘creative’ misuses and abuses. Avoid getting caught by never committing a crime in the first place! You’ll learn the most common crimes against consoles, then get ready to ride as we explore our top-ten best power practices. These Simple Setsâ„¢ will give you hours of new ride content and provide priceless aha! moments for your participants. Join Stages® Indoor Cycling to see how easy it is to use today’s data to achieve tomorrow’s goals.
11:00-12:00 -Head Up to Get Down! – Led by Cameron + Dennis Do you want to know that you’re doing exactly the right amount of effort? Join Stages® Indoor Cycling for a ride with our Special Edition version of Performance IQ Heads Up Display, better known as Stages IQ. A quick 3-minute assessment is all you need to determine your Power Rx – the most important piece of ride data you’ll ever need! For the first time ever your entire class is doing exactly what they need to get better and see the results they’ve always wanted.
1:30-2:30 -Show Me – Led by Dennis Mellon:If a picture is worth a thousand words, then a video is worth a million! Since the inception of indoor cycling, instructors have been talking and talking in an attempt to set the scene for their riders’ indoor journey. Let’s stop talking and start showing! What is the speed of a sprint finish or the increased pulse of an epic ski run? Let’s dance to the beat of your favorite artist and experience the POWER of your favorite band playing a live concert. Through the use of video and the new Stages SC3 Eco Screen there is no course that cannot be ridden and no metric that cannot be evaluated to take your riders on the most epic fitness journey ever!
3:30-5:00 – Oh No! Not the Power Police + SIQ – Led By Cameron Chinatti:It’s official: consoles and power measurement for indoor cycling are here to stay. But with every new piece of equipment comes ‘creative’ misuses and abuses. Avoid getting caught by never committing a crime in the first place! You’ll learn the most common crimes against consoles, then get ready to ride as we explore our top-ten best power practices. These Simple Setsâ„¢ will give you hours of new ride content and provide priceless aha! moments for your participants. Join Stages® Indoor Cycling to see how easy it is to use today’s data to achieve tomorrow’s goals.
Last week I wrote about how my simplest sets and profiles are most often my most popular. I have also found that if I simply progress profiles from week to week, usually in 3 week blocks, my classes enjoy the familiarity of the workout and see progressive improvement.
To add progression to a block of workouts all you need to do is add time to each interval or reduce recovery or increase intensity to each interval set. This allows the body to adapt from workout to workout. Check out this article from Training Peaks about progression, How to Build Workouts.
I inevitably get the response from instructors that their riders like every class to be different or they’ll get bored. My response is, “Even class IS different!” I use different playlists and videos from week to week, I may keep similar yet progressive profiles but I’ll change around how each set is ridden, for example, seated vs standing or fast rpm vs slower rpm. This makes each week “feel” completely different but is similar enough that the body can adapt from week to week and a progressive training effect can occur.
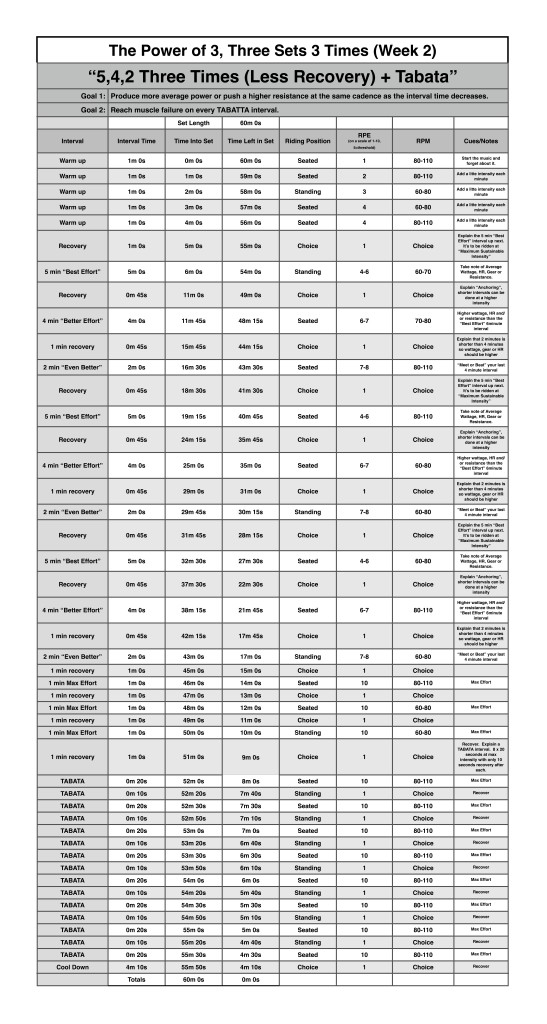
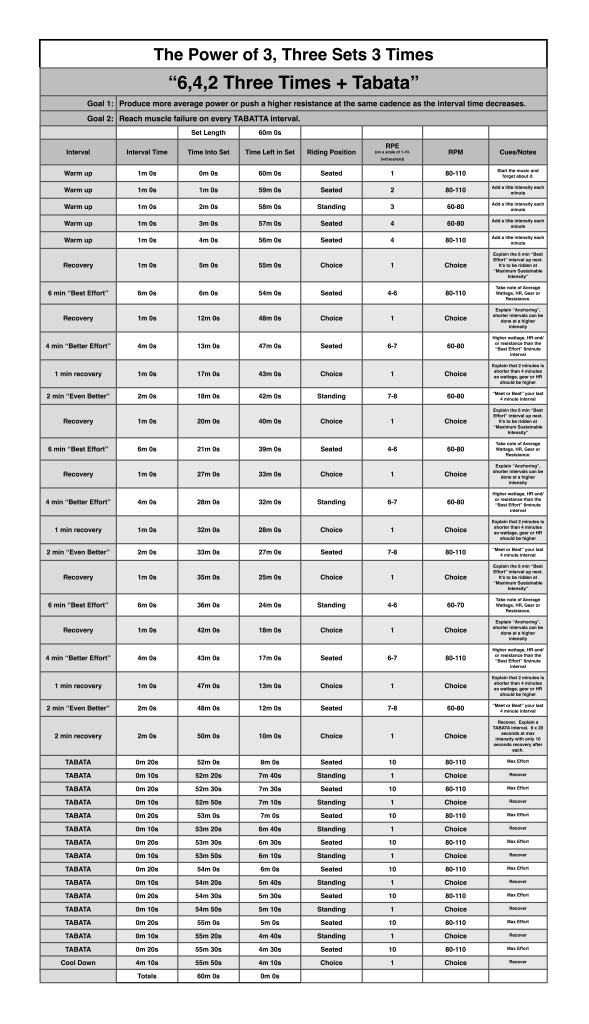
If you used my profile from last week with your class, progress with this new one below and let me know how it goes.
[wlm_private ‘PRO-Platinum|PRO-Monthly|PRO-Gratis|PRO-Seasonal|Platinum-trial|Monthly-trial|PRO-Military|30-Days-of-PRO|90 Day PRO|Stages-Instructor|Schwinn-Instructor|Instructor-Bonus|28 Day Challenge’]
The more I teach the more I find that the simplest profiles are the most popular. I often put together simple profiles and I’m always worried that my participants are going to be bored, but the longer the intervals and the more I repeat each set the more they love it. This gives participants more and more opportunities to understand the set and perfect how they perform it. When you combine a simple set with the science of anchoring time and effort, the shorter the interval the higher the output or the longer the interval the lower the output, it makes for a challenging and very personalized workout. I have also found the if I’m not taking the class on a “journey”, but just doing an interval based class my playlist only needs to be a mix of high energy songs, there is no need to try to match riding position or RPM with the music, just rock it!
This week I’m sharing with you a profile I used this week in most of my classes. It starts with a 5 minute warmup where I increased the intensity, wattage or HR ever minute. After a minute of recovery we did a 6 minute interval where we rode seated with a RPM of 80-110. If we were riding on bikes with wattage we remembered our average wattage at the end of the interval. If wattage wasn’t available but participants had HR monitors I had them take note of either their average HR for the interval. If average HR wasn’t available I asked them to take their best guess at their average HR. If the only option was perceived exertion I had riders remember the gear or resistance they were were working with and the feelings in their body like their breathing and burning sensation in their legs. After a minute recovery we rode for 4 minutes but this time we rode with an RPM of 60-80 and at a higher wattage, gear, HR and/or perceived exertion. After a 1 minute recovery we rode for 2 minutes while standing at an rpm of 60-80 and an even higher wattage, gear, HR and/or perceived exertion. After a 1 minute recovery we repeated the 6,4,2 minute set again, taking a 1 minute recovery after each interval, but this time we rode the 6 minute interval in a seated position with a RPM of 60-80, the 4 minute interval standing at 60-80rpm and for the 2 minute interval we sat between 80-110prm. After another 1 minute recovery we we rode for 6,4,2 minute interval for a final time. This time the 6 minute interval was ridden in a standing position at 60-80rpm, the 4 minute interval was ridden seated between 80-110prm and the 2 minute interval was ridden seated between 60-80rpm, taking 1 minute off between each interval and trying to increase the wattage, gear, HR and/or perceived exertion with each interval.
Finally I finished with a tabata interval of 8 X 20 seconds at max effort and 10 seconds recovery. If done properly output, wattage, gear and/or rpm will drop throughout the interval. I tell my class the output will drop but effort should not.
New Power of 3 Mix, Right Click > Save As / Save Target As to download on PC or Download Linked File As on Mac. Open in iTunes and then you’ll see this in your Spotify Local File folder.