by Gino | Oct 23, 2019 | Keiser Cycling, Training With Power
 –
–
My original objective of the Power blog here in ICI/PRO was to build the case for power precept upon precept, slowly but surely. Good idea, except for folks who already find themselves teaching on power bikes and are anxious to get to the meat & potatoes. So, as the line in Monty Python’s Holy Grail said (whilst preparing to throw the Holy Hand Grenade) “Skip ahead brother…”
The most fundamental principal in power training is that you can sustain higher power output for shorter periods. This is common sense of course, but when trying to train or “hone in” on power levels you will use for different types of riding outside, one needs to identify these time periods, and develop power based on the length of those efforts.
For example, outside of the long mountain passes in Colorado, or Europe, your standard “hill climb” will often be only 3 to 5 minutes. This is also met with generally a steeper grade than those more gradual, longer climbs, and thus there is a measure of power required to climb those that is significantly higher, and requires different training.
In addition, if you race (or simply want to just impress your friends at every opportunity), you may want to develop significant sprinting or break away skills. To do that, you will want power that is even higher than climbing power, but may only be needed for as little as 60 seconds. This may seem quite short, but it is often all that is needed to achieve a real break away, or triumph in a race ending sprint.
Consequently, we have built the Cycling Fusion Power Training system on 3 zones of power; Sustainable Power (7 to 20 minute efforts), Climbing Power (3 to 6 minute efforts) and Explosive Power (1 to 2 minute efforts). These ranges are quite large, and there are 7 power levels within each zone. Rather than bore you with all the details, let’s just jump in and conduct a class that provides a sample of each of these zones.
The class design below is based on the Keiser M3 bike, since it is what we use at my club (Global Ride Training Center) in Pittsburgh. Since we also speak specifically to how we can reset our power numbers, I’ve written this class specifically to this model, and thus I call the class: The Keiser Tour De Power. For those that do not have a Keiser M3, but do have power, simply replace the portion of this workout that speaks to resetting the bike to get your average power numbers for one of the zones, and it will work just as well on any other bike.
Download the PROfile here.
Please post any comments or questions here, and I’ll do my best to answer them all.
Originally posted 2010-02-10 05:22:00.
by Gino | Oct 15, 2019 | Training With Power

Sixteen weeks, countless hours on the bike, more Yoga & Pilates than I thought I’d ever see, and all the 40+ VO2 tests later, the results are finally in. The Winter Training program based on Cycling Fusion Training principles, at Global Ride has produced results that have exceeded even the most ambitious expectations set. These results were not relegated to just the first season participants either. From our newbies to our experienced racers, the numbers prove beyond a shadow of a doubt that This Stuff Really Works!
(more…)
Originally posted 2010-05-23 06:09:43.
by John | Oct 3, 2019 | Instructor Tips and Tricks, Instructor Training, Training With Power

How steep is a 4% grade? 8%? Over 10%?
How do I effectively explain % of grade to my class?
What are the feelings I would experience climbing different % grades on a bicycle?
And finally, how do I effectively communicate that feeling to my class?
Every July we hear commentators Phil Liggett, Paul Sherwin and Bob Roll discuss how the Tour de France is won or lost in the mountains. Just winning one of the popular climbs; Alpe d'Huez, Mont Ventoux, Col du Tourmalet or others can be the highlight of any cyclists career. But when Liggett explains that Alpe d'Huez has an average grade of 8% what exactly does that mean? Based on context, we can assume that this is a very difficult climb… but how difficult? What does it feel like to ride with the professional Peloton as everyone powers up a long climb at 8% grade?
So with the Tour only a month away and many Instructors and students riding outdoors, I felt you might benefit from some cliff notes on Grade and Slope. If you are reading this outside of North America, the concepts that I'm going to present are the same, but how they are noted on street signs varies from country to country.
Simply put, % Grade is gain in elevation (what's called the Rise), over a horizontal distance (the Run) – “typically” 100 feet or meters. The actual distance traveled is the Slope length which is slightly longer than the Run – it's that A²+B²=C² Pythagorean theorem thing you grew to love in highschool 🙂
So…
A 5% grade = a 5′ increase in elevation in 100′ of horizontal travel.

Image from Wikipedia
So you don't confuse the engineer's in your class, be careful not to mix up % of grade and the degrees of angle. They're completely different and roads aren't measured in °. If you feel it would be helpful to your students, you may want to comment that a road at 45° (as if that would be possible) would have a 100% grade, i.e. 100′ forward @ 100′ up.
Wikipedia has an informative page on Grade / Slope if you'd like to learn more.
Alpe d'Huez has an average grade of 8.1% over a run of about 13 km. Click to see the profile. That sounds impressive but it really tells you nothing if you don't understand what it feels like to ride a bicycle up an 8.1% grade. Actually 8.1% is the average. The first kilometer and a half are at over 10%.
If you want to clearly communicate the pain of climbing a 8.1% my suggestion is to find a steep hill, ride up it and experience what it feels like.
So now you may be thinking; “great idea John… but I don't recall seeing the grades marked any of the roads in my neighborhood.” My response would be; go out, find one and measure it.
I made the video below for a different project where I recommend that cycling studios measure and mark the road as a helpful guide to outdoor cyclists. In the video I describe the simple process of measuring the grade of one of the local climbs in your town.
If that went by to quickly, you divide the number of vertical inches by 120 (10′) which gives you the % grade.
How I communicate % grade in my classes.
Discussions of % grade typically come up when I'm teaching a virtual ride using an Epic Planet DVD or Global Ride's Dirty Dozen DVD, the grade of each climb is listed in the information bar at the bottom of the screen and I'll use it to help explain the intensity of each effort. I start by explaining that, although it doesn't sound like much, 4% is a serious climb that will have most of us at Threshold HR or Power FTP if it's of any length. I go on to explain that (at least where I live) most roads or highways rarely exceed 4%.
I'll reference local roads, that I understand the % grade, to my class – my apologies to those of you in flat lands of Iowa or Florida, you're on your own. Some of these roads, on established cycling routes, have steeper grades that I have measured. I'll talk about them by name; “Fox Road Turn” 8%, “Carver Wall” 12% and “Eden Prairie Road” 13.5% as a way to appeal to my cyclists who have experienced these climbs for real.
Other examples:
- 5% has you in your small chain ring (the sprocket in the front) and you need to manage (limit) your effort so as not to blow up!
- 8% and you're wishing you had a smaller gear and it's everything you can do to ride in a straight line. It's also everything you can do keep your pedal stroke smooth. Time here is short with your HR way over VT2 – Threshold.
- 10% is the limit of most recreational cyclists, if the climb is longer than a block or two. Smallest gear, out of the saddle and HR is as close to maximum as you can tolerate.
- 15% or more and you get off and walk 🙁
Once you've measured and ridden a climb with known grade, my guess is you're going to have a new appreciation for how truly difficult those famous climbs in the Tour de France really are and a new respect for the professional cyclists who climb them.
You can find the profiles of every climb, in every major Tour, along with 33,773 others at http://www.climbbybike.com/
Do you have any tough climbs near you?
Originally posted 2012-06-06 11:45:22.
by John | Sep 19, 2019 | Master Instructor Blog, Training With Power

Every year it's the same. We all have high aspirations that the weather will be nice enough to ride what's called the Minnesota Ironman Bicycle Ride. Not a true Ironman (no swimming or running thank God), this Ironman is the first large, organised/supported ride of the season. It gets its name from the notoriously crappy weather we normally have here in Minnesota the last Sunday in April and the foolish people who enjoy riding in it.
Twenty years ago freezing temps and a little rain wouldn't have stopped me from attending. Not having anything more to prove, I'm one of the first to politely decline any invitations – unless the forecast calls for a reasonably decent day. Rain is a non-starter, which was exactly what we experienced this morning. Add to that 37° F + 22 mph cross winds and a bunch of us found ourselves inside the warm and dry studio at Life Time Fitness 🙂
I like to ride with my class during long endurance rides. As this wasn't a regularly scheduled class, I have the freedom to sit in and enjoy the class with my friends and get the same workout as everyone else.
But I'm still “The Instructor” and everyone still expects a proper class. I start with an intro about how, as endurance athletes, we're all pretty self directed – so I'm going to be giving everyone a minimum amount of cuing and they will do the work they need to do.
My classes always include power and the first 15 minutes typically follow the same general format.
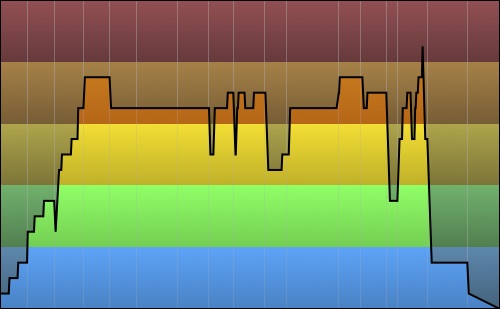
Warm Up — 10 minutes. 5 minutes of gradual increases in wattage. During the second 5 mins. we’re finding the wattage where everyone is first noticing a change in breathing; VT1 / Aerobic Threshold = the top of the Recover Zone. This establishes a rough understanding of a Base Level Wattage that we use throughout the rest of class.
3 x 30 sec. Hard / 30 sec. Easy – Openers to AT/LT. I cue these by first having everyone find the amount of load @ 70 RPM that has them feeling they should (not just could) come out of the saddle. The 30 sec. Hard is then simply accelerating to 90+ RPM which results in some pretty impressive power numbers. The 30 sec. Easy is back to 70 RPM — many will stand during the Easy portion.
1-3 minutes rest – I encourage riders to focus on their recovery. Once they feel calm in their breathing, bring back the Base Level Wattage.
3-5 min. Hard Effort — Here’s a “Best Effort” to establish a benchmark PTP Personal Threshold Power (top of the Perform Zone) or ride at 110% of FTP if known. It’s very helpful to riders to have that understanding of their personal upper wattage number. The “Best Effort” Threshold # + the Base Threshold # we found earlier form the three Power working zones I use in class. This “Best Effort also helps everyone understand where they are today… on this bike. Despite the efforts of our maintenance people, there are differences in the displayed wattage between bikes. My power meter was indicating that superman must have been riding it because I was seeing 320 watts, when I normally push ~240 watts at threshold.
With an Epic Planet DVD providing the entertainment, and me perched front & center between two regulars, we were off to virtually ride this year's Ironman indoors.
My cuing was very simple; depending on the song, we would ride at Base Level Wattage, Best Effort or something in between. Two hours is a long time to keep anyone's attention – so don't feel you need to. They're self-directed after all. Stand when you feel you need to and then give them a hard push at the end. You needn't make it any more difficult than that.
Here's my playlist.
Originally posted 2014-04-27 17:00:56.
by Joey Stabile | Sep 11, 2019 | Audio PROfiles, Best Practices, Class Work-Sets, Creativity Indoor Classes, Instructor Training, KEEPING IT FUN, Master Instructor Blog, PRO/Playlists, Training With Power
Welcome to the The Weekly Ride by Cycling Fusion
Welcome to our new era of The Weekly Ride, you get:
- Full Ride PDF
- Apple Music Playlist
- Spotify Playlist
- File to Download the Ride directly into My Fitness DJ (Yes, no Programming)
- The Ride will be available for purchase in the iClass Builder Store (No Programming)
- A Podcast of the ride being delivered by a master instructor.
(more…)
Originally posted 2018-12-18 21:31:33.
by John | Sep 2, 2019 | Class Work-Sets, Instructor Training, Training With Power
Week #2 of my Performance Cycle class and I introduced the concept of using your stage average watts as a “riding buddy” today + had a nice email when I got home.
Hi John-
Thank you so much for the great class this morning. I took a picture of my results when I was finished. My avg watts was 148, not 212. I have no clue where I got that number. 😉
I also took your advice and upgraded my membership, so if it's ok with you, I would like to take advantage of the class next Sunday as well. Do I need to come early to be tested or will this take place during your class?
My goal is to get strong and gain endurance. I have an Ironman in 2014 that I would love to CRUSH! 😉
Thanks again for the great morning!!
Tina (Smiley, Orange Shoes girl)
This gal is an animal – the 212 watts she refers to was her average for both of the 10 climbs we did, with only a minute of recovery in between them. Here's the picture she took.

Those are awesome #s for anyone.
Now to the Riding Buddy
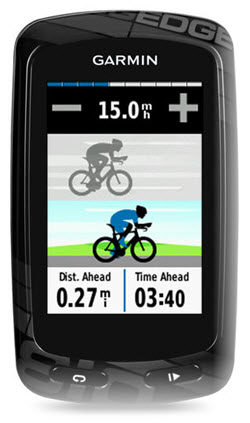
Pictured on the right is a Garmin 810 cycling computer. Beyond measuring and displaying all the typical stuff; RPM, MPH, Distance, Time elapse, etc… these computers allow you to race against a Virtual Partner, which is yourself previously riding over a known course. Racing against yourself is a fascinating concept which allows you to compare today vs last week or last year. Are you getting stronger/faster/fitter? Yes? No?
http://youtu.be/o8YhrAAvh7w
After all, it's just you, who you're really racing against.
I use the stage average timer in class as a sort of Riding Buddy, comparing a specific intervals against earlier efforts. Asking; are you keeping up? Yes? No?
Today's class followed Spinervals Competition 41.0 — Ascending Mountains in Leadville, CO
Class length 75 minutes + Cool Down
Spotify Playlist 12-29 Performance Cycle class
Warm Up — 10 minutes. 5 minutes of gradual increases in wattage. During the second 5 mins. we’re finding the wattage where everyone is first noticing a change in breathing; VT1 / Aerobic Threshold = the top of the Recover Zone shown above. This establishes a rough understanding of a base wattage that we use throughout the rest of class.
3 x 30 sec. Hard / 30 sec. Easy – Openers to AT/LT. I cue these by first having everyone find the amount of load @ 70 RPM that has them feeling they should (not just could) come out of the saddle. The 30 sec. Hard is then simply accelerating to 90+ RPM which results in some pretty impressive power numbers. The 30 sec. Easy is back to 70 RPM — many will stand during the Easy portion.
3 minutes rest – I encourage riders to focus on their recovery. Once they feel calm in their breathing, bring back the Base level work wattage.
5 min. Short Hill — Here's were we do our 5 min. “Best Effort” to establish a benchmark PTP Personal Threshold Power (top of the Perform Zone) or ride at 110% of FTP if known. It’s very helpful to riders to have that understanding of their personal upper wattage number. The “Best Effort” Threshold # + the Base Threshold # we found earlier form the three Power working zones I use in class.
– 1 min. build at preferred cadence (suggested as 85-95 rpm) — press the Stage Button to reset the averages.
– 5 min. “Best Effort” This should hurt, but be do-able. I ask everyone to observe their average at the end and then…
2 minutes rest
3 x 5 min. Medium Hill @ 1 min Rest – Now that everyone knows how hard they can go for 5 minutes, we worked at ~90% of PTP on each of the three, five minute climbs. The recoveries and transitions back to climbing are simplified by leaving resistance where it is and do what I call Walking. Have everyone stand and pedal slowly “walk” for a minute. Load should be too high for seated soft-pedaling. Then accelerating up to preferred cadence brings everyone back to ~90% of PTP.
3 minutes rest
2 x 10 min. Long Hill @ 2.5 min. Rest – the songs I used were a little short so I had everyone up to RPM/Watts before starting the songs and hitting the Stage button to establish averages. I prefaced the first climb with; “As Endurance Athletes, you recognize that you get stronger as the class goes on.” Here's where I got a few smiles and hoots… “so my expectation is that you can all climb this at your PTP (5 min. Best Effort wattage)” and we did 🙂 The Spinervals profile calls for near constant changes in gears and cadence, which is easy to do on a bicycle… not so easy on an Indoor Cycle. So instead we made 3-4 changes in load/RPM + alternated in & out of the saddle.
Here's where I was cuing everyone to focus on their Riding Buddy. No matter the change, it is imperative that you keep your instantaneous watts at or above the average, so you keep up with your Riding Buddy.
5 minutes at Base wattage @ 90RPM – which becomes a recovery > step down in intensity while we stay aerobic.
Cool Down
I'm very excited to be able to teach these Performance Cycle classes – they fit me and my personality perfectly and we have an excellent group of athletes to ride with.
Next Sunday 1/5 is the official kickoff of the winter training program > FTP assessment day. Feel free to contact me if you'd like to ride with us.
Originally posted 2013-12-29 16:27:31.