Indoor Triathlons are very popular here in the frozen north, offering club triathletes the chance to swim bike and run long before its warm enough to be outside.
In the past, the Life Time club where I teach used Spinner NXTs with a Spinning computer for the bike leg. Participants would run up from the pool, jump on a bike and pedal as fast as they can until the reached the prescribed distance. The clever one's figured out that the amount of resistance they used had no effect on how quickly the computer added mileage, so you had a bunch of flailing legs @ 130 RPM with no resistance = not really doing any real work 🙁
But not this year…
With all of our NXTs being replaced with Indoor Cycles with power, the participants in the Indoor Tri actually needed to “TRY” and ended up really working for their mileage this year!
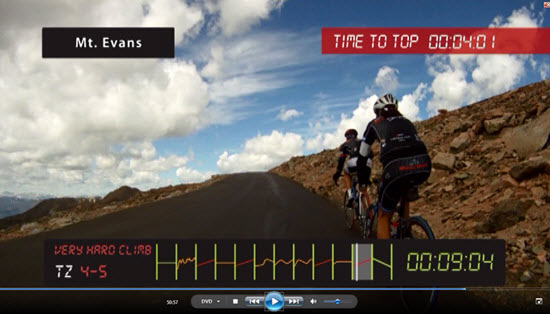
I took this picture while I was riding a FreeMotion S11.0 at 115 RPM, but with no resistance. You can see in the display that even though I was pedaling very fast, I wasn't producing any power because I had zero resistance. No power = no speed and more importantly, no distance is recorded.
I talked with a couple of finishers about their experience, especially what the bike leg was like, compared to last year.
“It was a lot harder.”
“More like riding outdoors.”
“I completely over did it trying to keep up with the guy next to me. My legs were junk by the time I started the run.”
Screenshot of the Big Finish from Tour Of The West – heading into & above the clouds .
With the weather starting to break here in the frozen north, today [Sunday] is my last scheduled Performance class for the season. To celebrate our (hopeful) return to riding outdoors, I thought it would be fun to ride along with this new Indoor Cycling DVD from Epic Planet – Tour of The West.
This 60/45 minute video is a compilation of five minute long segments, from past titles, that includes various terrains. This should make for an excellent interval class, with lots of climbing, intermixed with plenty of fast flats.
I'll be coaching my riders to be working, as usual; Below/@/Above the PTP we'll discover during the first climb – segment #3 Mt Lemmon Climb. Alternately, you could easily coach this as an Interval set Below/@/Above Threshold Heart Rate, if you don't have power.
You might need some remote control for this
My preference is to ride along with the class, facing the screens, whenever I'm teaching to video. That way a can comment on what they're seeing + easily view the countdown timer. You'll need to have control of either your music… or the video, to pull this off professionally. With the of the video segments being exactly 5 minutes long, you'll want to change songs with the video. My playlist below is comprised of ~5:00 min songs (not exact), so you'll want to skip ahead a few times to keep the music and video in sync. Now if you've got a really long cord for your iPhone you're set. If not, my solution is to use an inexpensive Bluetooth receiver. You can learn more about using these simple devices here & here.
Tour of The West Class Profile
[wlm_private ‘PRO-Platinum|PRO-Monthly|PRO-Gratis|PRO-Seasonal|Platinum-trial|Monthly-trial|PRO-Military|30-Days-of-PRO|90 Day PRO|Stages-Instructor|Schwinn-Instructor|Instructor-Bonus|28 Day Challenge']
Featuring Epic Planet Video [ Title ] – the segments shown in Red are skipped if you select the 45 minute play option. My preference for a 45 min class, is to use the 60 min version and forward past #s 8 – 9 & 10. The first four segments conform better to my class format. You can obviously skip any three segments you choose, or if you're feeling devilish, repeat #5 [Beartooth Pass] to create a 10 minute threshold effort 🙂 Just make sure you have the video remote handy.
#1 [Wine Country] – Warm up > Let's get this class started! I take everyone through very purposeful series of intensity increases. The track Eireann is ~ 95RPM. Your objective to begin to feel warm and your effort should have you noticing that early change in breathing that signifies crossing over VT1 (Aerobic Threshold)
#2 [Saguaro East] – Openers > Repeated hard efforts, with the last one reaching Threshold. We slow the pedals to ~ 64 RPM to match the track Daybreak and I have everyone add load until they sense they need to stand > which we do. There's a nice build of intensity in the music that really hits at 1:00 where we accelerate to as fast as possible and hold for 30 seconds. I have my participants “walk”, with very slow cadence, during the recoveries. Follow the changes that you hear for around 30 secs on/off. Pay attention to the time on the countdown timer. I'll have everyone really push for the final minute. This should have everyone breathless (or close) so we get that first, painful trip to threshold out of the way.
#3 [Mt. Lemmon] – Four Minute “Best Effort” > I love these and my classes tell me they enjoy them as well = I include them on every ride I do, regardless if I have power meters or not. Use the first minute as an easy spin and to describe the effort to follow. If your power bikes have a stage timer, I encourage you to use it to time and record the maximum amount to work everyone can do during the last four minutes of the climb.
#4 [Monument Valley] – Establish “Base” Watts/Effort > I'll tell my class: On a group ride, you often don't get the chance to fully recover after a long climb. You have to keep up so you're not dropped, so you take whatever recovery you can grab. This often means you need to recover, while you continue to work, abet at a lower effort level.
Now that we're warm and aerobic, we'll use this fast flat (Call me the Breeze) @ 100RPM to establish the wattage or RPE, that has us early into Zone 3 – just above the transition in your breathing. I like to describe this as “above chatty”… and it is. VT1 is where your class begins to shut up and ride, because their need for O2 has them losing interest in talking with their neighbor.
NOTE: from here on we're limiting recoveries to no lower than “Base” Watts/Effort (HRs above Zone 2 / VT1) Your riders can recover there > it just takes awhile longer. This is a great opportunity to train out that need to; WORK – FULLY RECOVER. You never get that chance in the real world, why would you include it in your classes?
#5 [Beartooth Pass] – Five Minute “Performance Climb” > Between your “Base” and “Best Effort” is an intensity where you can perform for a long period of time. I make this time “self directed” by simply telling them; you've got a 5 minute climb somewhere between your base and best effort. You decide if you want to lead at the front… or struggle along at the rear.
Next you enter a series of rollers and short, steep climbs
#6 [San Diego] – Watch and ride these rollers. This segment includes a steep, 45 sec all out effort to keep up.
#7 [Mt. Baldy] – More rollers that have you powering your way over a 1:29 min and 1:50 climb
#8 [San Diego] – Hits with a sharp climb right at the start. Plenty of fast downhill action to stretch everyones legs.
#9 [Aspen] – 5 minute climb > back to a performance climb here. The rider's in this video don't appear to be working very hard = we just need to sustain the effort to keep with them. You're saving energy so you can beat everyone to the top of Mt Evans.
#10 [Sedona] – Begins with a gentle climb that flattens out to a nice fast flat were everyone should quickly find and maintain their Base Watts.
#11 [Mt. Evans] – BIG FINISH! > here's where everyone can demonstrate their physical endurance. THE RACE ISN'T WON AT THE BEGINNING… YOU NEED TO CRUSH THEM AT THE TOP! Here I'm asking for an effort above their 4 min “Best Effort”, for the complete 5 minutes. I don't care how they do it, I just want an average Watts / above Threshold HR for the total time. Get after it!
#12 [Wine Country] – Cool down and recovery
Here's the full playlist
Let me know how this worked for you. [/wlm_private]
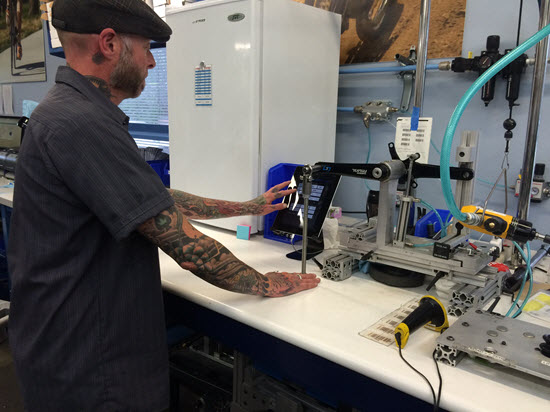
I had the privilege of visiting the Stages Cycling HQ and factory in Boulder Colorado with my buddy Randy Erwin. Director of Indoor Cycling education Cameron Chinatti, along with Stages vice president Pat Warner, were our tour guides. We spent a fascinating couple of hours learning exactly what goes into building the Stages single side crank arm power meter used on the new Stages SC3 Indoor Cycle and available for most road/mountain bicycles.
You know these people are cyclists the moment you walk into the place. Everywhere you look there are bicycles; tucked into every corner, hanging from the ceiling, along every wall – heck, their conference room has probably the coolest table I've ever seen. Instead of legs, the table top is supported by a pair of 70's vintage Schwinn Sting-Ray bicycles.
Cameron explained the hiring process, “you pretty much have to be a passionate cyclist to even be considered… many of these guys have been riding buddies for years.” And I'll add that these “cyclists” are also some of the most brilliant people I've ever met 🙂
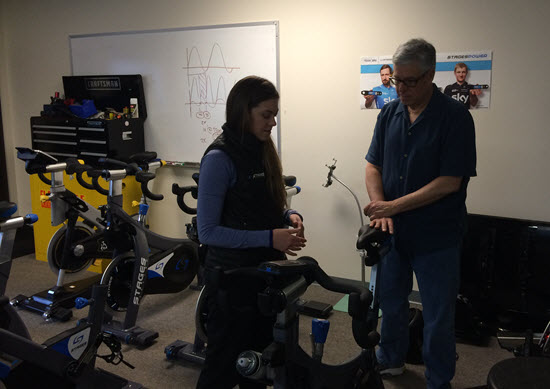
Cameron explaining all the cool features of the Stages SC3 to cyclist Randy Erwin
Cameron met Randy and me and our tour started in their official “training room” except it won't be for long. Stages is growing so fast that half of this room has been taken over by manufacturing stations. My friend Randy was very interested in the new SC3 because the Westminster, CO Life Time Fitness (where he's a member) will be the very first location to get these new cycles. Now if we could get Dennis Mellon in there as an instructor…
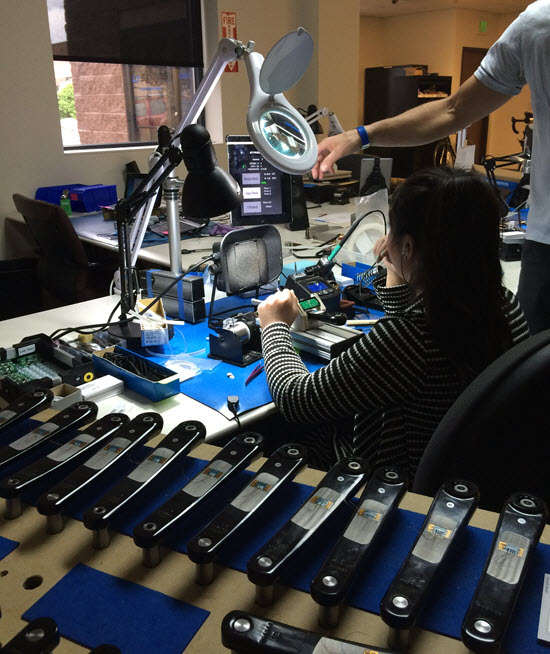
New power meters being installed and tested – this is super technical stuff.
Early in the our factory tour, I asked Pat; “why aren't your power meters built in Asia, like most other technology companies?” His responses made perfect sense to me; “there are multiple reasons actually.” “Stages has become the leading provider of bicycle power meters, after only a few years. We can't afford any preventable issues when it comes to quality or availability. It's critically important that we control the quality of these power meters… we can't if we're dependent on a third party supplier's factory, regardless of where it's located.”
Pat explained how keeping everything in-house provided a solution to a unique challenge they faced. “We manufacture power meters for 16 different model bicycle crank arms, from major suppliers (Shimano, SRAM, Cannondale and FSA) plus the power meter for the SC3 Indoor Cycle. Bicycle cranks aren't made just one size. Multiply each model bicycle crank by the four or more available crank arm lengths and we have to stock over 60 part numbers. Sure, 172.5 is the most common size for a road bike, but how many of each should we be building? The lead time for overseas manufacturers is measured in months – customer's won't accept waiting that long. We have thousands of stock crank arms on hand and we're setup to quickly change production. So if we receive an order for an out of stock power meter, we can normally build one and ship it within a few days!”
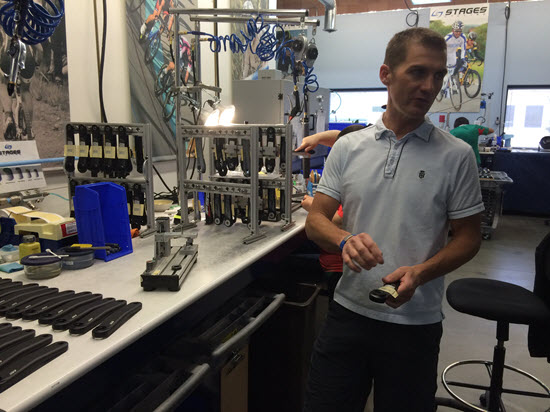
Pat Warner explaining the complicated process that attaches the power meter to the crank arm.
Every power meter is checked for proper calibration and the results captured using a iPad with custom software that's developed in-house too!
The Stages SC3 is build by Giant Bicycles in Taiwan – Pat told me,”those Giant guys are experts at mass producing high quality bicycles and fitness equipment, so we leave that part to the experts. We still produce the SC3's power meter here in Boulder and then ship them out for installation on the cycle.”
Stages has a separate facility, near their main offices, that's use for product endurance and destructive testing. We just missed the completion of a test rig that repeatably pressed down on a handle bar, tens of thousands of times without any failure.
Want to know how long the drive train will last pedaling at a continuous 360 watts? This video shows the test rig that pedals 24/7 for weeks at a time. Not only are they watching to see if something will break, or wear out, but they also record the actual power readings vs what they know their electric motor is pushing.
Quality control – Early production Stages SC3 cycles are unboxed and checked for any defects.
Feel free to leave the lights on! There's the battery charger for the Stages SC3 power meter.
“Why do I make less power (fewer watts) standing, then when I'm seated, John?”
A great question from one of the riders in yesterday's Performance Cycle class. An observation that shows he's paying attention + it gives me the chance to clear this up, so you can properly explain this anomaly to your participants.
The short answer is you don't* If resistance and cadence remains the same, in or out of the saddle doesn't matter. The amount of power/watts you are creating doesn't change… because it can't.
The bike decides the right amount of power
You know that Power = Force x Cadence. So let's assume this participant is riding seated and pedaling @80RPM. Their resistance is set to a level that results in the console display showing 150 watts.
Our legs create the perfect amount of force required to get the job done, which in this instance is overcoming the resistance to pedal @ 80RPM. If your resistance setting on the cycle requires “X” amount of force to push down the pedal, your muscles will create exactly “X” – no extra force is created and no less. The combination of that force, multiplied by a cadence of 80 RPM results in the power meter showing 150 watts.
In fact there's an actual law of physics that says that it's impossible to get the same amount of power out of a machine with a reduced amount of power added into it – which is why I'm saying the amount of power/watts you are creating stays exactly the same, if you make no change other than to stand and ride out of the saddle.
“But then why does the power meter show my watts lower, when I'm standing.”
My response was; “you're right it does and there's a simple answer why…**[wlm_private ‘PRO-Platinum|PRO-Monthly|PRO-Gratis|PRO-Seasonal|Platinum-trial|Monthly-trial|PRO-Military|30-Days-of-PRO|90 Day PRO|Stages-Instructor|Schwinn-Instructor|Instructor-Bonus|28 Day Challenge']
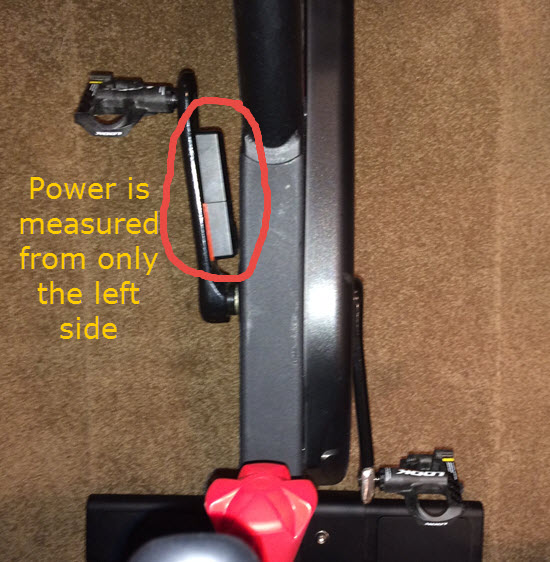
Let me begin with the basics. I teach at a Life Time Fitness Athletic Club and we ride FreeMotion S11.9 with the Carbon Drive belts. FreeMotion's measure power only through the left crankarm as you can see here.
This is my personal S11.0 (the home version) which is why it's black and not the normal silver color. The electronics are identical across all models.
Yes, the meter shows a drop in power…
Many of us who teach or ride on this Indoor Cycle have noticed that the power meter will show a lower wattage number when you transition out of the saddle, without giving any thought as to why. As I explained above, it shouldn't > the wattage number should remain the same. Again; Power is equal to force times cadence. If you didn't change the resistance setting, and you're maintaining the same cadence, the power meter should continue to show the same wattage… but it doesn't because >>>> your legs aren't the same strength.
Your dominate (stronger) leg does more work
The force required to pedal is divided between your two legs – but not equally. Because many (if not all) of us have one leg that's stronger than the other, our brains automatically proportion the amount of force from each. Remember: our legs only create exactly what's needed. Unless you consciously choose otherwise > more force is unconsciously asked from the stronger leg and the opposite leg adds what's left, equaling the total required.
Some quick research showed me that it's very common for one leg to be stronger in most people. Your dominant/stronger leg is typically the same as your writing hand. Since ~90% of people are right handed, the majority of your class will be seeing lower wattages when the come out of the saddle > because they are doing more work with their right leg. The FreeMotion's left hand power meter sensors are seeing a lower amount, of the total amount of work, as coming from your left leg.
Because this IC can only sense force on the left side, when you stand your stronger leg carries a greater percentage of your body weight = the wattages appear lower.
So standing or seated at the same cadence, you continue to create the exact same amount of power. It's just that the power meter doesn't see all of it and displays the reduced amount = the misperception that we create less power standing… which you now understand isn't true 🙂
Make this a feature (not a bug) in your class
Since the Freemotion can show leg strength disparity, why not use it as a training tool?
Novel idea, right?
Start by teaching everyone which leg is their stronger/dominate leg. The simplest way I know is by doing Step-Ups on a box or step raised to the proper level as shown in this short video.
This exercise was eye opening to me, when we did them in Boot Camp. Learning that my right leg is considerably stronger, I'm now really focusing on making my left leg do more work. Hopefully over time, a stronger left leg will result in me having a higher FTP and greater overall muscular endurance.
I suggest having your riders do this as an after class activity > or you could bring a box into your studio and have everyone take a turn.
Using a pair of reasonably sized dumbbells, perform 8-12 reps all on one side and then the other. It should be quickly apparent which (or if) they have a leg strength disparity.
We'll explore drills to exploit this feature and help riders train their weaker leg in future posts! [/wlm_private]
* I'm not referring to pedaling efficiency here, which is a completely different subject.
** Please let me know if this isn't clear, if I've confused you or you have an alternate method of explaining this.
Work Set Length: 13:44 + 7:17 recovery [21 minutes]
The Sprint Shift on the new Stages SC3 bike is your interval training solution. Left position for easy, Center position for medium, Right position for hard. Make micro-adjustments with the resistance knob during the interval. Could it be any easier?
Now, I am a big believer in training with power, benchmarking your effort, and documenting your progress. All three are important for successful long-term cycling training but people sometimes misunderstand my position as “all science, timed intervals — no fun.” That's not the case at all!
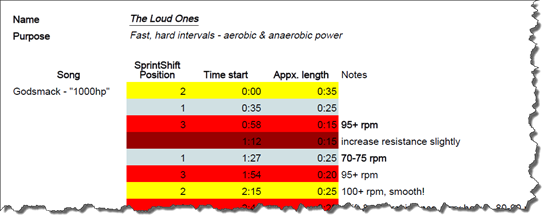
For the 3 songs below, all I would track is total distance traveled. My riders would hit “The Loud Ones” maybe once every 10 rides and see if they went farther. You could also use average wattage or average speed – it is still a benchmark, just not a complicated one.
As for the science, these are aerobic and anaerobic power intervals – near maximum, brief efforts with short rests. This makes you strong during the frantic parts of road races, during time trials on hilly terrain, and when you want to inflict some pain on your group ride mates. The ride gradually slows in cadence as the resistance and length of efforts creep steadily upward.
But don't think too much about all of that. Do a quality warm-up with 2 or 3 very short sprint-type efforts, tell your participants they are in for some HARD WORK, then just turn it up, follow the music's energy, and have some rough, fast, sweaty fun!
[P.S.: You really just have to feel the music to get the transitions. Don't try to follow the time stamps to the letter. But the Sprint Shift makes that possible! Call each position (left, center, right) “gear 1, gear 2, gear 3” if you like. Slam the lever into gear and ride hard!]
[P.P.S.: After “Little Man,” I like to throw in one long, steady effort, usually to “Animus Vox” by The Glitch Mob. You can take your pick of ‘finisher.']