It can be intimidating and awkward to instruct an indoor cycling class when not on the bike. Our bike seat can become a security blanket — a comfortable, happy place. However, getting off the bike and mingling with our riders can enhance their experience and allow them to draw closer to us as their instructor or coach. I find it to be an excellent way to engage riders and keep them focused on the objective of the class while adding a more “personal touch” to an otherwise group format. Here are 3 ways you can start to mingling with the crowds during class.
Introduction and Warm-Up
I love starting class OFF the bike. It gives me a chance to pace the room and stir up some energy as I introduce myself, learn who is new, and explain the objective of our time together. It is not uncommon for me to spend the the first 3-5 minutes of the class nowhere near my bike. As I’m rambling on about all of what we will experience, I randomly say “hey” to people as I pass their bikes. I also find this an effective way to bring an overly energetic class to order. Instead of trying to get their attention from the instructor bike (usually farther away), I’m in the crowd and in their face (strategically close to those with the greater tendency to continue chatting once class has started).
Recovery Time
Some instructors may find it easier to be off the bike during times of recovery. One usually doesn’t have to keep track of detailed timing and cues for 2-5 minutes and can feel free to move around the room. Similar to the introduction and warm-up, I use recovery times to explain what’s ahead. As I’m talking and moving around the room, I will often pause next to a rider and give them some encouragement “Abby, you looked like you were really focused during that last drill, how are you feeling?”. Abby may say “yeah, that was tough, but I was able to hang on until the end”. I would then say something to include the entire class like “Abby, you certainly got the most out of it. So how about everyone else? How are we doing?”. Remember, as the instructor, you are standing in the middle of the class. This puts you in the action and better connects you to your riders.
During Drills
In many of the surveys I’ve conducted, a greater percentage of riders prefer to see the instructor on the bike during hard efforts. It is motivating and an example of good form and technique. I don’t often get off my bike during climbs or when visualizing a road or certain terrain (feels like I’m being left behind), but I do find getting in amongst your riders during intervals can be very motivating. Instead of being in an educational mode, I go full-bore into coach mode. For example, during a 3-minute strength interval, I’ll walk from rider to rider “Joe you are crushing it! Keep your foot on the gas!”…. “Anita, you are a machine…unstoppable…unwilling to back down! You’ve got this!”….”Alright everyone, we’ve only go 45 seconds left, dig down deep and finish what you’ve started!”. Again, you can use a combination of personal encouragement and group motivation.
EXTRA: Get Physical
I will often make direct contact with my riders as I walk around the room. Sometimes it is as simple as solid eye contact as I stand in front of their bike. However, other times I may put my hand on a rider’s shoulder as I’m giving them some words of encouragement. Obviously, you as an instructor need to be comfortable with this and be aware of those who may want their personal space. In general, I usually reserve physical contact for my “regulars”. Those who attend often and who I’ve spoken to on an individual basis. 99.9% of the time, if you act with the proper intentions, it will be received as positive personal attention and yet another way to draw yourself into your class. However, if you are uncertain — DON’T DO IT! If you want to give it a try, choose one of your best friends in class to be your first victim.
Get off your bike, get in your class and get connected!
You'll be able to ride longer with less fatigue. You should have your feet attached to the pedal (either with toe cages or clipped in) to ride at 90 RPM comfortably if you are not used to this pedal speed.
Here's the Science:
90 RPM recruits more Type 1 (“slow twitch”) muscle fiber which generally use aerobic forms of energy (stored fat for fuel) and allows you to cycle for longer periods of time without getting fatigued.
Pedaling slower, say 60 to 80 RPM, tends to recruit the Type 2 “fast twitch” muscles (ironic, right?) which are larger and more powerful. Because of their high demand, Type 2 muscle fibers tend to use anaerobic energy production (glycogen stores) for powerful bursts of speed.
Glycogen stores are limited, fat is not. Let's use more fat and pedal at 90 RPM.
I'll add that most people whom I've worked with who have never had any cycling training start out pedaling slower, say at 60-75 rpm. I think this is because…
1) No one has taught them good pedal stroke (how to pull back, up, and over the pedal in addition to pushing down).
2) Their feet are not attached to the pedal – it is hard to impossible to have a good pedal stroke when your feet are not somehow attached to the pedal (cleats, toe cages).
3) No one has explained the whole idea of pedaling faster to conserve energy. And they haven't practiced it to make it smooth and comfortable.
4) No one has explained that pedaling slowly into a hill will only S L O W your pedal speed even more – and maybe you'll end up walking up the hill. If you head into the hill at a faster cadence, then you have more room to slow your pedals as the hill gets longer or steeper. (Don't forget to shift or reduce resistance!)
How to Count your Cadence – Watch the video below
Does your Indoor cycle or bike monitor show RPM or Cadence? (by the way, RPM – Revolutions per Minute – and cadence mean the same thing)
If not, here is how to count your RPM:
* Take a 15 second count
* As you pedal, tap your right knee each time at the top of the pedal stroke, count how many times you tap.
15 taps = 60 RPM
17-18 taps = 70 RPM
20 taps = 80 RPM
22-23 taps = 90 RPM
25 taps = 100 RPM
27-28 taps = 110 RPM
Here is a video to show you exactly how to do this: How to Count your RPM
Happy Tapping!
Coach Robin
CEM (Chief Executive Mole)
www.powertopedal.com <= We teach you about pedal stroke and speed in these videos!
Chrispins sent me a note earlier this week about how the iPhone/iPad Class Builder App will now work with Spotify playlists. Fantastic! I've been waiting for someone to create an Instructor App that uses Spotify.
I have a sort of love-hate relationship with the Spotify App… I love the huge selection of music available for $10 a month, sharing playlists and especially the cross fade – it has my playlists sounding like a near professional mix, with no extra effort. But I hate the tiny numbers they use for the track length timers. If you're a 30 something year old Instructor, with youthful eyes, those itty bitty numbers are probably not a problem. I (and there's a good chance you) on the other hand, have reached the start of my Golden Years where everything looks a little fuzzy without my readers.
Class Builder has BIG NUMBERS – which is awesome and that feature alone is enough for me to look past the $19.95 cost of the App. The options to add cues, tied to each specific track, could really simplify teaching a well crafted profile. Projecting the class profile's training zones on a screen would be cool if your studio's system will accept the video signal from your device.
Class Builder does have a few limitations…
Class Builder requires a premium Spotify account
No off-line mode… only streaming using WiFi.
But before you purchase Class Builder, with the plan that you'll be using music from Spotify, there's something important that you should be aware of – Class Builder doesn't offer a play music off line, option. To use Spotify in a class, where you're using the Class Builder App as the music player, you'll need to be connected to a reliable wireless internet connection. Which is fine if you've got one. In the studio where I teach, the WiFi is weak and when I've tried to use it in the past I was repeatedly asked to sign in to the WiFi multiple times. So I'm doing some testing to find if I can feel comfortable using Class Builder.
No option for Local tracks
Spotify will only stream Spotify tracks. Because Class Builder can only stream music, it can not play your local iTunes music tracks.
I realize this is can be confusing. Let me try to explain: Let's say you want to include a fun remix or mashup MP3 that you have in iTunes, in a playlist on your iPhone/iPad. The only option is to sync your device with your computer, using the same WiFi to connect between them and then set the playlist on your device to Make Available Off Line or my iPad now says Download Playlist.
Because Class Builder has no ability to download, or make tracks available off line, there is no option to include your local files (iTunes) in a playlist used with Class Builder.
No cross fade or EQ either
There was some early discussions about Class Builder on one of the Instructor Facebook groups. People were having a hard time understanding why, for example, Class Builder wouldn't follow the settings they've made in the Spotify App or play in an off line mode. It took me a while before I understood where the confusion was coming from; Instructors were rightly thinking that “I have everything set correctly on the Spotify App… why isn't this working?”
Class Builder doesn't use the Spotify App on your iPhone – Class Builder is a completely separate App that can access your premium Spotify account. I haven't tried it, but I'm guessing you could delete the Spotify App off your phone and Class Builder would continue to steam music from Spotify.
Realizing that much of what I've written here is conjecture, I've scheduled an interview with the App's developer Gene Nacey, from Cycling Fusion, for early AM Friday. We'll explore this latest version of Class Builder. If you have any questions you'd like me to ask him – please leave a comment below. Friday 8/8 update: scheduling issues have moved this out until next week – stay tuned.
P.S. If you already own Class Builder, the Spotify option was included with the latest update. From the Home Screen go to Settings > tap the Spotify logo > enter your Spotify User and Password. If you've been playing with this please let us know your experiences.
Before I risk provoking your wild side, I’m referring to your stomach. The riders in my classes can be the best informants as to what is circulating around the indoor cycling industry. They are hungry for knowledge and some are even taking workshops to become instructors. It is common for one of them to approach me each week and ask about something they’ve read or seen about indoor cycling (or cycling in general) that confuses them. This week the question was “should I suck my stomach in when I ride?”
The answer….NO. That’s right, I didn’t say “it depends” or “only when…” Simply, No. Usually it is someone who participates in or teaches another fitness discipline that believes the abdomen needs to remain contracted “always”. But this time it was another indoor cycling instructor — no, don’t say that!
Breathing is Good
The most important reason to keep one’s stomach “relaxed” while cycling is to be able to breathe optimally. When your abdomen is contracted it restricts the movement (contraction) of the diaphragm and the expansion of your lungs. The diaphragm is a muscle between the abdominal cavity and thoracic cage. When you take a deep breath in, the diaphragm contracts creating more space in the thoracic cage allowing the lungs to expand. If your stomach is sucked it, the diaphragm is pinned by the contents of your abdomen. Thus, your breathing is severely restricted.
Breathing properly also includes the ability to exhale. Exhalation (particularly when your training and riding hard) will contract the rectus abdominis. If your stomach is already sucked in, it will very hard to contract the rectus abdominis and exhale fully.
But I Thought Cyclists Need a Strong Core?
Yes we do. However, there is a difference between a strong (or tight) core and sucking in your stomach while riding. It is often thought that the stomach is responsible for supporting the upper body while riding. There is more to the “core” than just the stomach. The core (to cycling coaches) also includes the other upper body muscles such as the back, obliques, chest, shoulders, etc. Although we do not want to voluntarily contract any of these core muscles either, we do need them to be conditioned to support our posture, movement and transfer of power.
What a Waist
Yeah, I know you’re not going to look nearly as sexy in the mirror while you ride, but you’ll be able to work harder and perform better and longer. Not sucking in your stomach will also help you in 2 other ways. First, tightening your stomach while riding requires that your abdomen be contracted. Contracted muscles require fuel and oxygen. In this case, both are being “waisted” in order to restrict your breathing. Second, if you are an outdoor rider, tightening your stomach while you ride will hinder your ability to respond quickly when bike-handling skills are required.
So, breathe! Let it hang out and enjoy a full deep breath in and long exhale. Experience the additional endurance, power and performance from utilizing your full aerobic capacity. And keep working on that core. Just don’t work on it while you’re riding.
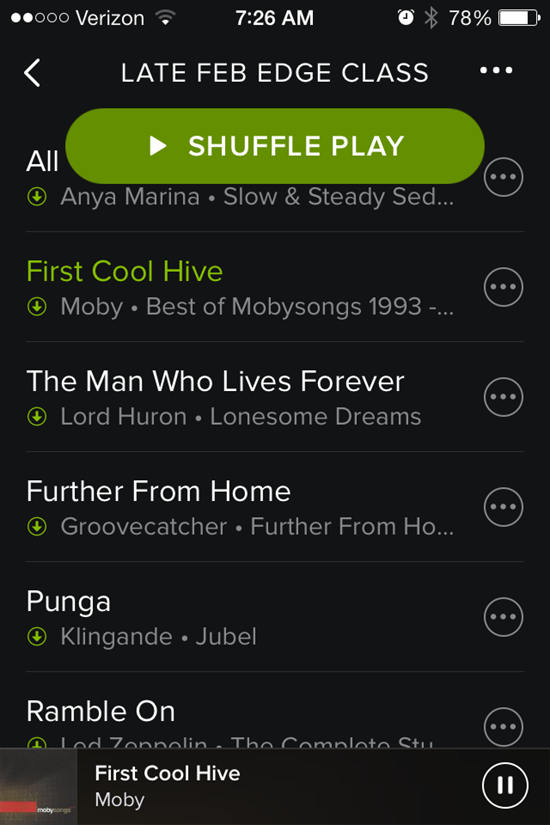
I was greeted by another Spotify update this morning and see they've added a new way to accidentally screw up your class 🙁
Forgive me if you have already experienced this Spotify update. I might be a few days late reporting the change – I've been using the new Schwinn Class Tamer app and wanted to use a past Spotify playlist today.
That big Shuffle Play button sits there at the top, taunting you to inadvertently touch it (or drip on it) and mix up your song order. It won't go away. Swipe up or down to scroll through the playlist to see what's next and that dang button stays right there at the top. Who thought that would be a good idea?
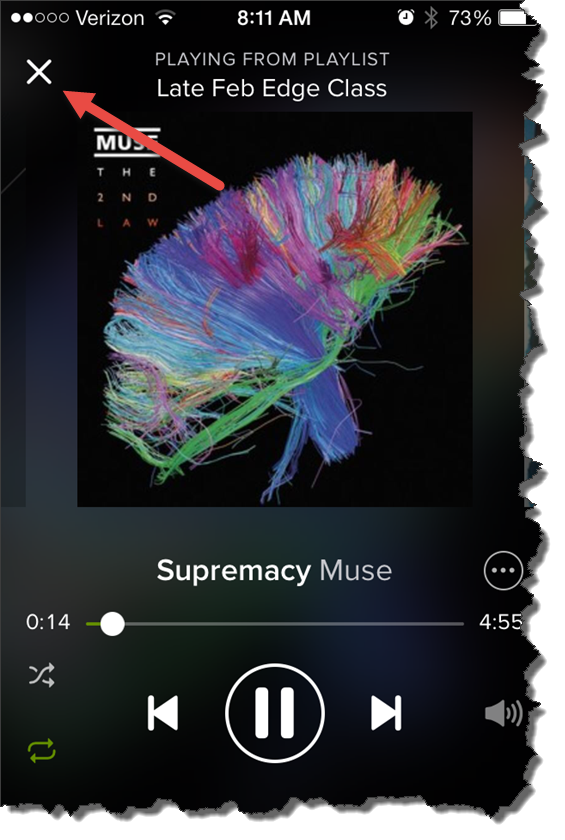
I do like the white on black fonts – they're a bit easier for me to see/read – but still the same frustratingly tiny track length time font.
During class this morning it took me a few tries to get out of the Now Playing Info screen. Tapping anywhere on the bar across the top doesn't work anymore – you need to carefully tap the little X in the top-left corner.
For some reason I couldn't see that X this morning.
What does mind/body training mean to you? Which activities count as mind/body training? Yoga and t’ai chi almost certainly. Weight lifting? Why or why not?
Some would submit that almost any activity can be a mind/body workout, depending on how it’s approached. So maybe it’s best to ask what a mind/body approach is.
Jim Karanas and I wrote a post some time ago (The Tao of Training, parts 1 & 2), outlining the differences between exercise and training, and suggesting that the primary distinguishing element of training is consciousness. It’s a short leap from that to a discussion of mind/body training, since bringing conscious to an indoor cycling class would most likely make it a mind/body activity.
It’s almost impossible to discuss the mind/body approach without including focus. When some (maybe most) people exercise, their focus is not on what they’re doing. They may be thinking about work, calls they need to make, plans for the weekend, anything but the workout. This type of focus is called “dissociated.” It takes no practice because it’s our default whenever we’re not disciplined. Dissociated focus, I was taught, has no place in training.
It recently came to my attention that dissociated focus is actually taught in indoor cycling certifications. It’s a method of getting cycling participants to work harder by taking their minds off the discomfort of hard cycling. Because my first certification was quite some time ago, this surprised me. What I was taught to do is keep my focus on exactly what I’m doing. That type of focus is called “associated.”
Associated focus can be external or internal. External focus includes anything going on in the room: the instructor’s voice, the sound of pedals turning, whatever’s in your visual field. Internal focus pertains to what’s happening in your body: sweating, body temp, the feel of clothing against skin, heart rate, breathing.
Associated focus may be wide — taking in as much information as possible regarding what we see, hear, feel and so on — or it might be narrow — zeroing in on one thing, such as the pedal stroke or even one segment of the pedal stroke, e.g., the upstroke. In either case, the key is not to attach a thought process to it, but to “go sensory” and experience it through our senses.
I was taught to approach hard training by being aware of all that’s happening — in the muscles, with heart rate, with the breath, and more — but not to think about any of it. Jim loves to say we defeat ourselves mentally long before we’re defeated physically. He teaches us to feel everything, and then transcend it. “It’s not that it doesn’t hurt, it’s just that it doesn’t matter,” he said one day during tough, big-gear climbs. I immortalized the saying on a boxful of t-shirts.
As great as transcendence sounds, it didn’t always work for me. I would find myself “striving” to get into that transcendent state, then striving to stay there. The striving itself was antithetical to the state. It also linked “good” or “bad” with whichever state I was in at any moment. If I felt discomfort, was I doing it wrong?
My solution came from a non-cycling environment, a workshop with Zen master Genpo Roshi. I modified one of Roshi’s techniques, and discovered the key to keeping my focus associated during hard efforts. (For those who might want to try it or teach it, it’s helpful to practice first during moderate-intensity cycling.)
The Zen behind this is No Attachments, No Aversions.
Visualize a triangle superimposed on your body. The lower left corner is the part of you that feels the discomfort or pain and reacts to it: “This sucks. If it hurts now, what will it feel like in 5 more minutes? Why did I come in today?” And so on.
The lower right corner is the part of you that transcends the pain/discomfort and rises above physical limitations.
Now bring those two points together at the apex of the triangle, directly over your head. Clear your mind of thought, and train with absolutely no preference.
With no preference, there’s no striving to reach the transcendent state. One moment you might transcend the discomfort. There’s no attachment to that, no holding onto it because it’s better. Experience it for as long as it happens.
The next moment, you might find yourself feeling the pain, or reacting to it. If that occurs, there’s no resistance — either to the pain or to the reaction. Experience it with no aversion and let it pass through. Whatever happens is absolutely okay.
The state of No Preference is the ultimate mind/body state, or more accurately the no-mind/body state. In a very real sense, there is no emotion, just energy. Appreciate it; let it happen and pass through.
Using this technique, I can stay connected, associated with what’s happening. Because any state is okay, I don’t strive, fight the moment, or resist what is. I never feel I’m doing it wrong.
When students started asking me to run through “the triangle” during classes, including classes I subbed for Jim, I knew it worked for others, too.
This method is in the moment and fully conscious. There’s no fear of difficulty, because it truly doesn’t matter. Whatever happens is okay.
If you try this, please let me know how it works for you.
 It can be intimidating and awkward to instruct an indoor cycling class when not on the bike. Our bike seat can become a security blanket — a comfortable, happy place. However, getting off the bike and mingling with our riders can enhance their experience and allow them to draw closer to us as their instructor or coach. I find it to be an excellent way to engage riders and keep them focused on the objective of the class while adding a more “personal touch” to an otherwise group format. Here are 3 ways you can start to mingling with the crowds during class.