If you're teaching with power, there's a good chance you'll have a participant ask you this simple question; how many watts should I be making when I'm working at my threshold? Same goes for any new studio or one that is upgrading to indoor Cycles with power/watts. You will be asked for a number from many of your riders. The reason is pretty simple, many people naturally want to know how they compare.
There are two schools of thought on if, or how, you should answer this question:
There's the “Don't give them a number – ever” school that believes whatever you tell them could be wrong and potentially upsetting. You don't want to demoralize riders, or hurt their feelings, especially with a new rider with no/limited fitness, by suggesting anything. The recommendation is to respond with a question; how many watts did you see today? Then respond positively to any response.
Then the “give them something to work with” approach. My preference is to start with the suggestion of one watt per pound or a little bit over 2 watts per Kg.
They're adults = tell them the truth… they can handle it.
Have you ever had someone lie to or mislead you, under the pretense that they didn't want to hurt your feelings? Did it make you feel valued and respected? If you have experienced a situation where you weren't told the truth, did you feel you would have acted differently, if you had been given accurate information?
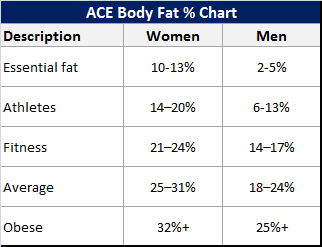
Imagine for a moment you're a personal trainer and your client asks you this question; what percentage of body fat should I have? A common question I'm sure. Is the correct response; “what is your body fat percentage now?” And then to positively affirm what ever answer they give? I don't think so… do you? There are established ranges for body fat %, published by credible fitness authorities like ACE. Here's their chart.
Let's see where you fall on this chart…
If your female client told you their body fat is 34% – would you smile and say; “that's great!” ? Of course not. You would probably suggest a diet and exercise program directed toward reducing their fat percentage down, with a goal to get into the average range. The person standing in front of you may not like hearing that they're obese, but don't they need to learn the truth so they can decide to do the work needed to change their body composition?
What about running a 5k? Or bowling for that matter? They both have metrics that define a reasonably achievable level of proficiency for an able-bodied person. Would it be wrong to suggest a goal time of 36 minutes (12 minute mile) for a 5K or 120 pin score in a bowling game?
Teaching with power for two years has me in the “give them something to work” with camp. And that something is a goal of one watt per pound of body weight*. I've asked multiple dozens of riders; “are you close to your body weight in watts?” Are they all there? No, but it's been very few. I'll bet if you were to privately poll your regulars, at the end of a 3-4 minute sustainable threshold effort, you would hear wattage #s around body weight.
At the end of the PST (Personal Spinning Threshold) assessment I did at WSSC, MI Janet Toussaint allowed me to ask the class this exact question. The majority agreed that their PST was at or above their body weight. Now a room full of fit Instructors may not be a representative sample, but it reaffirmed my experiences.
If you'd like to learn more about this concept – listen to this podcast where I first learned about it.
*I've heard other Instructors suggest using lean / goal body weight, which would reduce the number slightly. This calculator provided by ACE might be helpful.
Better late than never they say. It certainly applies to this season's Performance Cycle classes – now we're in full swing after some initial confusion that came from a sudden change on GFDH's.
We kicked off this past Sunday with an assessment to find the wattage numbers we will be using going forward. I like to use very simple terminology that minimises any mathematical computations.
… Instead I base my Life Time Performance Cycle classes on two numbers; PTP (Personal Threshold Power) and JRAP (Just Riding Along Power — AKA > Base Watts > VT1 / First Ventilatory Threshold Power). From these two rider identified threshold wattages, we can construct three meaningful power Zones;
Recover zone — watts below JRAP
Perform zone — watts between JRAP and PTP
Improve zone — watts above PTP
Today we added one more wattage number – their 20 minute FTP watts. As you can guess, riders should have a lower 20 min average than a 3-4 minute PTP / Best Effort and be above JRAP / Base Watts.
Wait John, you just said you only use the two thresholds in class.
What's the point of adding a third number?
Adding the third point of reference helps you draw a straighter line. At least that's what my high school drafting teacher taught me. It's much easier to draw between two distant points, if you add one in the middle = it helps you understand if you're on the right path between the two known points!
[wlm_private ‘PRO-Platinum|PRO-Monthly|PRO-Gratis|PRO-Seasonal|Platinum-trial|Monthly-trial|PRO-Military|30-Days-of-PRO|90 Day PRO|Stages-Instructor|Schwinn-Instructor|Instructor-Bonus']
The process of sustaining a 20 minute effort is helpful to many riders – it validates and reinforces the two threshold numbers and confirms that people are understanding my cuing.
Before/during and after these twenty minute efforts I tell everyone; this effort should fall between the two thresholds. Which you would think I shouldn't even have to mention… until you hear the confusion I heard after the effort was completed:
I really surprised myself – my 20 min watts was the same as my 3 minute level!
There must be something wrong with me – I couldn't sustain my base watts for the whole ride 🙁
Teachable moments here
In the first example; my 20 min watts was the same as my 3 minute level! I was able to ask him; “what does that say about your 3 minute effort?” He understood before I completed my sentence; “I'm not working hard enough!”
The women who told me I couldn't sustain my base watts for the whole ride also had a revelation and asked me; “Do you think I'm working too hard at my base level?” I didn't even need to answer her.
Do you now see the value of adding that third number?
A continuous state of observation
I asked my class on Sunday; how many of you are on a specific training plan? None. Not a single hand went up. This is very typical for my very diverse group of middle age men and women. Yes most ride outside – but their objectives aren't structured beyond not rolling over and hitting the snooze button. They come to my Performance Cycle class to get a nice combination of intensity and endurance work, in a fun group.
My object in this class is that everyone learn from observing their performance, make adjustments and observe again. Over time they learn exactly where they need be. When it's time to work hard – they WORK HARD and when they should work easy – it really is easy.
Make sense?
Here's my playlist –
I'll get the rest of the profile up later in the week if you want to try this in your class.
No more hunting for new music or counting out cues to develop your ride profile. Here is your ready to ride profile for a fully choreographed ride, that can be displayed from your phone, or printed out onto cue cards for your class. This ride is timed out, down to the second, to make your life as easy as possible!
Matrix and the Indoor Cycling Group (ICG®) debuted their new IC7 Indoor Cycle with power at IHRSA last month. In many respects it's different from any group cycle on the market today. You could go so far as describing a number of their technical innovations as revolutionary – not to mention how everything is wrapped in a very good looking package.
Where do I even start?
There are so many innovations engineered into the IC7, it's difficult to know where to begin… So I'll list off a bunch of the cool features that I feel are important and IMO not just marketing hype. You can download an informative brochure for the IC7 here.
First the basics
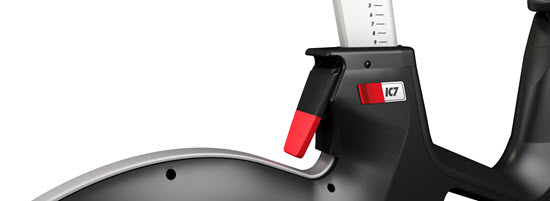
The IC7 features a unique two-stage, belt driven drivetrain – a toothed belt so it retains the feel of a chain. Turning away from the friction pads and weighted flywheel on their previous models, the IC7 now spins an aluminum flywheel and utilizes magnetic resistance, controlled by a micro adjusting knob with 100 (yes you read the correctly) individual levels to choose from.
If Q-Factor is important to you, it now appears that the IC7 is now the narrowest on the market @ 155mm – three millimeters narrower than the claimed 158mm of the Blade Ion. Just for fun, I measured my VeloVie road bike, with its top of the line SRAM Red Groupo @ 149mm. FYI – Spring is here and our member's discount on a new VeloVie bicycle is waiting for you here.
Fitting the IC7 to various size riders is done with seat/handlebar gas strut assisted raise/lower and both have fore/aft adjustment. Settings are then fixed using over-center cam locks vs. threaded adjustment bolts. If you've been frustrated by the time it takes to screw/tighten down settings when setting up a rider, you'll love how quick and simple these are to use. The handlebars have a very refined/substantial/solid feel to them and include two water bottle holders. The assist from the gas struts (similar to what helps lift the hood or tailgate on your car) had me changing their height easily, even while in the riding position 🙂
In the quest to accommodate a wide variety of people, the handlebars extent outward as you raise them up (think Keiser M3) and they begin very low. I typically ride any IC with the bars all the way down and I needed to raise them to get comfortably setup on the IC7.
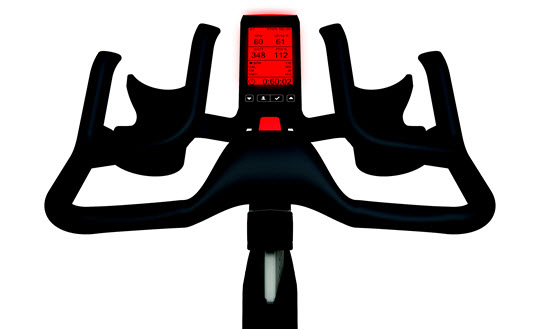
The power console (self-powered = no batteries) provides the expected rider metrics for watts, RPM, distance and HR if you're wearing a chest strap. And the unexpected – a resistance level indication and very cool LED lights that change colors based a participants‘ WattRate® (power) or heart rate and the training parameters set by the Coach By Color® training system. More on the console, the Coach By Color® system and how they get those lights to change correctly for each rider coming in a separate post.
One feature not included was a stage or lap button to measure intervals – but it will shortly. In a followup email from Bernd Pürschel – ICG's CEO and lead engineer, Bernd offered that they will be including this function in the near future.
Measured Power Using Optical Sensors
With multiple manufacturers offering power/watts, any comparative discussion between brands nearly always comes down to two simple questions;
How accurate is the wattage displayed?
Is that wattage consistent (feels the same) from bike to bike?
The claimed accuracy of the IC7 is +/- 1% which to me is saying the wattage displayed is nearly perfect.
Is that possible?
I had a long conversation with Bernd to understand where his confidence about accuracy and consistency of power come from. I wanted to learn specifically how torque is measured and displayed on the IC7's console. You no doubt understand that power/watts is equal to the twisting force (torque) a rider applies to the pedals… multiplied by the speed (RPM) in which the power is applied. Measuring the RPM side is easy, you just count the number of revolutions. Measuring the torque is the hard (and expensive) part of any power meter; indoors or out.
The accuracy, Bernd explained, comes from the use of an Optical Torque Sensor that forms the intermediate shaft in the drive train shown here in this photo of an IC7 going through long-term reliability testing.
Pedals turn the large sprocket and the toothed belt turns the intermediate shaft that doubles as the optical torque sensor.
To measure torque, something needs to twist or deflect and then have a sensor in place to measure tiny amounts of twist or deflection. In the bicycle world, strain gauges installed in the; pedals, rear hub, bottom bracket or crankarms are used the measure deflection caused by the rider pushing the pedals, that is resisted by the tire's contact with the ground. The FreeMotion S11.9 uses a strain gauge attached to the left side crankarm and the Blade Ion uses a strain gauge in the arm the holds the brake pad in place.
Instead of using strain gauges to measure torque, the IC7 measures the amount of twist that occurs in the intermediate shaft, using light that passes through a series of little windows on either end of the intermediate shaft. I found this drawing that may help to show what's happening down there.
Measuring your awesome amount of torque using light 🙂
Here's a very simplistic explanation of how this works:
In its rested state, the little slots in the disks on either end of the shaft line up perfectly. Light shown (fig 150) from one end will pass easily between the slots and out the other side to a sensor (fig 160). Now imagine what would happen if you twisted the shaft – the slots are no longer lined up, right? Using fancy electronics it is possible to measure this twist with incredible precision by sensing changes in the amount of light passing from one site to the other.
Now if you know with certainty what amount of force twists the shaft “X” amount, you have the makings of a very accurate method of measuring torque. Bernd assured me that the intermediate shaft is build using very special (and expensive) German steel, which results the complete system having a margin of claimed error of just +/- 1%. It's important to note that ICG didn't invent using Optical Sensors to measure torque. They've been used for years in precision machines that require a very high degree of accuracy.
Here's a computer simulation showing details of the inner workings.
So how about bike to bike?
The fundamental problem I see on our classes where we've introduced power, is a lack of trust from both Instructors and riders in the wattage being displayed. Consistency between cycles is (to me) more important than if they're super accurate. I don't care what I see as my FTP wattage, as long as that level of effort feels the same regardless of which of the Indoor Cycles in our studio I choose to ride. Bernd feels they have that solved through a simple method of calibrating the 100 position resistance control with the magnet holder. It's beyond me to explain how it works in words – hopefully they'll create a video that shows the procedure.
Next up – Coach by Color® and how it will help communicate to you (the Instructor), that everyone has heard and understood your intensity cues.
So we’ve talked about why Indoor only riders will benefit from Power Training, and in the last post we reminded the avid outdoor cyclist just why Power is a must for their continued growth and improvement riding outside… but how to get started. That’s the question I’ve heard from a number of folks that have just gotten new Keiser M3 Power bikes (even though our Power Training system from Cycling Fusion works for all indoor bikes – it is what we use at Global Ride Training Center). The inevitable first question is like one from a new blogger sitting in front of a blank computer screen. Where do I start!?!
Introduce Power With Games
While most indoor cyclists still don’t wear heart monitors when they ride, most know what it is and why it is used. However, when it comes to training with Power, that’s a different matter altogether. Unfortunately, this is also why many clubs do not consider bikes with Power. Their ignorance leads them to feel it is too complicated or worse – intimidating. In this case ignorance isn’t bliss, it’s just plain ignorance. The goal here is to show that riding with Power is fun, interesting, and easy to do. This will help to beat back a consensus of complexity, which right now, threatens to slow the growth of Power bikes in our industry. Consequently, it’s best to just let students begin to play with Power before they really begin to train with it.
We do this by offering structured and methodical Power Games that make training with Power more fun. These are just a sample of Power Training games one can play. With feedback like Watts, Heart Rate and Cadence, (typical tools that come with any bike already equipped with Power) one is only limited by their own imagination. Here are some games that might help “break the ice” when it comes to training with Power.
Ten Songs To 10 Gears
Let your students warm up, encouraging them to increase their gears slightly as they “warm up with purpose”, but to keep it light and easy during the warmup. Once they have warmed up for at least 5 or 6 minutes, ask them to check their gear number, and the Watts they are genearting. This will represent their “baseline” or the bottom gear or Wattage for them today. This concept of establishing a Power “baseline” will apply to all of the games we discuss here, except for our last game; the 5 X 5.
Each of the next 9 songs then you should direct them to increase it 1 gear. The first 3 or 4 should be easily handled in the saddle. The final 3 or 4 may need to be out of the saddle, and some students might not be able to negotiate a gear much more than 7 or 8 above their warmup, depending on how high they start, and the type of Power indicator your bike uses.
Outside of the first couple and last couple, you should have plenty of leeway for what position to be in for all the other Power levels. Continue to work on form, and draw their attention to how each gear affects the Power, and how it probably also affects their cadence and certainly heart rate. This is a good exploratory exercise to help students see just how far they can go. Some may never go beyond a few gears without this slow and methodical increasing of Power. Others might find that they haven’t really stressed themselves, or at least not to the max. This is good too, as it helps to show your students a wide range of Power levels and helps them to understand what kind of Power range they have.
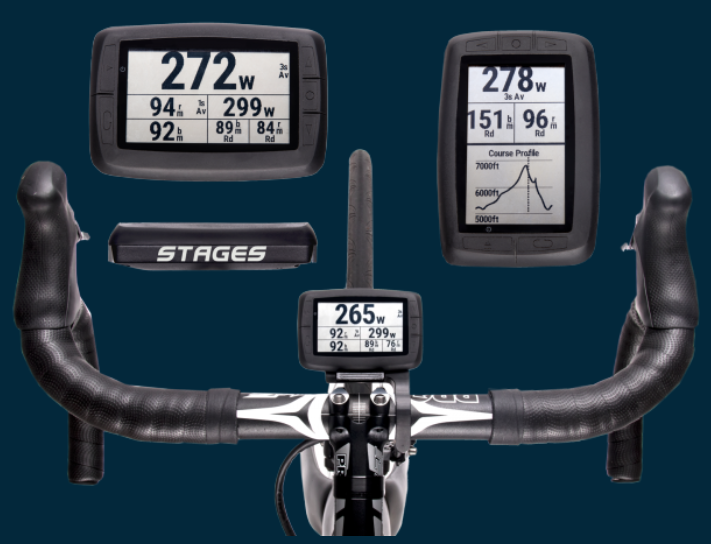
Stages Dash is a power-training-optimized GPS head unit that seamlessly integrates with Stages Link, a new cloud-based training and analytic system that includes custom-tailored coaching and education for cyclists of any ability. Stages Link will be in beta release fall 2016 and Stages Dash will be available early 2017, with a MSRP/RRP of US$399/€399.
“When a rider buys a power meter, they’re looking for something more than a number–they have a goal,” said Pat Warner, SVP of Stages Cycling. “After three years providing power to Team Sky, we’ve realized that athletes from professional to recreational have similar aims: they all want to meet their goals and they need simple guidance and immediate feedback to succeed. This new Stages ecosystem enables all riders to maximize their performance and meet their goals, with a simple and intuitive interface featuring unrivaled customization, and training programs that learn and adapt from each rider’s unique characteristics and achievements. “
Stages Dash
The Stages Dash performance training GPS head unit is specifically designed to coach a rider to his or her best performance. In the five years since launching the Stages Power meter, Stages Cycling has optimized its use with 3rd party cycling computers, but discovered a need for a highly-focused, customizable, training device. Stages Dash answers this unmet need with the delivery of robust Bluetooth and ANT+ connectivity to Stages Power and 3rd party devices, plus GPS capabilities, while introducing new features including the ability to offer guided workout coaching and specific provisions to manage critical training metrics across all devices.
Stages Link
Stages Link is a hub of cloud-based coaching, education, training analysis and equipment management tools, which were developed collaboratively with the analytics experts at Today’s Plan. The system is backed by the industry’s most advanced analysis capabilities currently being used in the professional peloton. Stages Link custom tailors training plans and daily workouts to benefit rider performance and enable performance goals, whether the goal is to simply improve fitness or target specific races over multiple seasons.
Stages Link will also help you quickly set up your Stages Dash and keep tabs on your Stages Power meter, all while being open and compatible with 3rd party devices. Stages Link plan pricing is TBD, however, riders who purchase Stages Power or Stages Dash will receive complementary access for two months.
“We’ve developed a complete experience that will personally guide a rider through the process of living with and meeting their performance goals with power,” said Warner. “This system we’ve developed is an easy and fast way for a rider to achieve their best performance.”


 So we’ve talked about why Indoor only riders will benefit from Power Training, and in the last post we reminded the avid outdoor cyclist just why Power is a must for their continued growth and improvement riding outside… but how to get started. That’s the question I’ve heard from a number of folks that have just gotten new