Two Recordings of Me teaching this profile on the Stages SC3 IC Bike
June 14th, 2016 Class Recording.
June 17th,2016 Class Recording
65 minute “Play it and Forget it” harmonically mixed music set that was used for the June 14th,2016 recording. This mix was featured in a previous post. You can check it out by clicking here.
If you have not downloaded the VismoX app yet, what are you waiting for? This app takes these profiles to the next level of understanding power and your body's reaction to it.
Below, Premium Members can follow links to download all the above media, view and download a printable Class Profile that can be used in class, read a detailed description of the Power Based Training Zones and download a printable Power Postcard.
[wlm_private ‘PRO-Platinum|PRO-Monthly|PRO-Gratis|PRO-Seasonal|Platinum-trial|Monthly-trial|PRO-Military|30-Days-of-PRO|90 Day PRO|Stages-Instructor|Schwinn-Instructor|Instructor-Bonus|28 Day Challenge']
Stages Dash is a power-training-optimized GPS head unit that seamlessly integrates with Stages Link, a new cloud-based training and analytic system that includes custom-tailored coaching and education for cyclists of any ability. Stages Link will be in beta release fall 2016 and Stages Dash will be available early 2017, with a MSRP/RRP of US$399/€399.
“When a rider buys a power meter, they’re looking for something more than a number–they have a goal,” said Pat Warner, SVP of Stages Cycling. “After three years providing power to Team Sky, we’ve realized that athletes from professional to recreational have similar aims: they all want to meet their goals and they need simple guidance and immediate feedback to succeed. This new Stages ecosystem enables all riders to maximize their performance and meet their goals, with a simple and intuitive interface featuring unrivaled customization, and training programs that learn and adapt from each rider’s unique characteristics and achievements. “
Stages Dash
The Stages Dash performance training GPS head unit is specifically designed to coach a rider to his or her best performance. In the five years since launching the Stages Power meter, Stages Cycling has optimized its use with 3rd party cycling computers, but discovered a need for a highly-focused, customizable, training device. Stages Dash answers this unmet need with the delivery of robust Bluetooth and ANT+ connectivity to Stages Power and 3rd party devices, plus GPS capabilities, while introducing new features including the ability to offer guided workout coaching and specific provisions to manage critical training metrics across all devices.
Stages Link
Stages Link is a hub of cloud-based coaching, education, training analysis and equipment management tools, which were developed collaboratively with the analytics experts at Today’s Plan. The system is backed by the industry’s most advanced analysis capabilities currently being used in the professional peloton. Stages Link custom tailors training plans and daily workouts to benefit rider performance and enable performance goals, whether the goal is to simply improve fitness or target specific races over multiple seasons.
Stages Link will also help you quickly set up your Stages Dash and keep tabs on your Stages Power meter, all while being open and compatible with 3rd party devices. Stages Link plan pricing is TBD, however, riders who purchase Stages Power or Stages Dash will receive complementary access for two months.
“We’ve developed a complete experience that will personally guide a rider through the process of living with and meeting their performance goals with power,” said Warner. “This system we’ve developed is an easy and fast way for a rider to achieve their best performance.”
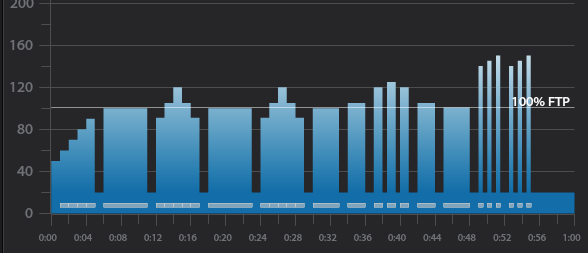
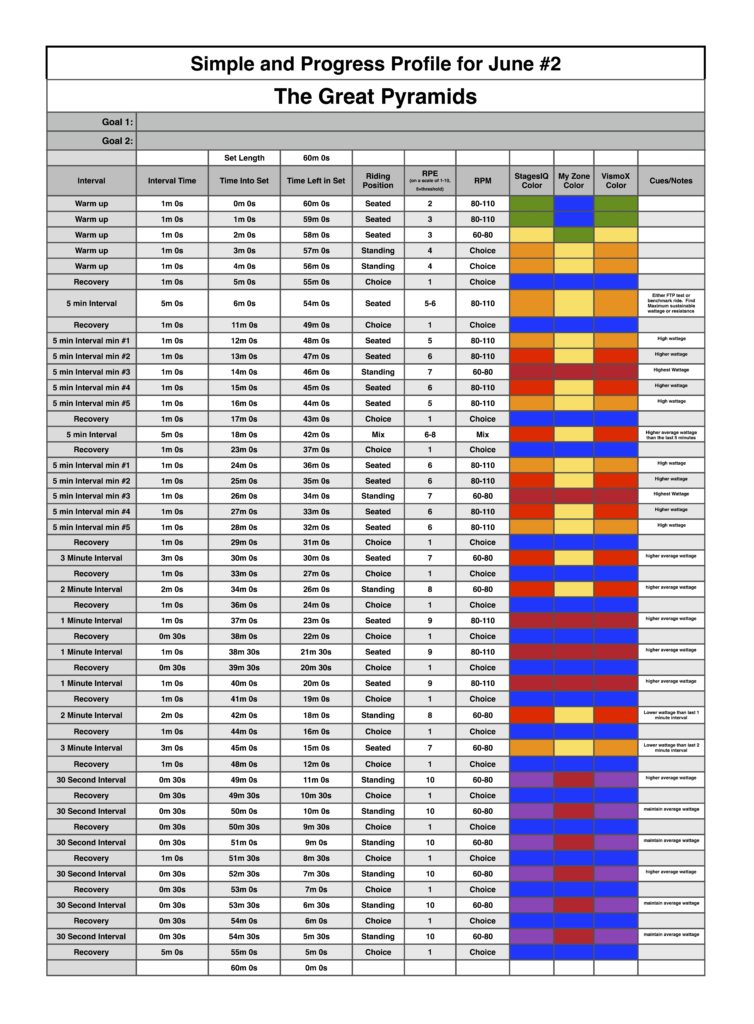
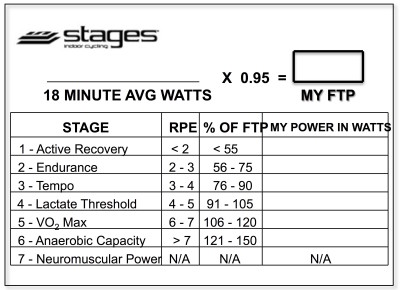
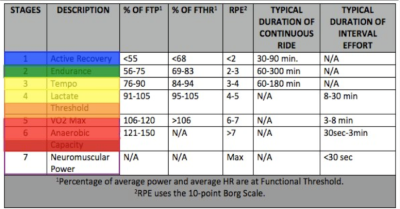
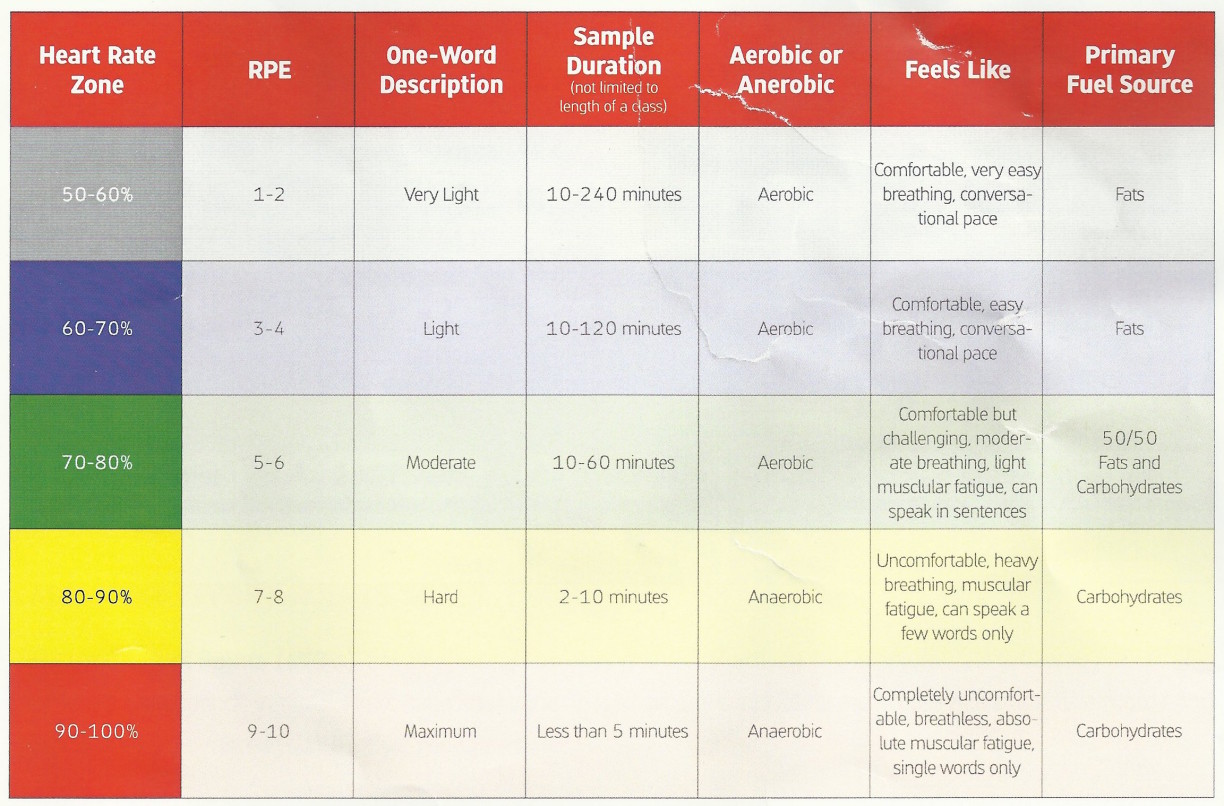
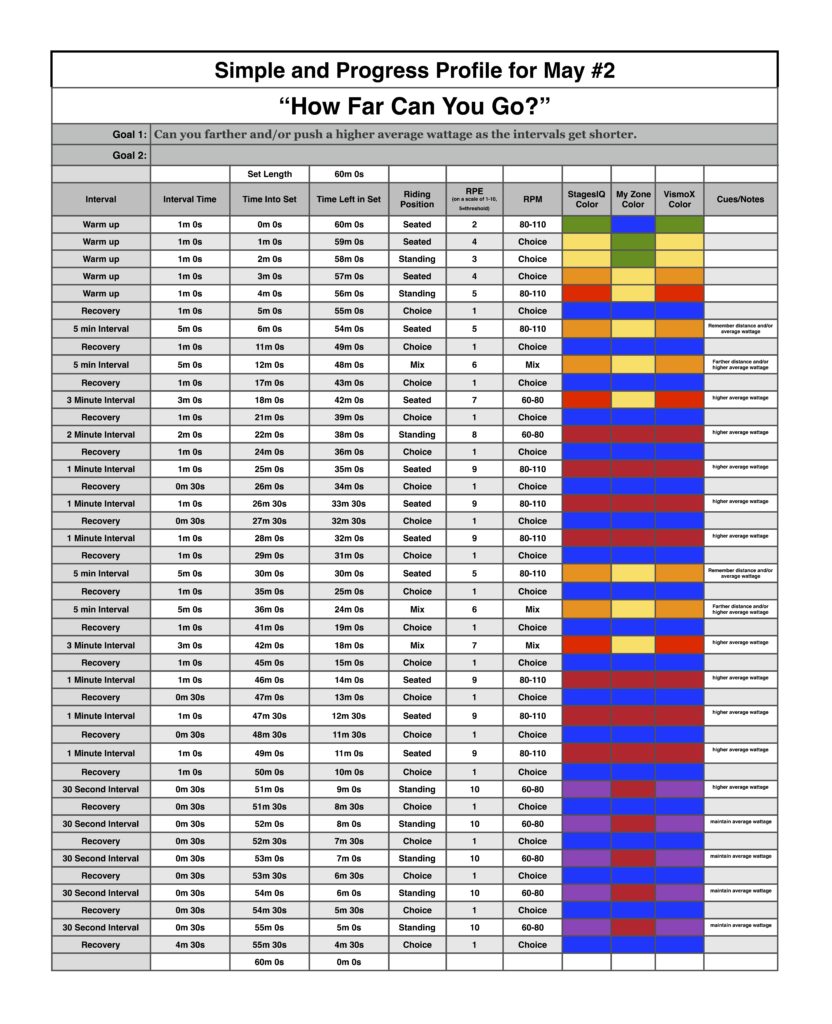
Below, Premium Members can view and download a printable Class Profile that can be used in class, read a detailed description of the Power Based Training Zones and download a printable Power Postcard.
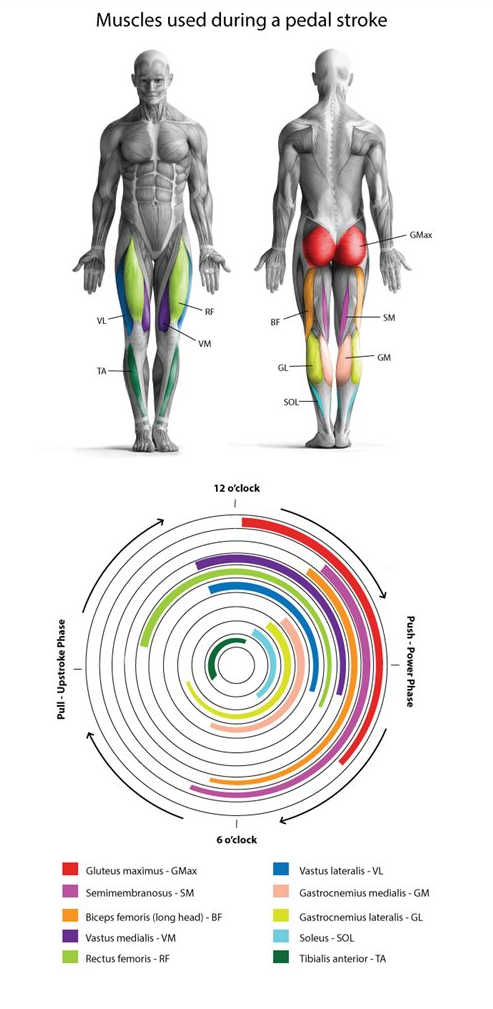
For a road cyclist pedaling while in the saddle, most of the power happens between the 12 o’clock and 5 o’clock position of the pedal stroke. This is when a majority of the primary muscles are activated. Hip and knee extension, along with hip flexion, are the main movements of a pedal stroke. Between the 6 and 12 o’clock position in the pedal revolution, there is some knee flexion to help bring the pedal back to the top, but the downward force being placed on the opposite pedal by the opposite leg is generally far greater. Lessening this negative (downward) force through the back half of the pedal stroke is accomplished through the action of the hamstrings and calves at the bottom of the stroke pulling the foot backward, to the hip flexors at the top, lifting the foot and knee back to the 12 o’clock position.
The power phase happens while the hip and knee extend, pressing downward on the pedal. This action starts with a combination of the gluteus and quadriceps muscles but then is joined by the hamstrings and calf muscles a quarter ways through the revolution. This shows the need for equally strong hamstrings, hips, and quadriceps. These muscles are some of the largest in the body and are the primary power producers in a pedal revolution.
A Brief on Pedal Torque
Is there such a thing as the perfect pedaling technique? And does anyone have it? The answer to both of these questions is probably ‘no' but the answer to ‘is there good technique?' is definitely ‘yes' and answering the question ‘what's the difference between good and bad technique?' is the objective of this article.
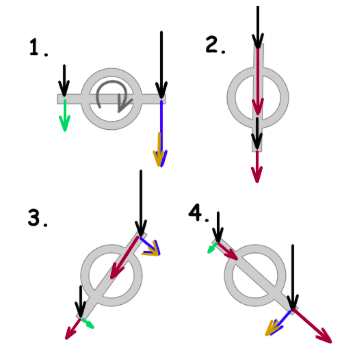
Let's consider the following four scenarios:
1. Cranks at 3 o'clock (horizontal). Pressing down on the front pedal will cause the cranks to rotate in the direction that we want them to go. Pressing down on the rear pedal will cause the cranks to turn in the wrong direction. If the force on the front pedal (lever) is greater than the force on the rear (lever), then we'll get some rotation in the right direction. Any downward force on the rear pedal has to be overcome by downward force on the front pedal before any effort is used to propel the bike forward. Let's keep that in mind.
2. Cranks at 6 o'clock (vertical). Theoretically pressing down on the top pedal won't cause the cranks to rotate but in practice, it will simply because the position is unstable. Whether it causes them to rotate forward (to 3) or backward is anyone's guess. Pressing down on the lower pedal will not cause the cranks to rotate – in fact, it will stop them. In addition to being 100% ineffective, a straight downward force at when pedals are positioned at 6 and 12 o’clock is also biomechanically stressful, and over time may result in pain or injury to the knee joint.
3. Cranks between 1 and 2 o'clock. Pressing down on the top pedal will cause the cranks to rotate in the direction we want them to go – but only a small part of the force will contribute to the rotation. The rest of the force is wasted. Pressing down on the bottom pedal will cause the cranks to rotate in the wrong direction – but again with only part of the force. As long as the force on the top pedal is greater than the one on the bottom rotation will be in the right direction.
4. Cranks between 4 and 5 o'clock. Similarly to 3, a proportion of the downward force applied to each pedal will affect the rotation, the remainder will have no effect.
If we look at the diagram below, we can understand why bad pedaling works (i.e. why anyone can ride a bike – or a stationary one at least). Pressing harder on one pedal than the other will result in the pedals turning in one direction or the other. It's easy to apply a large force to the front pedal through the 3 o'clock position, enough to turn the pedals to 6 o'clock. There will be enough momentum in the legs to get past the vertical after which it's easy to exert a larger downward force on the upper crank than the lower one. The momentum (energy applied to the pedal) ensures that the rotation direction remains the same.
In the diagrams above the direction of travel is left to right (as with the animations below). The black arrow represents applied force. The colored arrows show the applied force resolved radially (in red) and tangentially (in blue and green).
Bad pedaling works because the blue arrows are longer than the green ones. The effective contribution is blue minus green, I've shown that in amber. The amber arrows represent the ‘torque'.
Bad pedaling is bad because all of the force represented by the red and green arrows is wasted.
The aim of good pedaling is to modify the direction of the black force to minimize radial forces and maximize torque.
The Ankling Technique
Deriving from the above explanation of Torque, we can conclude that the main application of force to the pedals is in the downward thrust which comes naturally to almost everyone. The technique of drawing force across the bottom of the revolution arc and upwards to the start of the downward thrust is called ankling. The action involves a lowering of the heel as the downward force of the pedals takes place, and a lifting of the heel as the pedal begins the upward movement of its revolution. Think of scraping mud off the bottom of your shoe at the bottom of the pedal stroke. Ankling enables the application of constant pressure upon the pedals throughout the revolution eliminating the dead spots at the upper and lower points. This pedal stroke requires less peak muscle contraction which spreads the load over the muscles (engaging more calf muscles) and promotes a smooth efficient style that allows the production of more power with less difficulty.
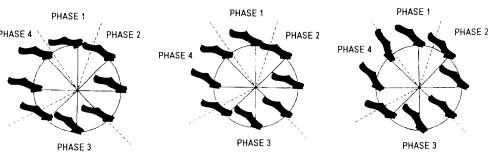
Different cyclists will vary in the position of their heel while pedaling. Depending on one's flexibility and basic biomechanics, some of us will use a high heel action and some may use a low heel action. Heel height also depends on one's cadence (see illustration bellow). One may end up injured if an attempt to change the basic heel height of the pedal stroke if it doesn’t feel natural. One should try to develop ankling within the constraints of their basic pedaling movement. A proper bike fit along with cleat positioning goes hand in hand with this and is well worth the money to optimize your pedal stroke. Because good anklng technique is dependent on proper foot placement on the pedal, it is important to remind indoor riders who do not use cleated shoes to place the BALL of the foot on the pedal before tightening the toe straps. Placing one’s foot all the way to the end of the cage can result in the arch of the foot being on the pedal and restrict ankle movement.
The faster one's cadence, the more difficult and unnecessary it will be to use the ankling technique. The downwards force on the pedals and the muscle contraction will be so quick in a sprint at 150 RPM that one won’t be able to do this effectively. However, we can observe that track sprinters will often use a high heel action when in a full sprint. Indoor riders are notorious for riding with an overly exaggerated “toe down” style, especially at high RPMs. However, unlike the outdoor sprinter, this style indoor usually reveals an inability of the rider to “keep up” with the momentum of the weighted flywheel.
Road cyclists often use a low heel action resulting from their cleat being positioned past the ball of the foot (towards the toe). The low heel technique is important in hill climbing while sitting back on the saddle and one can notice an improvement in climbing abilities upon mastering this technique. (note: keep in mind this technique most likely does NOT apply indoors, as simulation of a “hill” is simply an increase in resistance; there is no real incline to lift the front portion of the bike above the rear).
See illustration below for an example on heel action at different cadences (pay more attention to the pedal angle than the heel angle in these pictures. The heel appears to be higher than I would suggest. This will depend on the flexibility of the rider).
Understanding the role of the ankle joint is quite important; however cueing indoor riders about foot position (i.e., “point your toes,” or lift your toes up”, etc.) are NOT likely to result in better ankling technique, or more effective force generation. Instead, remind riders to keep their ankle “loose and flexible”, while seeking to apply effective force to the pedals with cues that describe the circular nature of the pedal stroke and the role of the primary force producers in the pedal stroke. This will encourage good ankling to occur naturally.
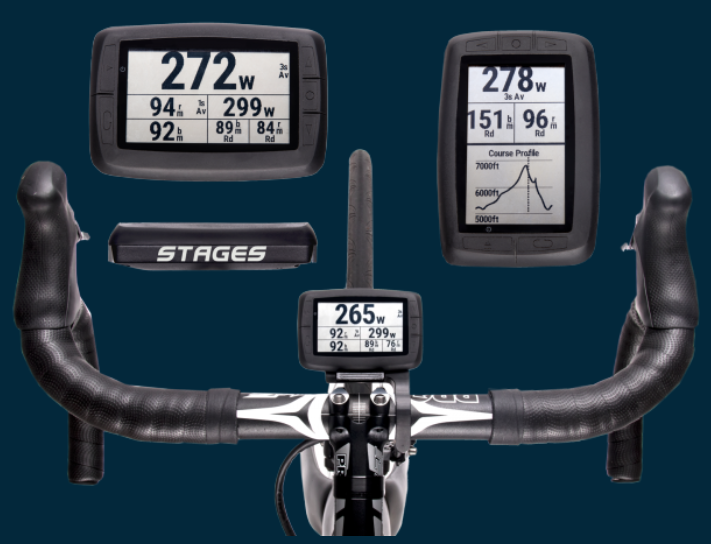
This is the first installment of a new series of posts I'll be sharing on all aspects of the States SC3 indoor cycling bike. The Stages SC3 has taken the indoor cycling world by storm and I believe it's important for all instructors who use this bike to have a clear understanding of all it's amazing features. Those who don't use this bike can also learn from many of its features. The science is the same no matter what bike you use.
I'm going to start with an overview its console than in future posts I'll explain the metrics that are displayed line by line.
Below is a video narrated by Stages Director of Education Cameron Chinatti that overviews the Stages SC3 Console.


