
by Joey Stabile | Apr 12, 2018 | Best Practices, Class Work-Sets, Creativity Indoor Classes, Instructor Training, KEEPING IT FUN, Master Instructor Blog, Training With Power
Welcome to the The Weekly Ride by Cycling Fusion
No more hunting for new music or counting out cues to develop your ride profile. Here is your ready to ride profile for a fully choreographed ride, that can be displayed from your phone, or printed out onto cue cards for your class. This ride is timed out, down to the second, to make your life as easy as possible!
(more…)

by John | Apr 10, 2018 | Best Practices, Big Box Instructor, Class Work-Sets, Instructor Training, Latest News

We all like our specific brand…
Ever notice how, if you teach on multiple brands of Indoor Cycle, your class presentation changes a little from one to the other? From the distance all the IC's from FreeMotion, Keiser, Schwinn and Star Trac, look pretty much the same. But you know better if you're teaching at more than one location. Each brand's bikes have their own unique characteristics:
- The resistance systems react differently and the method for adding and subtracting load is different.
- The consoles are all different in what information they display during and after class.
- Is there a lap/stage button? How do you use it?
- Hand locations & positions vary.
So why not help our ICI/PRO members learn the differences?
Dennis Mellon's profile; The Power of 3 — Three Song Harmonically Mixed Indoor Cycling Sets offers members three different options to hear how Dennis presents the same class on a; FreeMotion S11.9, Keiser M3 and a Spinner® Blade Ion. Very cool stuff!
Practice makes perfect
Do you spend any time practicing your classes? I realize that few of us have a lot of extra time. If you do – why not spend an hour of “ME” time, riding along with Dennis leading your ride. This may be the best 60 minutes you'll spend this week 🙂
Our membership really grows this time of year. So if you've been contemplating joining us here at ICI/PRO, you won't be alone.
Start your PRO/Monthly subscription $9.95 – no minimum. [wlm_paypalps_btn name=”Monthly-trial Product” sku=”E90D58D12B” btn=”pp_pay:s”]
by John | Apr 9, 2018 | Best Practices, Engage Your Students, Instructor Training, New Instructor 101
I'll let you in on my little secret.
I edit many of my interviews. When my guest misspeaks, has a few too many ums/ahs/likes/you knows or they run off topic. They tend to say “stop” and then ask “please edit that out”.
Although I've been asked multiple times, I never agree to let a guest listen and then approve the final recording. I also never agree to edit or delete anything just because a guest says; “I sound awful!” I've learned that people are just too critical of themselves > especially when they're not used to hearing a recording of themselves in conversation
But more frequently I'm editing myself out of the recording. That's right. Even after recording over 300 interviews I still; talk way too fast and my tongue get's all tied up, signal my agreement with the same, tired; “that's awesome” or “OK, so…” and it drives me crazy!!!!
So I edit it much of it out and you never hear it 🙂
Unfortunately none of us has an edit button we can hit during a live conversation or class presentation.
Like you, I love learning and improving. I've recently been going through an online training course to improve my speaking and presenting skills. The course is called How to Create a 1000 Watt Presence Learn business communication skills for personal and career success by actress and communication coach Alexa Fischer. I really enjoyed this particular video (one of over 40 in the course) and Alexa has given me permission to offer it to you.
What grabbed me during the intro of this video is when Alexa says; “But unless you're a professional performer….” Aren't we all are Professional Performers? The PRO in ICI/PRO is short for Professional…. as in Indoor Cycle Instructor Professional.
I feel I am a Professional. Do you?
Here is the PDF she refers to that you can use to (as she says) compassionately critique your recording and then begin the process of improving your communication skills through changing how you speak. NOTE: the correct link to the Fricken Fillers video is here > it's broken in the PDF.
Here is a past Podcast that explains an easy way you can record your own class, using your iPhone or Android phone.
You can check out Alexa's complete training program here at Udemy.
by Joey Stabile | Apr 4, 2018 | Best Practices, Class Work-Sets, Creativity Indoor Classes, Instructor Training, KEEPING IT FUN, Master Instructor Blog, Training With Power
Welcome to the The Weekly Ride by Cycling Fusion
No more hunting for new music or counting out cues to develop your ride profile. Here is your ready to ride profile for a fully choreographed ride, that can be displayed from your phone, or printed out onto cue cards for your class. This ride is timed out, down to the second, to make your life as easy as possible!
(more…)
by Joey Stabile | Mar 27, 2018 | Best Practices, Class Work-Sets, Creativity Indoor Classes, Instructor Training, KEEPING IT FUN, Master Instructor Blog, Training With Power
Welcome to the The Weekly Ride by Cycling Fusion
No more hunting for new music or counting out cues to develop your ride profile. Here is your ready to ride profile for a fully choreographed ride, that can be displayed from your phone, or printed out onto cue cards for your class. This ride is timed out, down to the second, to make your life as easy as possible!
(more…)

by Guest Contributor | Mar 26, 2018 | Best Practices, Stages Indoor Cycling
The Power of the Pedal Stroke – Anatomical View
For a road cyclist pedaling while in the saddle, most of the power happens between the 12 o’clock and 5 o’clock position of the pedal stroke. This is when a majority of the primary muscles are activated. Hip and knee extension, along with hip flexion, are the main movements of a pedal stroke. Between the 6 and 12 o’clock position in the pedal revolution, there is some knee flexion to help bring the pedal back to the top, but the downward force being placed on the opposite pedal by the opposite leg is generally far greater. Lessening this negative (downward) force through the back half of the pedal stroke is accomplished through the action of the hamstrings and calves at the bottom of the stroke pulling the foot backward, to the hip flexors at the top, lifting the foot and knee back to the 12 o’clock position.
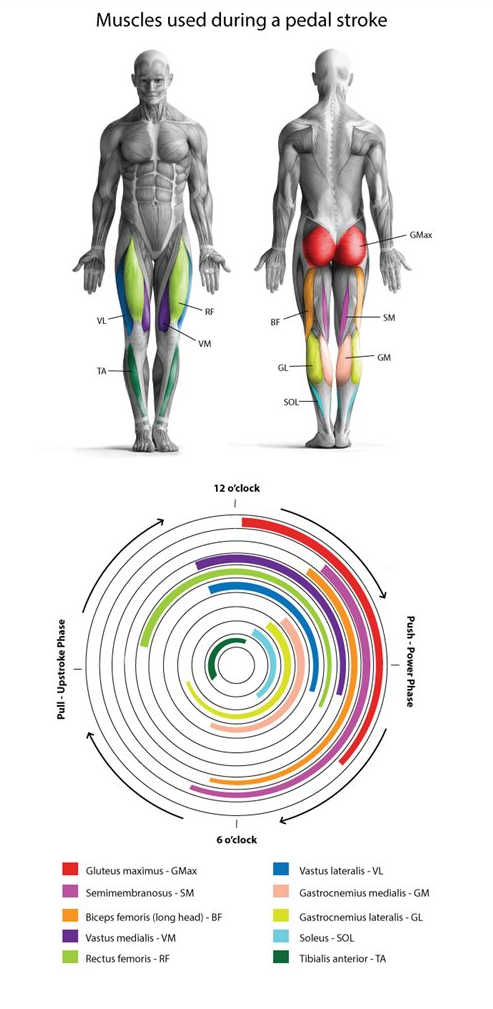
The power phase happens while the hip and knee extend, pressing downward on the pedal. This action starts with a combination of the gluteus and quadriceps muscles but then is joined by the hamstrings and calf muscles a quarter ways through the revolution. This shows the need for equally strong hamstrings, hips, and quadriceps. These muscles are some of the largest in the body and are the primary power producers in a pedal revolution.
A Brief on Pedal Torque
Is there such a thing as the perfect pedaling technique? And does anyone have it? The answer to both of these questions is probably ‘no' but the answer to ‘is there good technique?' is definitely ‘yes' and answering the question ‘what's the difference between good and bad technique?' is the objective of this article.
Let's consider the following four scenarios:
1. Cranks at 3 o'clock (horizontal). Pressing down on the front pedal will cause the cranks to rotate in the direction that we want them to go. Pressing down on the rear pedal will cause the cranks to turn in the wrong direction. If the force on the front pedal (lever) is greater than the force on the rear (lever), then we'll get some rotation in the right direction. Any downward force on the rear pedal has to be overcome by downward force on the front pedal before any effort is used to propel the bike forward. Let's keep that in mind.
2. Cranks at 6 o'clock (vertical). Theoretically pressing down on the top pedal won't cause the cranks to rotate but in practice, it will simply because the position is unstable. Whether it causes them to rotate forward (to 3) or backward is anyone's guess. Pressing down on the lower pedal will not cause the cranks to rotate – in fact, it will stop them. In addition to being 100% ineffective, a straight downward force at when pedals are positioned at 6 and 12 o’clock is also biomechanically stressful, and over time may result in pain or injury to the knee joint.
3. Cranks between 1 and 2 o'clock. Pressing down on the top pedal will cause the cranks to rotate in the direction we want them to go – but only a small part of the force will contribute to the rotation. The rest of the force is wasted. Pressing down on the bottom pedal will cause the cranks to rotate in the wrong direction – but again with only part of the force. As long as the force on the top pedal is greater than the one on the bottom rotation will be in the right direction.
4. Cranks between 4 and 5 o'clock. Similarly to 3, a proportion of the downward force applied to each pedal will affect the rotation, the remainder will have no effect.
If we look at the diagram below, we can understand why bad pedaling works (i.e. why anyone can ride a bike – or a stationary one at least). Pressing harder on one pedal than the other will result in the pedals turning in one direction or the other. It's easy to apply a large force to the front pedal through the 3 o'clock position, enough to turn the pedals to 6 o'clock. There will be enough momentum in the legs to get past the vertical after which it's easy to exert a larger downward force on the upper crank than the lower one. The momentum (energy applied to the pedal) ensures that the rotation direction remains the same.
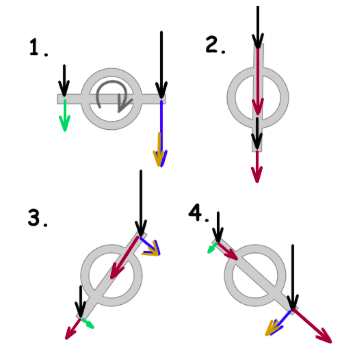
In the diagrams above the direction of travel is left to right (as with the animations below). The black arrow represents applied force. The colored arrows show the applied force resolved radially (in red) and tangentially (in blue and green).
Bad pedaling works because the blue arrows are longer than the green ones. The effective contribution is blue minus green, I've shown that in amber. The amber arrows represent the ‘torque'.
Bad pedaling is bad because all of the force represented by the red and green arrows is wasted.
The aim of good pedaling is to modify the direction of the black force to minimize radial forces and maximize torque.
The Ankling Technique
Deriving from the above explanation of Torque, we can conclude that the main application of force to the pedals is in the downward thrust which comes naturally to almost everyone. The technique of drawing force across the bottom of the revolution arc and upwards to the start of the downward thrust is called ankling. The action involves a lowering of the heel as the downward force of the pedals takes place, and a lifting of the heel as the pedal begins the upward movement of its revolution. Think of scraping mud off the bottom of your shoe at the bottom of the pedal stroke. Ankling enables the application of constant pressure upon the pedals throughout the revolution eliminating the dead spots at the upper and lower points. This pedal stroke requires less peak muscle contraction which spreads the load over the muscles (engaging more calf muscles) and promotes a smooth efficient style that allows the production of more power with less difficulty.
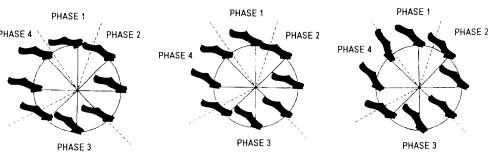
Different cyclists will vary in the position of their heel while pedaling. Depending on one's flexibility and basic biomechanics, some of us will use a high heel action and some may use a low heel action. Heel height also depends on one's cadence (see illustration bellow). One may end up injured if an attempt to change the basic heel height of the pedal stroke if it doesn’t feel natural. One should try to develop ankling within the constraints of their basic pedaling movement. A proper bike fit along with cleat positioning goes hand in hand with this and is well worth the money to optimize your pedal stroke. Because good anklng technique is dependent on proper foot placement on the pedal, it is important to remind indoor riders who do not use cleated shoes to place the BALL of the foot on the pedal before tightening the toe straps. Placing one’s foot all the way to the end of the cage can result in the arch of the foot being on the pedal and restrict ankle movement.
The faster one's cadence, the more difficult and unnecessary it will be to use the ankling technique. The downwards force on the pedals and the muscle contraction will be so quick in a sprint at 150 RPM that one won’t be able to do this effectively. However, we can observe that track sprinters will often use a high heel action when in a full sprint. Indoor riders are notorious for riding with an overly exaggerated “toe down” style, especially at high RPMs. However, unlike the outdoor sprinter, this style indoor usually reveals an inability of the rider to “keep up” with the momentum of the weighted flywheel.
Road cyclists often use a low heel action resulting from their cleat being positioned past the ball of the foot (towards the toe). The low heel technique is important in hill climbing while sitting back on the saddle and one can notice an improvement in climbing abilities upon mastering this technique. (note: keep in mind this technique most likely does NOT apply indoors, as simulation of a “hill” is simply an increase in resistance; there is no real incline to lift the front portion of the bike above the rear).
See illustration below for an example on heel action at different cadences (pay more attention to the pedal angle than the heel angle in these pictures. The heel appears to be higher than I would suggest. This will depend on the flexibility of the rider).
Understanding the role of the ankle joint is quite important; however cueing indoor riders about foot position (i.e., “point your toes,” or lift your toes up”, etc.) are NOT likely to result in better ankling technique, or more effective force generation. Instead, remind riders to keep their ankle “loose and flexible”, while seeking to apply effective force to the pedals with cues that describe the circular nature of the pedal stroke and the role of the primary force producers in the pedal stroke. This will encourage good ankling to occur naturally.
Co-authored by Stages Master Educators Paulo Stroud-Baranda and Lenita Anthony