“The most important Indoor Cycling class you'll ever take… will be the next one!”
I've forgotten which Instructor I overheard saying this to a new participant, but it's completely true. We want new students returning to our classes every week. It's good for us (fuller classes) and obviously good for them 🙂
So what should we be doing in our classes to encourage a Revolutionist, who finds him-or-her self in your class, to feel comfortable and (hopefully) return?
In our latest Audio Class PROfile, USA Cycling Coach Robin Robertson suggests we all get back to the basics of form fundamentals.
From time to time it is always good to get back to basics with form fundamentals. Form is often overlooked and not practiced enough. This workout takes you back to 5 fundamentals: independent leg work, pedal stroke, smooth transitions in and out of the saddle, the elements of adding and releasing tension through rolling hills while maintaining intensity, and a long seated & standing climb that gets progressively steeper.
Focus on fundamentals will help each rider to get more power out of every pedal stroke and to become more efficient on the bike, whether indoors or outside.
This is an ideal class for everyone — teaching beginners good form and reminding veteran riders of how to get more out of every pedal stroke. The overall intensity is moderate to heavy with the end climb. The focus is on good form!
The cuing for this class includes both indoor stationary cycles and bikes on trainers. This is the kind of class that is perfect for those who enjoy cycling outside because the drills practiced are directly transferrable to outdoor riding.
The Cycle Moles camps are designed as 8-week Training Camps that are a performance enhancing, progressive training program. They are geared toward cyclists, but part of the beauty of the programs is that you do not have to be a competitive cyclist to reap the benefits. The training is periodized and designed to progress the riders through their development. This is the next best thing to having a personal coach.
The program has two levels: Level 1: Appropriate for those who have a base level of aerobic fitness. You’ll learn secrets that will change the way you ride to make you more efficient and powerful both indoors and outside. Level 1 training sessions are 60 minutes and include a coached ride plus stretching.
Level 2: for the seasoned cyclist, triathlete, endurance event enthusiast or individual with a strong aerobic base who wants to improve cycling performance. We heat up the intensity of the rides throughout the camp so that you’ll end with a much stronger level of fitness and improvements in your pedal stroke and power. Level 2 training sessions are 90 minutes and include a 75 minute coached ride plus 15 minutes for the Core 100 and stretching.
Below is the Foundation Ride information that Robin Speaks about in the episode. Take your time and look at this, it is amazing information. The jpeg files below are linked to the full PDF files.
This protocol, developed by Team ICG®, outlines a “first HRM experience” to help the student connect HR with perceived exertion. The last post covered the warm-up and Level 1. From here, the progression builds to greater levels of effort.
Level 2
This is where the student’s sensitivity will grow the most. A novice is least able to feel the subtle changes that occur at this level. Level 2 is the point at which a training effect, i.e., improved functioning of the cardiovascular system after recovery, begins to take place. Level 1 is not intense enough to produce such a fitness effect.
Still maintaining 90 rpm, have the students raise the resistance slightly. At some point, the low muscle load will lead to a combination of rhythmic breathing and light sweating. The sensation of a training effect is quite noticeable to the experienced exerciser. There’s a feeling that continued training at Level 2 would make you stronger. Over time, the practical consequence of the training effect is a reduction in force necessary to apply power, and you can feel this begin to happen at level 2.
This sensation is hard to pin down for beginners. They may notice an amplification of their senses, a tingling throughout their body, or emotions. They may feel more relaxed and peaceful, even though their HR has gone up. They may smile.
In order to improve, musicians practice scales. There’s awareness that practicing scales will make them better musicians, so they don’t mind doing it. That’s the training effect. Level 2 feels like the beginning of practice that you know will bring improvement.
As an instructor, you must spend time at this intensity to recognize and appreciate the sensations fully so that you can accurately describe them to your students. Then relate them to HR. Maintain for 4 minutes.
Level 3
Continuing at 90 rpm, add resistance to raise HR again. There should be an immediate shift in the students’ feeling of effort. It now takes work to maintain 90 rpm. There may be an immediate sensation of difficulty, e.g., burning in the legs and/or breathlessness. This should last no more than one minute, although Level 3 continues past that.
Some students will start to breathe rhythmically and exhale forcibly to mitigate the difficulty. This natural mechanism dispels carbon dioxide and stabilizes blood pH. Demonstrate rhythmic breathing with forceful exhalations and explain that it will alleviate the feeling of difficulty, so they’ll feel better. Have them notice, or even induce, synchronization between their breathing and their cadence.
Have them settle into a new, higher target HR. This HR needs to be at a level that they could hold for about an hour, but with difficulty. “There are a lot of HRs you could hold for an hour, but we’re looking for the highest one you think you could maintain for that length of time.”
This level of effort feels like working out. It’s sustainable for an hour or so and isn’t painful, yet requires rhythmic breathing and focus to maintain comfortably. Maintain it for 4 minutes.
This is a good time to discuss what aerobic really means and how the increased workload has increased the demand for oxygen.
Before this segment is over, let them know what’s going to happen next: you’re going to raise their level of effort to threshold. (You may want to modify some students’ training, depending on fitness.) Threshold, in this case, is the level of effort at which the body’s ability to transport oxygen to the working muscles becomes compromised, resulting in an increase in anaerobic metabolism and a state of continuous discomfort.
My post “Why Do I Have to Hurt?” mentions that we’re not neurologically wired to accept pain willingly. Unless we’re completely conscious of what we’re doing, we’ll unconsciously find some way to offset the work and mitigate the pain. (Reducing cadence is the most typical example.) Let them know that they’re about to go into hurt, and that it’s part of training. If they’re not up for it, have them stay at their present HR.
Level 4
While maintaining the same resistance, have them increase their cadence to 100 rpm. You must use Beatmatch; otherwise, they won’t pedal hard enough. “This time, you’re at a level that you could hold — with difficulty — for about 30, maybe 40, minutes.”
Point out that this should change a number of things in the body: certainly breathing (they may find it difficult to get enough air), body temperature (pouring sweat), even thinking (conflict and doubt). An internal monologue may begin.
Encourage them to maintain focus. There are various names for this level of effort — anaerobic threshold, lactate threshold, ventilatory threshold — and each of them means something slightly different physiologically. For now, we’ll just call it threshold. It is not an exact number and refers to the heart rate below which you can keep exercising for a sustained time (with effort), and above which you tire very quickly. Thirty minutes seems like an eternity.
Have them pick their target HR and maintain it for 4 minutes. It’s easy to recognize this level of effort in a student. No one should seem distracted. Also, a look of true anxiety is difficult to fake.
It needs to hurt right away. The hurt is manageable, but they’re never comfortable. If you were to approach the student and ask how he/she is feeling, the reply would be, “Please get away from me.” (Perception of this level may vary with fitness.)
If they’re doing it right, it’s not a good time to discuss or teach anything. Remind them to stay at their target HR, maintain the increased pedaling speed, and breathe out forcibly in a rhythm. If they can’t maintain 100 rpm, have them adjust their resistance slightly but maintain their target HR.
Level 5
Tell them that it’s now time to peak their HR, to take it as high as they can that day. They need to go above threshold. Add resistance and maintain 100 rpm to raise HR for the final stage. Alternate a 30-second standing jog at ~90 rpm with 30 seconds seated at 100 rpm — but at full effort. The actual standing cadence is less important than the effort, but it must raise their HR. Many students, however, will drop their cadence because they’ve stopped caring about what they’re doing. It hurts too much. So the best cue is to make them jog as fast as they can. The effort is barely manageable and not sustainable for more than a few minutes.
Do this for only 3 minutes. Every time they stand and jog, they attempt to raise the HR higher. Since they’re holding this for 3 minutes, it will be uncomfortable and pretty much about survival. Cadence will keep slipping. They’ll experience failure. Keep them checking their HRMs so they remember their peak HR. Play razor-sharp, acerbic music with a rhythm to which they can Beatmatch when standing. Tell them to stay tough and not give up until you cue it, even if they hit failure.
Recovery
Have them regain composure quickly. After they’ve rolled for a few seconds, have them take off all resistance and bring the spin up to 100 rpm. It should feel easy.
Your students now have a numerical representation to match a perceived awareness of their exercise HR range. They’re likely to have come close to max HR, which can be used to help determine zones, depending on your method.
Training zones can now be related to a perception of effort. This will eliminate ambiguity when it comes to determining the correct level of effort for a designed training.
Have them ride with good form for 10 minutes as they spin their legs. If they start to get cold, have them add a little resistance. Review the various levels of effort (including resting and warm-up) and have them recall both the perception and the approximate HR for each feeling.
You'll be able to ride longer with less fatigue. You should have your feet attached to the pedal (either with toe cages or clipped in) to ride at 90 RPM comfortably if you are not used to this pedal speed.
Here's the Science:
90 RPM recruits more Type 1 (“slow twitch”) muscle fiber which generally use aerobic forms of energy (stored fat for fuel) and allows you to cycle for longer periods of time without getting fatigued.
Pedaling slower, say 60 to 80 RPM, tends to recruit the Type 2 “fast twitch” muscles (ironic, right?) which are larger and more powerful. Because of their high demand, Type 2 muscle fibers tend to use anaerobic energy production (glycogen stores) for powerful bursts of speed.
Glycogen stores are limited, fat is not. Let's use more fat and pedal at 90 RPM.
I'll add that most people whom I've worked with who have never had any cycling training start out pedaling slower, say at 60-75 rpm. I think this is because…
1) No one has taught them good pedal stroke (how to pull back, up, and over the pedal in addition to pushing down).
2) Their feet are not attached to the pedal – it is hard to impossible to have a good pedal stroke when your feet are not somehow attached to the pedal (cleats, toe cages).
3) No one has explained the whole idea of pedaling faster to conserve energy. And they haven't practiced it to make it smooth and comfortable.
4) No one has explained that pedaling slowly into a hill will only S L O W your pedal speed even more – and maybe you'll end up walking up the hill. If you head into the hill at a faster cadence, then you have more room to slow your pedals as the hill gets longer or steeper. (Don't forget to shift or reduce resistance!)
How to Count your Cadence – Watch the video below
Does your Indoor cycle or bike monitor show RPM or Cadence? (by the way, RPM – Revolutions per Minute – and cadence mean the same thing)
If not, here is how to count your RPM:
* Take a 15 second count
* As you pedal, tap your right knee each time at the top of the pedal stroke, count how many times you tap.
15 taps = 60 RPM
17-18 taps = 70 RPM
20 taps = 80 RPM
22-23 taps = 90 RPM
25 taps = 100 RPM
27-28 taps = 110 RPM
Here is a video to show you exactly how to do this: How to Count your RPM
Happy Tapping!
Coach Robin
CEM (Chief Executive Mole)
www.powertopedal.com <= We teach you about pedal stroke and speed in these videos!
When I get the same question, from two ICI/PRO members, a week apart, it means I should probably write a post about the subject.
First the questions:
Hi John –
I hope you are doing well and have the prospect of defrosting in the near future! A question came up at one of the places where I teach about minimum age for spinning. Back when I was certified, I understood that 16 was the earliest age based on growth plates, etc. Has there been any change in thinking? Can you point me to the most current research? The owner has been hounded by a member who wants his 12 year old to spin with him. I encouraged the owner to send an email to all the members spelling out the club's policy regarding kids and spinning (a tactic employed by the lovely studio owner from California who you interviewed on a recent podcast!). Having the research will give him the ammunition he needs.
Thanks, John. I appreciate any leads you can give me!
—————————————————————————–
Hello,
The YMCA I teach at wants to let children join the spin class. Is there an age limit or height recommendations that you can suggest? I have been on line before when some children came to spin with their parent. I found one source that said 4'10 but I need something to show my supervisor.
Thank you so much.
Here's how I initially responded
Hi Alice – I actually talked to Dennis Keiser about your question this morning during the early AM workouts here at IHRSA in San Diego. He doesn't have any specific research he could point to, but the engineer in him made these points – which I'm paraphrasing as I didn't record our conversation.
Most children are not just small adults. Although manufactures build Indoor Cycles to accommodate a wide range of adult heights, you can't compare a 5′ 12 year old with a 5′ 30 year old.
The crank arm length (typically 170mm) maybe too long for many young children. This forces the rider's knees to move through too large a range of motion.
The flywheels on IC bikes (and especially friction resistance cycles) have too much mass for children's underdeveloped leg muscles to control at low or no load pedaling.
That said, there are always exceptions to every rule – so making a blanket: no one under 16 rule is bound to have someone complaining when their 6′ 180lb 15 year old son is told they can't ride.
Not sure if this helps but it's what I have.
John
I'm thinking I may want to amend this a bit – truth is I was really squeezed for time when I responded to Alice.
Effective communication is a tricky thing and I totally failed to follow my own advice here. I know better than to give into the temptation to quickly educate – it's almost always the wrong initial response.
Instead I should have responded with questions, to better understand the issue.
I could (and should) have asked in response…
What's your goal or intent here?
Are you trying to protect kids from injury?
Do you dislike having kids in your class?
Are you trying to identify the nominal age where kids are mature enough to participate in a class?
Is this to create an easily understood standard for participation? You must be this tall to ride.
Are you trying to encourage more kids to get involved in our sport?
My view is that any response to these questions is legitimate. For example; one of the clubs where I teach is an Adults Only Life Time Fitness. The minimum age is 16 – period.
Your club may allow younger kids on the fitness floor, but wish to set a height/age limit for group classes. The reasons why can vary. You may be concerned about safety or a lack of maturity – it makes perfect sense not wanting a pack of 13 year old boys disrupting your class.
On the flip side, don't we want kids active and enjoying fitness? If a member wants to bring their 12 year old son or daughter to a class, shouldn't we try to find a way to accommodate them? Despite two fitness Instructor parents, neither of my daughters are very active. Abby and Carly work & play hard at their jobs and school, but they have almost zero interest in a structured fitness activity. I'd love to find a way to get them involved at our club.
If I had asked a few of those questions, I might have responded differently. My guess is that these Instructors don't want to have to be the “Bad Guy” = be the one who has to say “no, I'm sorry but little Billy can't ride with you.” There's an easy solution for this.
Appeal to a higher authority
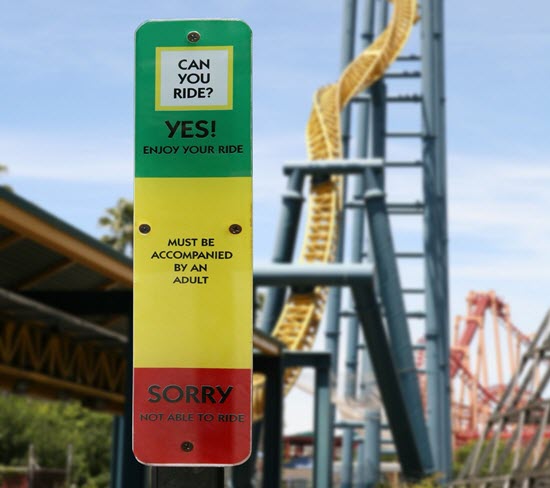
We're in a service industry and it's hard to have to tell a customer; “no sir, your 10 year old daughter can't take this class with you.” As an Instructor it puts you in a very uncomfortable place, and often has you debating with the parent to no good end. There's a simple solution that theme parks figured out years ago. Create a very clear GO/NO-GO line and display it prominently. The MUST BE THIS TALL TO RIDE sign becomes the authority you can point to. I know it can make you seem like an un-thinking robot, but having something solid to point at can really reduce conflicts.
Each Official Spinning Facility has its own policy on age requirements. Also, consider the following information in your decision —
Size: Proper bike fit is very important for injury prevention. Participants need to be big enough to get their proper seat height and fore/aft adjustments. Spinner® bikes usually fit people who are at least 4′ 11″. However, this is not an exact minimum height. Leg and torso length determine if the fit is appropriate.
Age/Maturity: Children need to be mature and responsible enough to follow the safety rules. It can sometimes be tempting for kids to pedal as fast as they can, and that can be unsafe. Because the Spinner® bike is a fixed gear bike, the weight of the flywheel can turn the pedals at a very high speed with a lot of momentum if there's not enough resistance.
I really like the sign pictured at the top of the post, with it's three zones 🙂 Would it make sense to create something similar you could post at your club? Maybe with these three zones?
Can I ride?
Red: Sorry, you need to be 4'11” or an adult to ride.
Yellow: Under 13 (you decide) needs to ride with a parent in the front row – so you can keep an eye on them.


 ICI/PRO Podcast host Joey has an amazing conversation with Robin Robertson and her innovative program Cycle Moles.