John's note: Welcome Spinning® Instructor Chris Jordan (aka Spinning Freek) as an occasional contributor to ICI/PRO!
The Paceline
The Paceline is by far one of my favorite routines to coach during indoor cycle. Not only because I can vary it to get different results, but also because it introduces some real world cycling components to a group of uninitiated.
So what's a Paceline? They didn't teach us that in our Spinning® class.
In the real world a paceline is what cyclists call their drafting formation that teams use to share the burden of driving through the wind. Let's back up a bit; ever see geese migrating? They fly in a V-formation so that they can “draft” off of the goose just ahead and slightly below them. With geese, the strongest takes the lead, and when he gets tired he swaps position with another to rest. In this manner the geese can fly much further (over 71% further) and faster than they could left to their own motivations. My favorite part about the geese comparison, and you can atest to this if you've ever seen them flying, is they're noisy. The geese in the rear of the formation are making all that honking noise to goad on the leader to fly faster; essentially talking smack.
So the paceline in cycling performs much the same function. One cyclist, just inches away from the cyclist ahead of her, essentially getting an active recovery period while the lead cyclist plows through the wind resistance.
So yeah, I know they didn't teach you this in your Spinning® certification class, but they did teach you that you could vary resistance and position AND that you can do combination movements as long as you don't do anything contraindicated.
I coach pacelines in two different manners, but reality is they're both segments of a rotating paceline.
Watching a rotating paceline you see a fast line and a slow line. In the fast line each change results in you moving closer to the front, which equates to working harder. In the slow line each change results in you moving further from the front so your working less.
Looking at my profiles you'll see instructions for a paceline like:
F – F – R :20
or
R – SF – F :25
or some variations of the theme. Let's break down the instruction set and then I'll explain how they relate to the paceline.
The number is the duration in each position in seconds. I adjust my duration depending on what I want the heart rate to do. If I want the heart rate to climb quickly, I'll make the duration 15 seconds; climb slowly then 20 seconds. Average out to a no net increase, greater than 25 seconds. I find recovery with general populations to be around the 25 second mark; so short duration pacelines won't allow you to recover before the next exertion.
Both instruction sets above would be above 80 rpm because that's what the minimum speed for a (F)lat is. If you want to do the paceline on a hill or in heavy wind the instruction might look more like:
C – C – SC :25
FAST LINE
Alright so if we're in the fast line, each change brings us closer to the front and thereby increasing our effort. So for a F – F – R :20 instruction you start with at your flat road resistance, this is where you're drafting. On the next change (20 seconds later) you increase the resistance to whatever you can WITHOUT slowing down or coming out of the saddle. 20 seconds later you take the lead position by increasing to heavy resistance into a (R)unning with resistance position. The next move resets the entire thing by “coasting” to the rear of the line with a light resistance (F)lat for 20 seconds
For simplicity sake I encourage you to stay to 3 positions.
Technically you could do the entire paceline in the saddle (looking more like what a real paceline would be, but since we're manually applying the resistance I think it works best to show distinct changes; rather than being subtle.
SLOW LINE
The slow line means each change moves you further from the front with lessening effort. That would be something like the R – SF – F :25 instruction. Starting with a heavy resistance you're pulling the group for 25 seconds while performing a (R)unning with resistance move; 25 seconds later you take the edge off the resistance for a (S)tanding (F)lat and then finishing in the drafting position with a (F)lat before starting the entire cycle over.
Variations?
You could do a full paceline where you do a combination of both the fast and slow lines, IF you have cadence monitors. Making the Fast line 10rpm faster than the slow line.
I have broken my room up into different groups where each group is performing a different stage of the paceline. A word of caution, this can be confusing for those unfamiliar so make sure to explain the cuing before hand.
One that I've not had the opportunity to try because of my class size, but I've spoken with people in smaller studio's where they circled the bikes for the class. Then your next move is always the move of the person just to your left. If their doing a (R) this time, at the next change you do the (R), resulting in a follow the leader effect.
One last coaching tip:
Be sure to explain what position you're in and why you've change the resistance in the manner you did for your participants. This lets them understand the real world implications of what you're doing.
I hope this post helps demystify some of my profile instructions, and even more important gives you something new and different to introduce to your classes; bringing a bit of road cycling into the studio.
Instructor Chris Nielsen was one of our Ultimate Instructor Class Profile winners with her Going the Distance profile!
Training Type: Endurance
HR Zones: 3-4
Effort: moderate to hard
Class length: 60 minutes, includes ~9 minutes for cool down and stretch
This profile was developed as part of a series to show that endurance classes can be as engaging and informative as rides with higher intensity. This class gives the instructor an opportunity to simultaneously address effort management, pedaling mechanics and related form issues, universal mental challenges and also introduce some outdoor bike safety topics. The intent in mixing all of these facets into one class is to help people understand that there is much more to an endurance ride than just mindless pedaling.
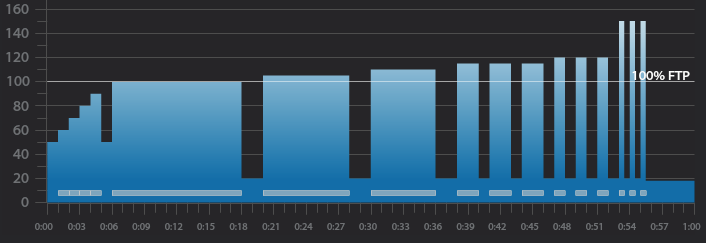
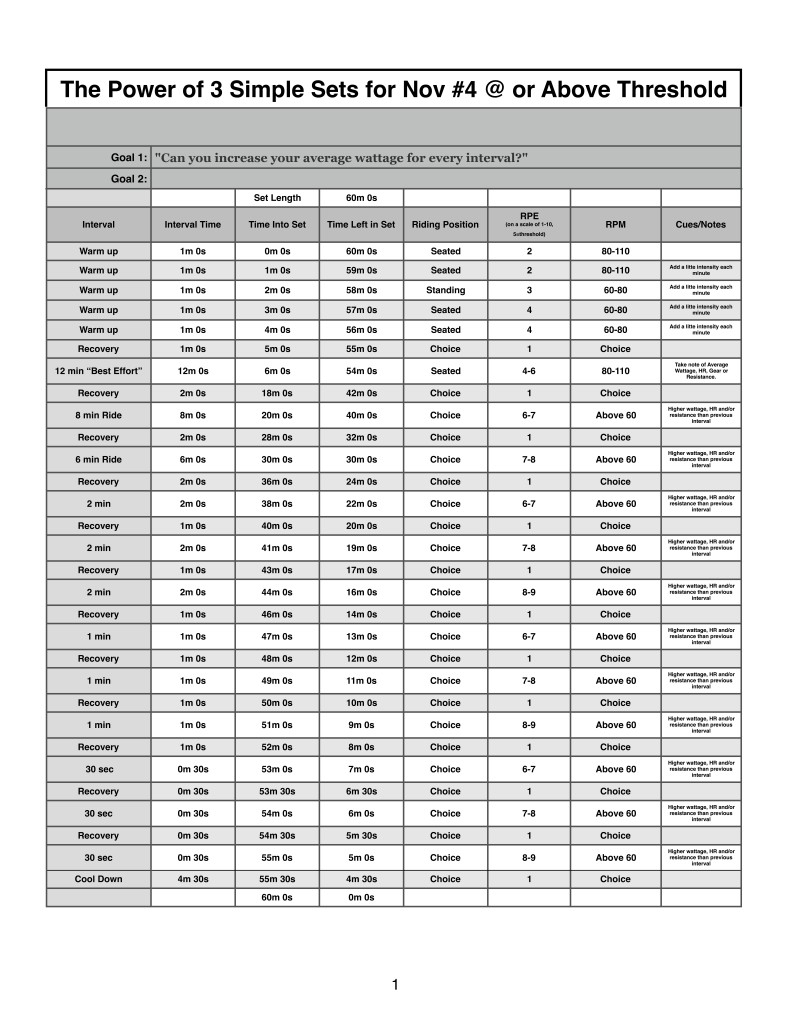
Below you'll find Week 4 of November's @ or Above Threshold Keep it Simple and Progress indoor cycling profile.
Workout Basics:
5 minute warmup
12 minute benchmark ride to find “Maximum Sustainable Wattage”
2 minute recovery
8 minute interval
2 minute recovery
6 minute recovery
2 minute recovery
3 x 2 minute intervals w/1 min recovery after each
3 x 1 minute intervals w/1 min recovery after each
3 x 30 second intervals w/30 second recovery after each
4 minute 30 second cool down
Workout Goal:
“Can you increase your average wattage for EVERY interval?”
5 minute warm up
Slowly and steadily elevate the HR or Wattage to above threshold
1 minute recovery
12 minute “Maximum Sustainable Wattage” Test
Settle into a sustainable intensity, HR or Wattage
Ride for 12 minutes and let the songs dictate the terrain
Remember average wattage for the 12 minute ride
2 minute recovery
8 minute Ride
Settle into a sustainable intensity, HR or Wattage
Ride for 8 minutes and let the songs dictate the terrain
Remember average wattage for the 8 minute ride
2 minute recovery
6 minute Ride
Settle into a sustainable intensity, HR or Wattage
Ride for 6 minutes and let the songs dictate the terrain
Remember average wattage for the 6 minute ride
2 minute recovery
3 x 2 minute w/1 minute recovery after each interval goals and specifics:
Ride for 2 minutes (as the instructor you dictate the position and RPM)
The goal is to complete every effort with a higher average wattage than the previous interval.
1 minute recovery or reset
3 x 1 minute w/1 minute recovery after each interval goals and specifics:
Ride for 2 minute (as the instructor you dictate the position and RPM)
The goal is to complete every effort with a higher average wattage than the previous interval.
1 minute recovery or reset
3 x 30 seconds w/30 seconds recovery (2 times)
Ride for 30 seconds (as the instructor you dictate the position and RPM)
The goal is to complete every effort with a higher average wattage than the previous interval.
1 minute recovery after the 3rd interval then repeat
Cool Down
[wlm_private ‘PRO-Platinum|PRO-Monthly|PRO-Gratis|PRO-Seasonal|Platinum-trial|Monthly-trial|PRO-Military|30-Days-of-PRO|90 Day PRO|Stages-Instructor|Schwinn-Instructor|Instructor-Bonus|28 Day Challenge'].
Even though I have been teaching indoor cycle for five years, I somehow managed to make it through the first four without ever setting foot on a road bike. Why the long gap? Fear. The thought of clipping in and out of my bike was scary to me, so I kept putting it off. Did my lack of experience bother me? Yes. When participants came dressed in flashy jerseys and official-looking bike shorts, I sometimes felt like an imposter. Maybe I didn’t know something that “they” — the experienced outdoor folks — did.
When my husband announced last July that he was selling my road bike – a birthday present from the year prior – that all changed. Within minutes of learning about his plan, I was suited up in my bike shorts, Team CycleQuest jersey, helmet, and sunglasses, ready to take on the outdoors. For a good thirty minutes after that, I rode up and down our street, back and forth, back and forth. The neighbors must have wondered what was going on. I practiced clipping in and out, stopping, and turning. I think Justin started to realize he was no longer going to be able to sell the bike, so he spent time coaching me, too.
And then we hit the road. Aside from holding on for dear life down a couple of hills and falling once or twice when trying to stop (just paying my dues), I had a great experience. You could say I was hooked. After riding with Justin a few more times throughout the summer, I eventually built up the confidence to venture out on my own … and loved it. Though I still have room to grow and lots to learn, my first summer on the roads definitely impacted my teaching. Here are a few examples.
1. I don't spend so much time — if any — teaching out of the saddle. Though I occasionally ask my participants to stand, I don’t do it nearly as much as I used to. Riding outside made me realize that I feel much more powerful seated than I do standing. Interestingly, I have noticed my watts on the bike tend to communicate the same message. When I do give folks the option of standing, I encourage them to monitor their power output to make sure that they are truly benefiting from the change in position.
2. I give an overview of the ride. The first few times Justin and I rode together, I found myself wanting to know how far we were going to go and what the terrain would be like. Prior to riding outside, it seemed like my intro for classes was always pretty much the same … “We’ll be doing a mixture of hills and flats today.” Talk about vague! Is it an out and back ride? How many hills are we going to do? When faced with real roads, I wanted the 411. As a result of that revelation, I now make a point to provide specifics to my participants. And, I’ve been making an effort to give my profiles a name, per Krista Leopold’s recommendation. Justin and I know our “loop” by name alone, just as I am hoping my participants will fondly remember the “interval sandwich.”
3. I use visualization more. Riding outdoors has given my legs an opportunity to experience a variety of terrain as my eyes soak up the scenery. I am well-aware of the gradual two-mile hill that is unavoidable on our ride home. I know that it plateaus about mid-way through and seems to last for an eternity. There are more pleasant straightaways on the south side of town that quickly come to mind, too. The changing backdrop is part of what makes riding outside so much fun. To enhance the indoor experience, I now make a point to ask my participants to think about the stretch of road they might be on at different points during class.
I’m sure those three examples are merely drops in the bucket when compared with everything I have yet to discover about the indoor and outdoor cycling connection, but, we all have to start somewhere! Here's to many more rides in the future 🙂
Instructor Carole Harrell shared this awesome 11 minute mashup over on our Celebrate Indoor Cycling Group – The Ultimate Mashup of 2014. 55 track remix by Robin Skouteris. Listening to it, I don't recognise many of the tracks… but there's a good chance that your class may know them. As I think about it, you could do a fun “Name That Tune” game where you have anyone how knows the song yell it out.
http://youtu.be/igZA100ZTQ0
If you don't see a download link in the Soundcloud player you can find it here.
As our outdoor season, at least road bike
season — there is still plenty of Mtn Biking to be had, comes to an end we are
all faced with the question of what to do with our gear. Unlike running or
swimming where all your gear can be stored in a backpack in your closet, a bike
is a pretty large piece of equipment that requires much more real estate in
your home or garage. Multiply this several times over (N+1 rule, please), and
you'll have a mess on your hands.
There's a whole host of
ways to store your bike inside, but we'll address a few of the most common
methods. Of course, simply leaving a bike or three in the hallway is always an
option, but in case your significant other isn't OK with that, these are some
great alternatives.
Bike Hoist
One of the more complex
storage solutions out there, a bike hoist is exactly what it sounds like: a way
to lift your bike off the ground and store it in the rafters. It utilizes a
pully system where you simply hook the bike's saddle and handlebars and slowly
lift the bike by pulling on the rope. This storage method is perfect for rooms
or garages with high ceilings where having a bike hanging above won't pose a
risk for cars pulling in or people walking by.
Ceiling Mounts
For houses or apartments
with limited floor storage space, ceiling mounts are a great solution. Similar
to a bike hoist, this method stores bikes upside-down, off the ground by means
of hooks. I have used hooks in the garage for years and one of the great
things is that the bike is usually high enough that you can get the hood of
your car under it to maximize space.
Wall Mounts
Leaning a bike leaning
against a wall in the garage poses a risk of it being knocked over (usually in
slow motion, with a crash, bang and a few cuss words thrown in). A wall mount
still keeps a bike parallel to the wall, but it suspends it off the ground by
cradling the bike with hooks on the top tube. It's more secure, and depending
on the size of the bike, wall mounts will often allow one bike to be stored
above the other on the same wall.
Note that some
ultra-lightweight carbon frame manufacturers suggest no pressure be put on the
top tube. Keep this in mind when deciding if a wall mount is right for
you.
Gravity Stands
If you're renting your
living space, you may not want to put holes in the wall to mount hooks or
hardware to store your bike. Gravity stands are a nice alternative–they keep
your bike (in this case, bikes) off the ground and are designed to
safely lean against a wall. They're compact, adjustable and give you the
flexibility to store your bikes wherever you move the stand.
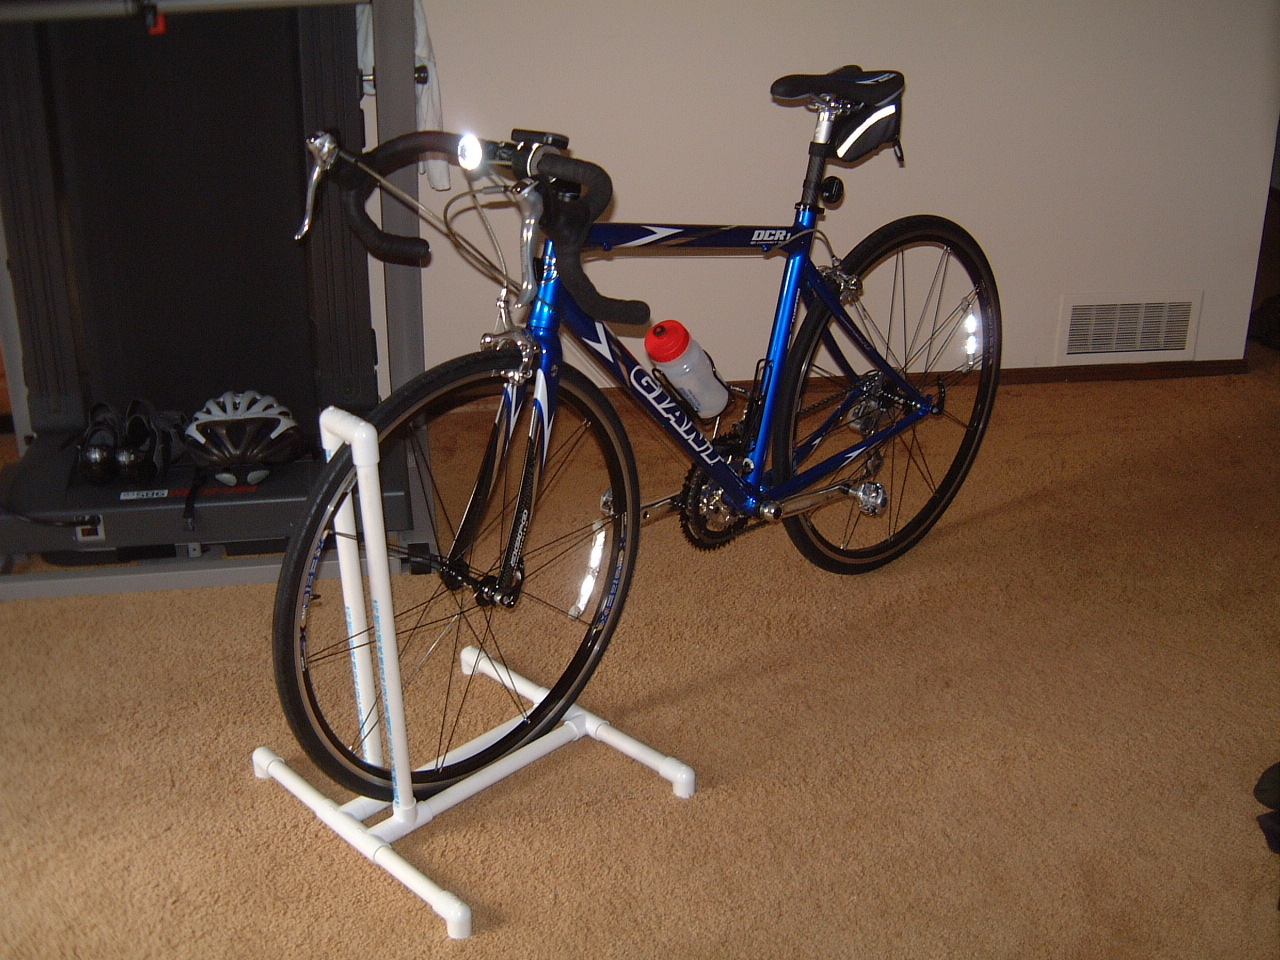
Floor Stands
Floor stands have come a
long way since the fixed metal bike racks at your school when you were a kid,
although the four bike one currently in my basement still looks a lot like that.
While you can still find racks that hold your bike upright by sliding the wheel
into the slot (the one that I have), it's more and more common to see floor
stands that prop a bike up by its rear hub. These floor stands utilize the gap
between the frame and the hub, and are often compatible with both road and
mountain bikes.
I hope this helps you to
organize your space a little bit while you get ready for the Winter Training
season.