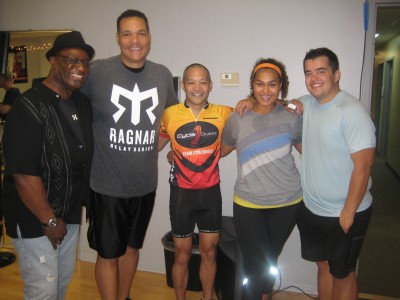
Joe Ducosin in the middle of Biggest Loser contestants O'Neil Hampton, Pete Thomas, Sunshine Hampton and Jessie Atkins.
ICI/PRO member Joe Ducosin invited Amy and me to a special event at Cycle Quest Indoor Cycling Studio, Joe's new studio in Eden Prairie, MN.
The event was a kick off for the Minnesota Tour de Cure, a fundraising ride for the American Diabetes Association. It featured Biggest Loser contestants O'Neil Hampton, Pete Thomas, Sunshine Hampton and Jessie Atkins.
All four are very inspirational and Amy and I thoroughly enjoyed meeting and riding with them.
During the break between the two classes held that evening, I had the chance to talk with Biggest Loser season 2 at home winner Pete Thomas and convince him to be a guest on a future episode of the Indoor Cycle Instructor Podcast.
Amy's interview with Pete is below and includes some footage from the class lead by these incredible Losers 🙂
This week we are exploring How You Sound and in the spirit of learning about ourselves and our individual “sound”, I want you to do something….it will be easier for those of us that teach in a club setting, but hopefully those of us in a studio setting will be able to explore this as well. Please find the best STEP class (yes, they are still out there and wildly crowded) and go to it. By the best, I mean one where the participants would describe the instructor as, “easy to follow”.
The reason behind this is simple: a good step instructor has learned how to cue properly. Why? Because if they don’t, the results are disastrous in their studio…people turning every which way- into each other, into the steps, falling, getting hurt- you get the idea. If you are not a stepper, simply listen. How do they cue? How early? How late? A good cue typically is given 4 beats before the needed action. Any later and it is too late for the verbal cue to be carried out. Any earlier, and the action will most likely be carried out before the instructor wanted it to be.
Why is cueing important as a cycle instructor? I don’t know if you all are like me, but I like to know what is coming. In a broad sense, as in what we are doing for our overall ride, and in a narrower sense, as in what is coming up on the specific road and what the expectations are in the next few seconds. I personally get frustrated when cues are thrown at me and the movement is already in play.
One of the best examples of this is lifts, or jumps. Cueing to lift out of the saddle 4 beats ahead gives the rider time to prepare and the sense of satisfaction when they are ready and able to lift out of the saddle on time.
We have a large ride here in Minneapolis every year and it is classic…the instructor cues the lifts like this: “up, down, up, down, up, down” ad nausium and the ups and the downs come right on the beat of the movement. As I look around the room of 100’s of riders, no one is lifting or lowering at the same time.
This could all be remedied simply with good cueing.
Even things like, “In four counts we are going to get up out of the saddle and tackle this billy goat path, taking our heart rate up to AT”, or “in 4 counts we are going to add some load and pull out to the left, passing the rider in front of us”, give our riders confidence in us as their coach and instructor.
So, check out the group fitness step instructor…the GOOD one that keeps their class in control and rocking and rolling in an orderly fashion. Listen to how they cue. When they do it and how the class responds. I took it for granted until I had to start doing it because a good one makes it look really easy. In fact, we don’t even know they are doing it. You can be like that too with a little practice.
If you are interested in learning more about cueing check out Gin Miller's Blog. Gin invented the “Step Class” and you may find her articles on cueing helpful.
One more thing – When John recorded his class he found that he works too hard. I am going to figure out how to record on my Droid and I will let you know in the weeks ahead what I learn about How I Sound 🙂
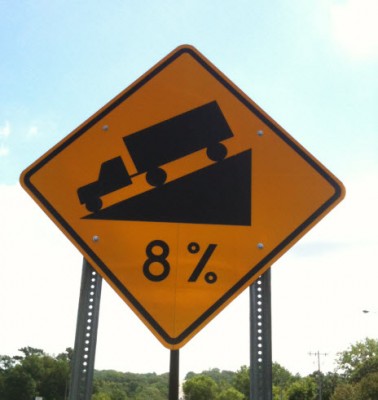
How steep is a 4% grade? 8%? Over 10%? How do I effectively explain % of grade to my class? What are the feelings I would experience climbing different % grades on a bicycle?
And finally, how do I effectively communicate that feeling to my class?
Every July we hear commentators Phil Liggett, Paul Sherwin and Bob Roll discuss how the Tour de France is won or lost in the mountains. Just winning one of the popular climbs; Alpe d'Huez, Mont Ventoux, Col du Tourmalet or others can be the highlight of any cyclists career. But when Liggett explains that Alpe d'Huez has an average grade of 8% what exactly does that mean? Based on context, we can assume that this is a very difficult climb… but how difficult? What does it feel like to ride with the professional Peloton as everyone powers up a long climb at 8% grade?
So with the Tour only a month away and many Instructors and students riding outdoors, I felt you might benefit from some cliff notes on Grade and Slope. If you are reading this outside of North America, the concepts that I'm going to present are the same, but how they are noted on street signs varies from country to country.
Simply put, % Grade is gain in elevation (what's called the Rise), over a horizontal distance (the Run) – “typically” 100 feet or meters. The actual distance traveled is the Slope length which is slightly longer than the Run – it's that A²+B²=C² Pythagorean theorem thing you grew to love in highschool 🙂
So…
A 5% grade = a 5′ increase in elevation in 100′ of horizontal travel.
Image from Wikipedia
So you don't confuse the engineer's in your class, be careful not to mix up % of grade and the degrees of angle. They're completely different and roads aren't measured in °. If you feel it would be helpful to your students, you may want to comment that a road at 45° (as if that would be possible) would have a 100% grade, i.e. 100′ forward @ 100′ up.
Wikipedia has an informative page on Grade / Slope if you'd like to learn more.
Alpe d'Huez has an average grade of 8.1% over a run of about 13 km. Click to see the profile. That sounds impressive but it really tells you nothing if you don't understand what it feels like to ride a bicycle up an 8.1% grade. Actually 8.1% is the average. The first kilometer and a half are at over 10%.
If you want to clearly communicate the pain of climbing a 8.1% my suggestion is to find a steep hill, ride up it and experience what it feels like.
So now you may be thinking; “great idea John… but I don't recall seeing the grades marked any of the roads in my neighborhood.” My response would be; go out, find one and measure it.
I made the video below for a different project where I recommend that cycling studios measure and mark the road as a helpful guide to outdoor cyclists. In the video I describe the simple process of measuring the grade of one of the local climbs in your town.
If that went by to quickly, you divide the number of vertical inches by 120 (10′) which gives you the % grade.
How I communicate % grade in my classes.
Discussions of % grade typically come up when I'm teaching a virtual ride using an Epic Planet DVD or Global Ride's Dirty Dozen DVD, the grade of each climb is listed in the information bar at the bottom of the screen and I'll use it to help explain the intensity of each effort. I start by explaining that, although it doesn't sound like much, 4% is a serious climb that will have most of us at Threshold HR or Power FTP if it's of any length. I go on to explain that (at least where I live) most roads or highways rarely exceed 4%.
I'll reference local roads, that I understand the % grade, to my class – my apologies to those of you in flat lands of Iowa or Florida, you're on your own. Some of these roads, on established cycling routes, have steeper grades that I have measured. I'll talk about them by name; “Fox Road Turn” 8%, “Carver Wall” 12% and “Eden Prairie Road” 13.5% as a way to appeal to my cyclists who have experienced these climbs for real.
Other examples:
5% has you in your small chain ring (the sprocket in the front) and you need to manage (limit) your effort so as not to blow up!
8% and you're wishing you had a smaller gear and it's everything you can do to ride in a straight line. It's also everything you can do keep your pedal stroke smooth. Time here is short with your HR way over VT2 – Threshold.
10% is the limit of most recreational cyclists, if the climb is longer than a block or two. Smallest gear, out of the saddle and HR is as close to maximum as you can tolerate.
15% or more and you get off and walk 🙁
Once you've measured and ridden a climb with known grade, my guess is you're going to have a new appreciation for how truly difficult those famous climbs in the Tour de France really are and a new respect for the professional cyclists who climb them.
You can find the profiles of every climb, in every major Tour, along with 33,773 others at http://www.climbbybike.com/
This ride is from Joey!! – “This was a fun ride to create. This is one of my favorite types of classes. I love the increasing tension class because it builds endurance, builds strength, and teaches the riders how to manage their tension
A new ICI/PRO member emailed asking me this question:
Just joined ICI and haven't had a chance to navigate the whole site yet but did go right for the Free Music Downloads. They appear in my itunes but when I go to listen to them itunes tells me that it cannot play them because it can't find the original file. I glanced over your site looking for troublshooting but couldn't find it. Any suggestions as to how to get itunes to recognize the songs?
This sounds like a Windows/PC problem: iTunes is the default player on most people's computers. When this ICI/PRO member clicked the Free Music Friday download link the song opened and played in iTunes but the file wasn't added to the My Music/iTunes Music folder. So the track plays fine the first time. But when you come back to the song, iTunes doesn't know where it is and asked if you would like to find it > don't waste your time.
Here's how to fix it:
Open iTunes and in the top left corner click Edit >then Preferences. A dialog box opens and click the far right hand tab click Advanced > you should see this, or something similar depending on which version of iTunes you have:
Tic the Copy files to iTunes Media folder and click OK.
Now whenever you open a song it will automatically end up in a folder where iTunes can find it 🙂
Yes, it's a good idea to Tic the other option to keep your iTunes Music folder organized.
I welcome your questions and I'm always here to help!
When I heard about a SPINNING® Certification Workshop being offered just minutes from my home-base in Eden Prairie, Minnesota, I jumped at the opportunity to sign up. Believe it or not, I have been teaching indoor cycling for nearly four years, but never received formal training on the bike. The workshop I attended was held in Minnetonka, Minnesota, on July 23rd, 2011, and was led by Seth Dedmon, from Tennessee. Seth epitomizes what it means to be a great workshop facilitator. His energy, sense of humor, and thick Tennessee accent made me want to listen, and his knowledge base from years of experience had me jotting down notes and quotes almost non-stop.
The nine-hour event was broken down into four sections:
– Bike Setup/Safety
– Form
– Heart Rate Training
– Class Design
Bike Setup/Safety
We spent the early part of the workshop learning how to properly set someone up on the bike. Because I had never been formally trained to teach indoor cycling; I knew that the bend in the knee should not be more than 25 degrees, but not much else. After completing this portion of the workshop, I now have a systematic approach to bike setup and feel completely confident with the entire process.
Form
Second on the agenda was form. During this part of the workshop, we were on the bikes for over an hour with absolutely no music (Imagine that!) and Seth led us through a series of drills while teaching us proper form for seated and standing flats, climbs, jumps, sprints, and running with resistance. Many of the participants — including me — realized form is something even we need help with from time-to-time.
Heart Rate Training
As someone who does not own a heart rate monitor, this was the time of the day when Seth convinced me to buy one. Additionally, he discussed the five types of cycling workouts — recovery, endurance, strength, interval, and race day — and their corresponding heart rates. Seth’s instruction helped me understand the benefit of workout periodization and encouraged me to make certain each class has a specific purpose.
Class Design
Finally, we learned about class design. As a team, we worked together to build unique profiles (workout routines) and also talked about the importance of using music to create feeling and emotion in class. It has always been a personal priority of mine to consistently create new playlists, but Seth encouraged me to broaden my horizons and search for songs from a wider spectrum of genres — from reggae and classical to tribal and alternative.
Sample Class
To top off the day’s experience, Seth had us get back on the bikes for a sample class, and he actually instructed off the bike. To our surprise, he encouraged us to do the same from time-to-time, as it allows the instructor to give riders personal attention, correct form when necessary, and check in on participant heart rates. Quite honestly, his brief, 30 minute class was one of, if not the best, cycling experiences I have ever had because of the ambience he created in the room. It motivated me to become a better instructor.
The Takeaway
In addition to what I learned about bike setup/safety, form, heart rate training, and class design, I learned two things. First, I discovered that indoor cycling is very much a mind/body form of exercise and have a stronger desire to encourage visualization through music, class design, and my words. Additionally, I realized that instructors reach plateaus in their teaching just as the everyday exerciser reaches ruts in their training. The entire day left me feeling empowered to continually improve my teaching so that participants — our number one priority — remain excited about their health and fitness.
*Jennifer Lintz is a Nutritionist, AFAA Certified Group Exercise Instructor, Certified SPINNING® Instructor, and ACE Certified Personal Trainer. Visit her web site at www.wellnessbyjennifer.com.