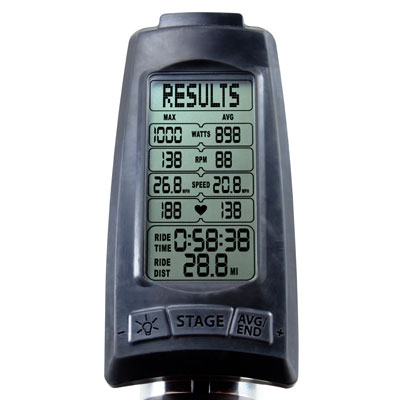
So we’ve talked about why Indoor only riders will benefit from Power Training, and in the last post we reminded the avid outdoor cyclist just why Power is a must for their continued growth and improvement riding outside… but how to get started. That’s the question I’ve heard from a number of folks that have just gotten new Keiser M3 Power bikes (even though our Power Training system from Cycling Fusion works for all indoor bikes – it is what we use at Global Ride Training Center). The inevitable first question is like one from a new blogger sitting in front of a blank computer screen. Where do I start!?!
Introduce Power With Games
While most indoor cyclists still don’t wear heart monitors when they ride, most know what it is and why it is used. However, when it comes to training with Power, that’s a different matter altogether. Unfortunately, this is also why many clubs do not consider bikes with Power. Their ignorance leads them to feel it is too complicated or worse – intimidating. In this case ignorance isn’t bliss, it’s just plain ignorance. The goal here is to show that riding with Power is fun, interesting, and easy to do. This will help to beat back a consensus of complexity, which right now, threatens to slow the growth of Power bikes in our industry. Consequently, it’s best to just let students begin to play with Power before they really begin to train with it.
We do this by offering structured and methodical Power Games that make training with Power more fun. These are just a sample of Power Training games one can play. With feedback like Watts, Heart Rate and Cadence, (typical tools that come with any bike already equipped with Power) one is only limited by their own imagination. Here are some games that might help “break the ice” when it comes to training with Power.
Ten Songs To 10 Gears
Let your students warm up, encouraging them to increase their gears slightly as they “warm up with purpose”, but to keep it light and easy during the warmup. Once they have warmed up for at least 5 or 6 minutes, ask them to check their gear number, and the Watts they are genearting. This will represent their “baseline” or the bottom gear or Wattage for them today. This concept of establishing a Power “baseline” will apply to all of the games we discuss here, except for our last game; the 5 X 5.
Each of the next 9 songs then you should direct them to increase it 1 gear. The first 3 or 4 should be easily handled in the saddle. The final 3 or 4 may need to be out of the saddle, and some students might not be able to negotiate a gear much more than 7 or 8 above their warmup, depending on how high they start, and the type of Power indicator your bike uses.
Outside of the first couple and last couple, you should have plenty of leeway for what position to be in for all the other Power levels. Continue to work on form, and draw their attention to how each gear affects the Power, and how it probably also affects their cadence and certainly heart rate. This is a good exploratory exercise to help students see just how far they can go. Some may never go beyond a few gears without this slow and methodical increasing of Power. Others might find that they haven’t really stressed themselves, or at least not to the max. This is good too, as it helps to show your students a wide range of Power levels and helps them to understand what kind of Power range they have.
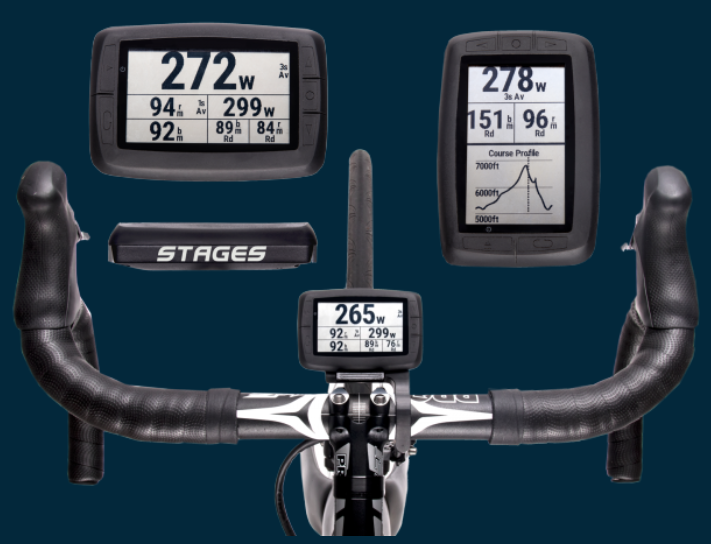
Stages Dash is a power-training-optimized GPS head unit that seamlessly integrates with Stages Link, a new cloud-based training and analytic system that includes custom-tailored coaching and education for cyclists of any ability. Stages Link will be in beta release fall 2016 and Stages Dash will be available early 2017, with a MSRP/RRP of US$399/€399.
“When a rider buys a power meter, they’re looking for something more than a number–they have a goal,” said Pat Warner, SVP of Stages Cycling. “After three years providing power to Team Sky, we’ve realized that athletes from professional to recreational have similar aims: they all want to meet their goals and they need simple guidance and immediate feedback to succeed. This new Stages ecosystem enables all riders to maximize their performance and meet their goals, with a simple and intuitive interface featuring unrivaled customization, and training programs that learn and adapt from each rider’s unique characteristics and achievements. “
Stages Dash
The Stages Dash performance training GPS head unit is specifically designed to coach a rider to his or her best performance. In the five years since launching the Stages Power meter, Stages Cycling has optimized its use with 3rd party cycling computers, but discovered a need for a highly-focused, customizable, training device. Stages Dash answers this unmet need with the delivery of robust Bluetooth and ANT+ connectivity to Stages Power and 3rd party devices, plus GPS capabilities, while introducing new features including the ability to offer guided workout coaching and specific provisions to manage critical training metrics across all devices.
Stages Link
Stages Link is a hub of cloud-based coaching, education, training analysis and equipment management tools, which were developed collaboratively with the analytics experts at Today’s Plan. The system is backed by the industry’s most advanced analysis capabilities currently being used in the professional peloton. Stages Link custom tailors training plans and daily workouts to benefit rider performance and enable performance goals, whether the goal is to simply improve fitness or target specific races over multiple seasons.
Stages Link will also help you quickly set up your Stages Dash and keep tabs on your Stages Power meter, all while being open and compatible with 3rd party devices. Stages Link plan pricing is TBD, however, riders who purchase Stages Power or Stages Dash will receive complementary access for two months.
“We’ve developed a complete experience that will personally guide a rider through the process of living with and meeting their performance goals with power,” said Warner. “This system we’ve developed is an easy and fast way for a rider to achieve their best performance.”
No more hunting for new music or counting out cues to develop your ride profile. Here is your ready to ride profile for a fully choreographed ride, that can be displayed from your phone, or printed out onto cue cards for your class. This ride is timed out, down to the second, to make your life as easy as possible!
FTP, a concept refined by power authority, Dr. Andy Coggan, is an estimation of the amount of work you are able to do in an hour. It serves as the basis for loads of other important metrics (e.g. TSS, CTL, ATL, TSB, etc.) that will be covered in future entries. Most immediately, the FTP value serves as the cornerstone to setting up training zones.
Rather than asking athletes to attempt a one hour maximal effort to determine FTP, I prescribe the method that Hunter Allen, co-author with Dr. Coggan of Training and Racing with a Power Meter, has developed. The protocol itself is actually quite simple: after a substantial warmup, start a lap on your head unit, and smash it for 20 minutes, as hard as you can. The average power recorded for the 20 minute test is multiplied by .95 to estimate what your “hour of power” (or FTP) would be.
The ideal terrain for a 20 minute test is a moderate (3-5%) steady climb that can be ridden safely without interruption (e.g. no stop lights). Of course, most of us might not have access to terrain that meets these requirements. A flat road (with the same requirement for safety) will do and of course, riding the test on a stationary trainer indoors is a great alternative.
“Smashing it” for 20 minutes might sound pretty straightforward but, to get the most out of your test, some smart pacing will be required. When prescribing an FTP test to my athletes, I encourage them to break the test down into smaller, more manageable chunks, like four-five minute efforts. For each five-minute time period, have a soft goal for average wattage. Trying to increase the average power for each five-minute segment (compared to the segment prior) will go a long way to helping you achieve proper pacing. As you get to the end of each five-minute portion, take an assessment based on your rate of perceived effort (RPE) and ask yourself, “Can I keep up this intensity? Can I increase the intensity for the next five minutes and the remainder of the test?” When it comes to the last few minutes, you should be at full effort, eking out every last bit of energy to assure that you have averaged the highest power possible. I refer to the wattage goal as “soft” because no matter what the goal power might be, you are going to be limited by your feeling on a given day. You might be able to do more work than you anticipate and you might not be having the absolute best day and will potentially fall short of your expected power output. Don’t let expectations get in the way of having your best test. Remember, the goal of testing isn’t to meet a particular number but rather, to measure your best performance you can do on a given day. Being in tune with your RPE is critical.
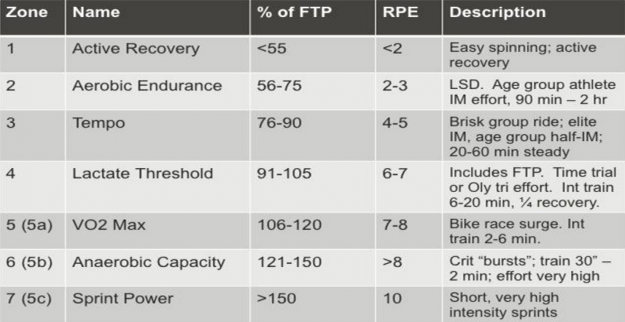
With your new FTP number in hand (best 20 minute power x .95), you can create training zones. With some simple calculations, you will be able to determine your training zones based on Allen and Coggan’s chart below.
Now that you are armed with your training zones, I suggest you record some of your regular rides and take a look at the files afterward to see how much time you are spending in each of your zones. This information can go a long way to helping determine what the demands of a ride/race/event are and potentially guide your training a bit, to meet those demands.
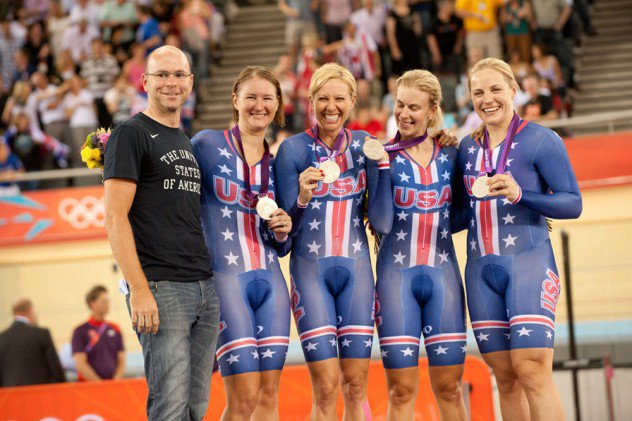
ABOUT BEN SHARP: Formerly a program director for USA Cycling, Benjamin Sharp is the resident Power Education Specialist for Stages Cycling. Prior to joining the Stages Cycling team, Benjamin spent seven years coaching the USA Cycling National Team. Under Benjamin’s guidance, riders racing for various national programs won 13 World Championships, and stood on 8 additional World Championship podiums. Benjamin’s crowning achievement was coaching the US women’s team pursuit team to the silver medal at the London Olympic Games in 2012. An accomplished athlete in his own right, Benjamin has amassed more than a dozen national championships in a cycling career that has spanned three decades. Benjamin is a USA Cycling Level 1 coach and has earned the USA Cycling Power Certification. As a coach, Benjamin’s strength is making accessible to the masses, the science of high performance elite athletics. As a Continuing Education provider for Stages Cycling, Benjamin now spends his time educating professional, amateur, and indoor athletes alike on the virtues of training with power.
I hate math, especially when I'm forced to do quick calculations in my head.
Figuring (forgive the pun) that many other people dislike math, I won't ask anyone to do any calculations in my classes. For example, I would never cue something to the effect of;now I need everyone at 85% of AT for one minute… and then we'll push up to 95% for the final 30 seconds! Against a background of loud, pounding music, at that point I've got my head up and I'm mouthing to you:
Wait… what are you asking me to do?
Won't do it. Instead I base my Life Time Performance Cycle classes on two numbers; PTP (Personal Threshold Power) and JRAP (Just Riding Along Power – AKA > Base Watts > VT1 / First Ventilatory Threshold Power). From these two rider identified threshold wattages, we can construct three meaningful power Zones;[wlm_private ‘PRO-Platinum|PRO-Monthly|PRO-Gratis|PRO-Seasonal|Platinum-trial|Monthly-trial|PRO-Military|30-Days-of-PRO|90 Day PRO|Stages-Instructor|Schwinn-Instructor|Instructor-Bonus|28 Day Challenge']
Recover zone – watts below JRAP
Perform zone – watts between JRAP and PTP
Improve zone – watts above PTP
That's all I need to coach and cue an easily understandable class, to a variety of riders. Regulars include committed endurance athletes, Cat 2 cyclists (A group riders), weekend warriors (B group) and lots of; “I'm not training for anything John… I just like your class” regular folks.
Using these three simple zones makes the cuing each task much easier to communicate and, without a lot of numbers and percentages flying around the room, much more actionable by my riders.
Now I need everyone in the upper part of their Performance Zone for one minute… and then we'll push up to the Edge of your threshold the final 30 seconds!
This is an expanded version of Dennis Mellon's Below/@/Above threshold cues he uses and similar to the well documented heart rate based concepts that makeup the Zoning Program.
Using this system to cue wattage intensity, I've successfully taught this class for past two years – this is our third on the FreeMotion S11.9 Indoor Cycles. We do not have a Display Training system like Performance IQ or Spivi to project rider metrics on a screen and/or do the “math” for you to display percentage based power zones. The numbers on the console are what we have to work with.
Over this times I have had numerous (dozens maybe) participants thank me for NOT using percentages of “something” to communicate intensity levels of heart rate or wattages. That makes me happy and it really simplifies my job as the Instructor/Coach > Coach is a much better description of my role in these classes training sessions as I will typically ride side by side with them, rather than up front in the normal Instructor position.
NOTE: I still have control of my music when I'm riding with the group. See this post about using an inexpensive bluetooth receiver so your iPhone is wirelessly connected to the sound system.
Today's 75 minute session > Pinning Down Two Numbers
I you look at the song lengths of my playlist you'll quickly understand the class format >
A long (9-13 minute) song where we play around finding JRAP / Base Watts
Followed by a short (3-4 minute) track where we explore PTP
Rinse and repeat
The first track is of course a warm up that includes 3-4 x 30 second accelerations / openers near the end to get everyone ready to work.
Track #2 – the first PTP track is important. We'll use this average wattage for each of the four PTP efforts to follow. Everyone seemed to enjoy Billy Idol — Rebel Yell – 1999 – Remaster – maybe suffered a bit as well. At 4:47 there's plenty of time to explore PTP. We use the Stage button to reset the averages at the beginning of what I describe as; Your Best Sustainable Effort. It's normal for riders to miss-judge where they should be, so I'll often have everyone make needed adjustments and hit the Stage button again to reset the averages.
Track #3 is for finding JRAP / Base Watts. The very recognisable Peter Frampton — Do You Feel Like We Do – Live is perfect for this. We used the first few minutes of the long track to recover and then begins of dialing in the wattage that has everyone at JRAP/Base Watts. It's fast @ 108 RPM – I don't demand they follow it exactly, encouraging cadences above 90RPM. With one hand on the resistance knob, we add / subtract load in small increments… and then wait for our breathing response. I cue the feeling where you're just above “chatty” = you are first noticing you'd prefer breathing through your mouth.
My own unscientific research has be seeing JRAP / Base Watts ~ 65-70% of PTP. Sorry, there are those damn percentages I hate > I offer that just for your perspective.
If using VT1 / First Ventilatory Threshold Power or heart rate is new for you this series of posts have a bunch more detail. This video from ACE does a great job demonstrating VT1 / First Ventilatory Threshold.
I get questions; John, they're talking about heart rates here, not power, so how does this apply?
Heart Rate BPM's are just an indication of effort (how hard you're working). Watts are the same. You work “X Watts” hard, it feels like “Y RPE” and your HR is “Z BPM”. Does that make sense? It doesn't need to be any more complicated than that. Remember, I hate math 🙂
Rinse & Repeat
Self direction is a key component of how I coach my Performance classes. After all, I'm not going to be there with them on the road. So once everyone understands the drills and what what they're supposed to accomplish, I pretty much turn them loose.
Please let me know if you use this > or your questions.


 So we’ve talked about why Indoor only riders will benefit from Power Training, and in the last post we reminded the avid outdoor cyclist just why Power is a must for their continued growth and improvement riding outside… but how to get started. That’s the question I’ve heard from a number of folks that have just gotten new Keiser M3 Power bikes (even though our Power Training system from Cycling Fusion works for all indoor bikes – it is what we use at Global Ride Training Center). The inevitable first question is like one from a new blogger sitting in front of a blank computer screen. Where do I start!?!