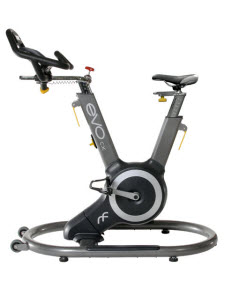
I was intrigued by the new Evo Indoor Cycle when I saw it at this past IHRSA. The first thing I noticed was there's no big flywheel… and it moves side to side.
Once I discovered that there was an educational component to the Evo, I knew I needed to learn more and share what I've learned with you.
Here's a video that demonstrates how the frame moves very similarly to an outdoor bicycle. I briefly rode an Evo at the show and it's very different from a Real Ryder. It just moves naturally underneath you and doesn't require you to force or man-handle it… it just responds to you.
Jack Nunn is the Master Trainer of TriCore Indoor Cycling and he joins me on this episode of the podcast to give you an initial understanding of the Evo Indoor Cycle, their education program and what they have planned for the future.
In my last article entitle “Make Recovery Work” we looked at how we as instructors can efficiently use recovery time to our advantage. Two of the main points were to use recovery as a time to provide instruction to prepare our riders for what is ahead and as a way to administer the “Recovery Litmus Test”. The biggest question that was prompted by the article was “so how long should recovery be?”.
An Excellent Question!
Not only and excellent question, but the right question. The subject of recovery ranks high on my “ticked off” list as an area needing much education and improvement. This is not just an indoor cycling issue, it is a dilemma I’ve seen in training as a whole. We live in a world of the 1-hour training block. To take it a step further, we are constantly asking (or being asked) “HOW MUCH can we jam into 60 minutes”. Well, as usual……it depends.
You Can’t Fake Reality
Many of us have experienced those indoor cycling classes where the instructor yells “GO!” within the first 2 minutes of the start of class and continues to pour on the intensity until the hour is up. Recovery….eh….stretching….eh…..wipe down the bike time is also reduced to barely 2 minutes. The goal is to “maximize” our class and our workout — squeeze the hour for what it’s worth. What an absolute waste of a class AND a bad sales practice (what?).
Instructors and riders alike often think that if you push hard through the entire class you will gain more fitness and lose more weight (the sales pitch). Because many have bought into this misconception, insane indoor cycling classes are still the rage (pun intended). Enter REALITY! The (physiological) reality is that most riders are not going to be able to hold 80-90% for an entire hour. One to 3 minutes is more like it. And then what happens? Their intensity decreases and decreases as their muscles continue to fatigue while their mental toughness dwindles. After 10 minutes of this insanity (being ridiculously generous), riders are reduced to 70% of their ability. The real fake out here is that the rider “perceives” that they are still working at 90+%. This is where having a power meter on your bike can sprinkle a does of the real world.
Top Performance Requires Adequate Recovery
Top performance is not just for the pros. It simply means to work at the best level of intensity for the given drill or effort. For example, if an interval requires that we maintain 80% of our ability for 5 minutes, maintaining only 70% will not provide the needed stress and will not yield the desired benefit. The sad part is, without recovery, our riders will never know they are getting gypped out of fitness. To them it stills feels like (is perceived as) a hard 80% effort.
Due to the time constraints (and lack of attention span of some riders), providing the same amount of recovery indoors, as we would when riding outdoors, may be unrealistic. But that doesn’t mean we throw out the baby with the bath water. For example, it may be ideal to provide 5 minutes of recovery after a hard 2 minute interval. In an indoor class, recovering for that long may cause riders to mentally tune out. Remember, we are trying to adhere to the best practices of exercise science, but not everyone in our classes are elite level athletes. So what do we provide? Considering the indoor environment and our demographic, 3 minutes to recovery can work. Let me provide some guidelines that may allow you to make better decisions. Keep in mind these are just “guidelines” and there are numerous variables.
I’ll break these down by using the common cycling zones 1 to 5:
ZONE 1 — ACTIVE RECOVERY (RPE 1-2 or Easy):
This IS recovery so one should not need to recover from recovery 🙂
ZONE 2 — ENDURANCE (RPE 3-4 or Fairly Light):
Endurance efforts can generally be held for longer times (1 hour +). In many cases, providing 1-2 minutes of recovery after an 8-20 minute steady-state endurance effort may provide more “mental” recovery than physical.
ZONE 3 — AEROBIC FITNESS (RPE 5-6 or Moderate):
Although aerobic fitness efforts can be sustained for 6 — 10 minutes by some, they can be considered very challenging for beginner and intermediate level riders. Depending on your class demographic, I would provide 1 — 2+ minutes of recovery depending on the length of the effort. If the duration of the effort is less than 3 minutes, 1 minute of recovery may be suitable.
ZONE 4 — SUB-THRESHOLD (RPE 7-8 or Hard):
Even though some fit outdoor riders can sustain this level of intensity for much longer, indoors these efforts are generally from 4 to 6 minutes in length and could require 2 — 4+ minutes of recovery respectively.
ZONE 5 — CAPACITY (RPE 9-10 or Extremely Hard):
These efforts can range from 30-second explosive sprints to 2+ minute anaerobic endurance efforts. If a rider is “truly” working at capacity, 3-5+ minutes of recovery should be well received.
Like most things that involve both the human body and science, there are many variables and options. One of them is Tabata training. In general, Tabata training provides a shortening (starving) of recovery between high intensity efforts to increase aerobic fitness and stamina. This type of training is best maximized by those with a higher level of fitness and should be “seasoned” into our training and not BE our training. And DON”T use Tabata training as an excuse to provide inadequate recovery in all of your classes. I WILL find you.
So as you can tell by my emotional state while writing this article, I’ve got issues surrounding this topic. Over the last 15+ years of coaching, I’ve seen numerous riders put at risk from over-reaching and over-training, as well as, a general loss of fitness. The biggest shame is that people don’t get to the fitness level they could achieve because they are working to hard to much of the time.
Give your riders Quality Training! Give your class the Real Thing!
Credit – Richard Ziade at Basement.org for the complicated diagram.
Are we losing some of the people in our classes with all this talk of; Max HR =bad & Threshold HR = good, T1 & T2, Training Zones, Functional Threshold Power, Watts, Kilo-calories, etc…? Spinning® & Indoor Cycling has been around for over 15 years and yet my perception is that only a minority of our students have embraced Zone Based Heart Rate Training. Now we are introducing Power, with all it's complexities, to studios where less than 50% of the participants regularly use a HR monitor. I'm sure most of us will agree that the move to Indoor Cycling 2.0 will benefit our students, but are they keeping up with the changes?
I've heard that the military will “Stand Down” (cease current operations) when it becomes obvious that something isn't working as intended. When complicated systems seem to break down, the solution may not be to layer on additional technology, information or instruction. Instead what's needed is a return to the basics, which has the effect of getting everyone caught up and back on the same page.
In this PRO podcast Tom Scotto and I discuss some ideas about how you could “Stand Down” and bring a renewed focus to the basics of Heart Rate Training in your club or studio.
What exactly should the “openers” in the warm-up consist of? In Tom's “Getting Started with Intervals” audio profile, he described them as 30 seconds of maximum effort followed by 30 seconds of recovery, which to me sounds the same as the first Muscular Strength interval in this audio profile (30s effort/30s recovery). I would appreciate help understanding the difference.
As always, I greatly appreciate the audio profiles!!! And Marc, thank you for the playlist suggestions!
Kristi
Kristi,
Thanks for you question. It is a good one. Many people don't understand the purpose of openers and thus never do them or benefit from them. Simply, they are all-out, maximum efforts for the prescribed period of time (openers can be different lengths depending on their purpose and what one is preparing for). How do we define the “all-out” maximum effort? Think of it as the most resistance you can use at the highest cadence. I would recommend a cadence of 85 RPM or greater (I personally prefer 100+ RPM). You should find yourself through into the high-end of Zone 5!
So what's the difference between the openers and muscular strength efforts? The muscular strength efforts are limited by the cadence. In order to more effectively develop strength in the legs, the cadence needs to be slower (60-70 RPM) in order to provide the necessary stress (I.e. Force) on the muscle. This in many cases will not produce the highest heart rates (but pretty high). Simply put, what is the most resistance/stress/force I can place on my legs at for example, 60 RPM.
Openers push every limit for a short period of time in an attempt to activate systems such as your anaerobic energy pathway and lactate buffering. If you prepare and active these systems BEFORE the structured part of the workout, the body will not be behind the 8-ball and will respond more consistently and repeatedly.
When a student asks what they should purchase for Indoor Cycling Shoes, what do you recommend? Do you have a place to send them? Does your club sell Indoor Cycling Shoes?
If you're only using them for Indoor Cycling classes, then a shoe with a recessed SPD cleat is the best choice. Often refered to as Mountain Bike shoes, you'll find they are easy to walk on and won't scratch the floor. Every pedal you will find and a studio these days will have a SPD on one side.
Here are links to a number of suggestions at Amazon.com which has as good a pricing as anyone and you can't beat Amazon's easy return policies.
I ride a lot outdoors and prefer a conventional “Cycling Shoe” that has an exposed cleat – I have used Look cleats on all of my road bikes. My feet are very wide and flat. After suffering with ill fitting shoes in a “regular” width for years, I finally broke down and purchased a pair of Sidi Mega Road Cycling Shoes. Yes I know they are expensive. I've had mine for at least ten years and other than looking a bit faded, they are as comfy as ever.
I should add that I wear my Sidi's with Superfeet supportive insoles that prevent my feet from rolling inward, which takes a lot of stress off my knees.





 When a student asks what they should purchase for Indoor Cycling Shoes, what do you recommend? Do you have a place to send them? Does your club sell Indoor Cycling Shoes?
 . Yes I know they are expensive. I've had mine for at least ten years and other than looking a bit faded, they are as comfy as ever.