

Riding the Stages SC3
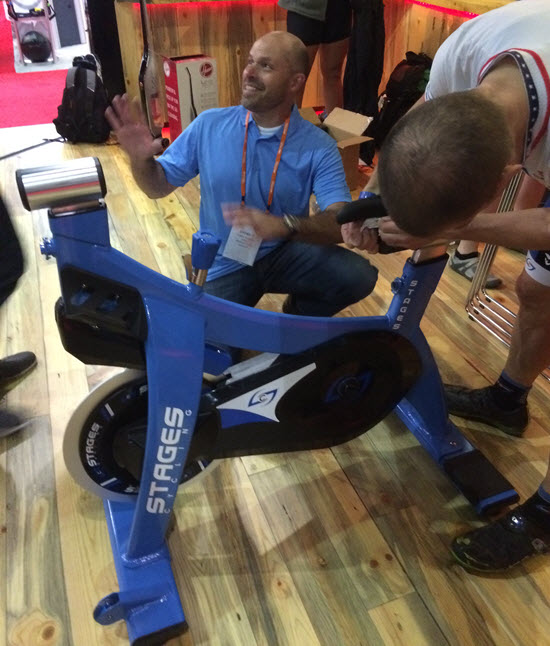
I got about 75 minutes of saddle time on the Stages SC3 during the conference. Two morning classes, a 60 sec challenge (445 watts – 2.78 watts/lb which I felt was OK for a 53 year old) and some undirected free time when I experimented with the SprintShift.
http://icipromedia.s3.amazonaws.com/Macgowan_Riding_the_Stages_SC3.wmv
Quick aside: Why does everyone look like they're setup too low in the videos? I had a Facebook comment asking this question and she's right, they do look low. But I can assure you that neither Dunte Hector or Cameron Chinatti riding in this video are set up incorrectly. Over the years, I have developed an eagle-eye for improperly adjusted riders = they looked right to me, riding there in front of them. So why do they look low? I have no idea. Might be an optical illusion, or the shutter speed of the camera is too slow. Do you have any idea why?
Fit – I'm 5′-10″ and I like a long & low reach to the bars. On a bicycle, this is determined by top-tube length. On most Indoor Cycles without handlebar fore/aft adjustment I feel a little cramped. With adjustability an option, I will normally push the bars all the way out – to increase the reach. On the SC3 I felt very comfortable with the reach with the fore/aft centered = this IC appears to have a longer top-tube length. (I didn't measure anything, this is just my general feeling)
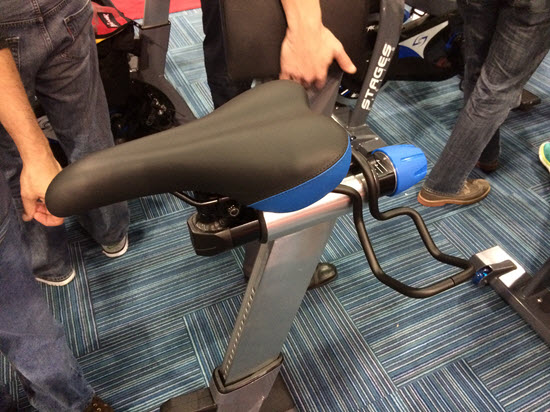
I also have long femurs, (thigh bones) which require my saddle position to be biased quite a bit rearward, to keep my knee over pedal. My road bike needed a special setback seatpost to get me in the correct position. Here too I found that there was plenty of room and found the perfect position with the saddle set about 1/4″ back from the center point on the adjuster.
I really like the road bars they are using. They offer some new options for hand positions, while at the same time creates limits – no more seated riders looking goofy with their hands extended way out to the bar ends. The imitation brake hoods (the bump at the end) form a very natural/secure place to rest your hands while standing, hopefully removing the temptation to tightly grip the bars.
All the adjustments include easy to read measurement scales = your participants will be able to quickly make their pre-class adjustments, after their initial fitting. The saddle/handlebar fore/aft are micro adjustable and use a nicely shaped knob that you tighten down to fix your settings. Height at both ends use the new FitLoc over-center lever to place setting pins into very closely spaced adjustment holes.
There are two water bottle holders attached to the frame, which are very easy to reach seated or standing. Why not include them as part of the handlebars? I asked that question to Cameron and she told me that they wanted to keep the bars as light as possible, so they're easy for small people to adjust with only one hand 🙂
The Ride – Smooth / Solid and very Quiet. As I discussed in Part 1, the aluminum frame is very strong and I couldn't detect any flex. All the adjusters stayed securely fastened = I never felt I needed to re-tighten anything during my rides.
The SC3's belt isn't under any tension, which is unique. It's hard to describe this in words… there isn't the feeling like you need to overcome some internal force in the drivetrain. The result is a very light feel, almost frictionless, with just a touch of chain like vibration coming through the peddals.
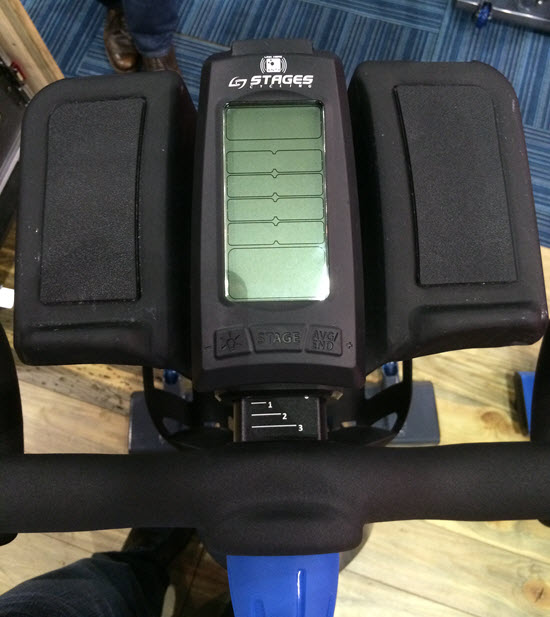
I'm a big fan of magnetic resistance on Indoor Cycles – you can read why here. The SC3 didn't disappoint as their drive uses this resistance system. The large, screw type, adjuster knob made for predictable and progressive adjustments in the amount of load added. Pushing down on the knob is the safety brake.
Using the SprintShift lever
If you do a lot of timed below/@/Above PTP intervals, where everyone is recording their average watts using a stage button, you'll love using the SprintShift lever. With apologies to Ron (pocket fisherman) Popeil – when you're running a series of intervals all you need to do is; “Set it… and forget it!”
Here's one way I found to use SprintShift: The Stages Instructors had us doing a fun relay race, as part of each class I attended. Each row competed to see how fast each rider in turn could complete 0.2 of a mile. They had some fun inflated batons that we passed, after completing our two tenths.
To prepare for the race, I practiced to get a feel for the proper resistance I could sustain, for what turned out to be about 25 seconds of work. With the SprintShift lever fully to the right, I set the level so I would see ~500 watts @ 100 RPM (where I work best during a short sprint) and then flipped the lever full left (making it lighter/easier) to wait for my turn. I maintained my 100 RPM cadence until I was passed the baton. Snapping the lever full right brought me to the perfect gear. I punched the stage button and was off. Did I mention I was the anchor person on our team? And that there were two very fit people behind me? So yes, I felt a ton of pressure to get my 0.2 done as quickly as possible.
We talk a lot about including “Best Efforts” (and below/@/Above PTP intervals) as part of your classes here at ICI/PRO. I feel they are an important components of every class I teach – they give my riders a quick understanding of PTP Personal Threshold Power. This answers the question for them; “how much power/watts should I be making, when I want to work hard?” without waiting for a scheduled 20 minute FTP class in the future.
Think forward to the (hopeful) day when I can teach on the SC3, I would have everyone dial in their PTP resistance with the SprintShift lever in the middle position. Then moving it to the left would give me a “Below PTP” working resistance. Bringing it fully to the right would add the “Above PTP” resistance. Cuing a return to whatever cadence we've been using should make for an easily understandable and challenging class 🙂
Power Observations
The power/watts readings seemed steadier/ didn't bounce around as much as what I'm used to on a competing bike. The absolute watts readings I was seeing was very similar to what I'm accustomed to.
I really like how your averages remain displayed for 5 seconds after you hit the stage button. It always takes me a moment to refocus after an all out effort = I enjoyed see my averages before they disappeared.
Bottom Line
I see the Stages SC3 as an excellent Indoor Cycle and it should be on your short list of cycles to choose from if/when you're planning a purchase.
If you have additional questions, or would like to be connected with them for more information, use this contact form.
Accessories
Custom painted Indoor Cycles can make a huge difference to the look of your room. Your Instructors will feel special with a uniquely painted Instructor bike, possibly one that matches your studio's colors. Contact us for pricing and lead times.
The Stages SC3 can be custom painted without affecting the warranty.

Aero Bar extension for the SC3
Stages SC3 rear dumbbell or hand weight rack.
A place for your iPhone or profile note cards


Podcast: Play in new window | Download
John is a member on the AFS (Association of Fitness Studios) Advisory Council.
Holding certifications from; Schwinn, Heart Zones, Team ICG and Life Time Fitness, John's held regularly scheduled cycling classes between 1998 and 2015 when he moved to Florida.
When the weather permits, you'll find him riding and leading outdoor groups by himself or with his Tandem partner (wife) Amy.
- More on preventing carpal tunnel / hand numbness in your students - June 18, 2026
- ICI/PRO Podcast #191 – Selling endurance to your class - June 15, 2026
- Use the “Mom Test” to help choose studio registration software & technology - May 20, 2026
Lions, Tigers, and Bears oh my…
This is the coolest, sickest, most Bad A#$ indoor bike I have ever seen. Sprintshift…are you kidding me? This has been needed for sooo long. Love the “stock” blue color(my personal favorite), and set apart from everyone else. Custom paint? oh baby!
Love my Stages outdoor meter, it now seems the right company is selling the best indoor bike. I must convince the powers to be to get these in our club!
Hey – Doug! Love your thoughts on these once you’ve had the chance to ride one.
JOhn…it’s now a year since your article was posted. What’s the down side of this spinner other than the price of $2600. Will this end up like the Blade Ion?
Are there any spinners coming on the market that will outperform the SC3?
Nino it’s still a good choice. The Blade hasn’t turned out to be. Nothing in the pipeline that I’m aware of right now… but I’m sure there will be something of interest next spring.
Any comments by users familiar with both the Stages SC3 and the Matrix IC7 spin bikes? I’ve been using the Matrix IC7 at my YMCA for a couple of months (after years of Keiser M3’s), and love the Matrix IC7!