
by Tom Scotto | Jul 30, 2020 | Master Instructor Blog
 I appreciate all of the comments on the previous post which discussed what those kcals were. Let’s continue with another number often found on our indoor bike computer (and other fitness equipment) – TRIP or Distance Covered.
Looking at your total distance number at the end of a cycling class can often provoke 2 very different responses: “Oh, that’s cool” and “No Stinkin’ Way!”. Someone who doesn’t do much riding outdoors may not have a perspective on (1) how fast they would actually be riding and (2) how far they could go in, say, an hour. This rider may see a TRIP number of 20.0 — 22.0 and think “oh, that’s cool”. Another rider who is accustomed to tracking their distance when riding out doors may view 26.0 to 28.0 (miles) after a steady hard class and say (out loud) “No Stinkin’ Way”.
What’s going on here?
As I coach, you keep hearing me talk about all of these “factors”. I seem to have factors for everything from cadence to training zones to power output to riding aero on an indoor bike and the list goes on. Well, smirk if you want, but the Tom Scotto FACTOR-Y is going to churn out a few more. Indoor bikes and fitness equipment that calculate distance are often only looking at a single measurement. For the indoor bike this would be the rotations of the flywheel (heavy wheel providing inertia/momentum). The bike computer simply adds up the number of rotations of the flywheel (not the legs or pedals) and determines the distance as how far the wheel’s circumference has traveled. Since there are no internal or external gears like on an outdoor bike, one rotation of the pedals ALWAYS equals the same amount of rotations of the flywheel. What are some of the other factors? How much resistance the rider is using can play a significant role. Is the person pushing a lot of resistance which could indicate a “fast” actual speed or spinning at high cadence with little resistance translating to a slower actual road speed? Is the rider going uphill or downhill? What about wind resistance (no, not the fans)?
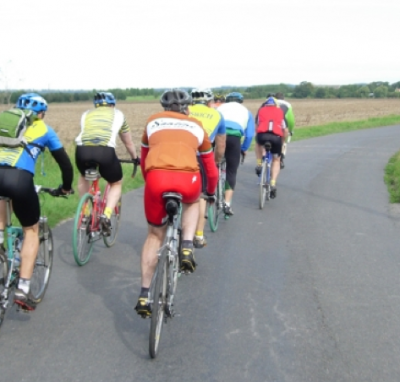
Here is an example from one of my riding experiences and the factors:
A number of members from my team would travel to Turkey every year for a couple of weeks to train in the mountains in warmer temperatures. One day, after having our traditional cup of Çay (Turkish tea), we headed toward one of the bigger climbs in the Taurus mountain range. It took us about 30 minutes to ride to the base of the mountain road where the climbing began. We climbed for 3 hours, transversing close to 70 switchbacks (sharp winding turns in the mountain road). We descended on a shorter back road for 45 minutes and arrived back at the cafe. One of the locals sitting at an outside table asked us how far we had traveled. I confidently looked at my bike computer and was disappointed to read only 48 miles. We were out for over 4 hours and only covered less than 12 miles per hour. In this case, my computer was not incorrect because it included ALL of the factors involved in my ride (the foremost being going “slow” uphill).
Simple Math?
Bringing it back to our indoor bikes, due to the factors that the bikes are NOT considering, the number we see displaying as our TRIP distance will rarely ever be accurate. So what is it? Each manufacturer may calculate this differently, but here is the formula for the Keiser bikes:
– 200 revolutions on the Keiser M3 = 1.0 (TRIP)
– Flywheel is 49 inches in circumference
– 1 revolution on crankarm = 8.75 turns of flywheel
– 49 x 8.75 x 200 / 12 = 7145.8 feet
– 1.0 on our computer = the rear flywheel traveling 1.35 Miles
Remember, the above calculations do not include the “factors” so we are still ONLY measuring how far the circumference of the flywheel is traveling. So what is the TRIP number good for? Since it is directly linked to our cadence (the more pedal rotations the higher the TRIP), one can observe if their overall cadence was higher or lower for a given ride or effort. Although the Keiser bikes already provide an average cadence number, the TRIP can tell you how many rotations you pedaled during the class (divide your trip by 200).
So, as instructors, it is important that we understand how these number work and what they represent. This will enable us to give sound guidance to our riders so they can view their efforts with a touch of reality. This will better prepare them (and not discourage them) if and when they venture outside.
Originally posted 2011-03-10 07:00:15.
by Tom Scotto | Apr 28, 2020 | Master Instructor Blog
 In a single indoor cycling class we can have a combination of beginners, cycling enthusiasts, competitive athletes, fit and unfit. We have those who are just interested in some cardio fitness, some with a focus on weight loss and others desiring cycling-specific training. There are the young, the old and everyone in-between. So with all of these different interests, expectations and age groups, how do we determine who we are talking to when we lead our classes?
As an outdoor cyclist and coach who discovered indoor cycling 16 years ago, I found the classes available at the time to resemble aerobics sessions. I was the odd-ball and a rarity in the classes I attended. I tried to imitate riding outside to supplement my winter training while others whirled their legs, jumped and bounced up and down. The instructor appeared confident, gave a few simple commands and everyone seemed to know exactly what to do (except me). As indoor cycling has evolved and now more closely resembles “cycling”, it is attracting a wider audience. Our classes are not only attracting the cardio-psychos and weight droppers, but since we are teaching rides that produce real cycling fitness and results, the charity riders, cycling enthusiasts and even competitive athletes are also joining in on the fun. Although this evolution is a positive thing, it can present a great challenge to indoor cycling instructors. With such a wide spectrum of fitness levels, interests and expectations, who are we or should we be talking to?
A few weeks ago I attended a class of highly diverse riders, led by a great instructor. The instructor had taken great effort in designing a dynamic workout and had a full room to show for their excellence. Even though, I could see the instructor struggle with this identity crisis. At one point, in a single breath, they described the desired intensity as “Let’s increase to 80 to 85% of your maximum effort, just at your lactate threshold or ventilatory threshold heart rate, approximately a rate of perceived effort of 8 to 9 out of 10. Your breathing should be challenged.” It was like spraying machine-gun fire — everyone was hit. Every cue they gave had 4 versions to it. I asked a few riders after class if they felt they were able to target their effort appropriately during class and they said “we just go as hard as we can — It’s a tough class”.
This challenge is one of the driving forces for Cycling Fusion’s level-based classes (beginner, intermediate and advanced). Although this doesn’t solve all of the issues, it does place riders into classes that will address their needs and expectations. However, like the evolution of bike-aerobics to indoor cycling, adapting the concept of level-based classes will take time. So is there anything we can do in the mean time? Well, that is a question I’d like to propose to our experienced ICI/Pro members. What have you found successful? I’ll start by throwing my approach into the hat.
What is your predominant teaching style? What types of classes or rides do you gravitate towards? Don’t assume you know, but instead ask some of your riders and other instructors that know you and persuade them to be honest. Most people peg me as a coach. My classes mostly resemble coached training sessions. Although I attract all levels, cyclists and non-cyclists, the clubs have caught on to my style and dubbed my classes as performance oriented. This designation has helped guide my language, choice of words when cueing and training concepts dramatically. Better yet, it has given me confidence to teach without sounding like an auctioneer. The clubs have labeled my classes as such so members know what to expect. It hasn’t hurt my attendance one bit.
I now open the floor to you. Let’s help each other and share wisdom from our many years of teaching and overcoming this type of challenge.
Save
Save
Originally posted 2018-03-05 09:00:00.
by Tom Scotto | Apr 19, 2020 | Master Instructor Blog
 “Will indoor cycling make my legs big?” I’ve been asked this question a number of times over the years. A few people told me their personal trainers told them that. Others just made the assumption based on the fact that we are constantly using our legs (not a bad assumption). The question was always asked as if people feared they would walk out of class with bulging quadriceps, calves and glutes.
I’m sure that I may have been asked this question more than some because….well….my legs are quite big. It is rare for me to find a pair of cycling shorts that fit comfortably without cutting of the circulation to my lower legs. For the record, I didn’t get my legs from cycling. Back in the day, my primary sport was baseball. Coming out of high school, I looked to have a promising career as a ball player until I blew out my shoulder. I was a catcher. Catchers find themselves sitting in a squat for most of their lives. To make matters worse, one of my early coaches used to have me (and the 2 other catchers on our team) run around the field in a squat position. I can only image what that must have looked like. My legs were so big during my last year of baseball that I was the only player who did not have his last name on their back. The back of my uniform read “Piano Legs”.
So it is understandable that someone would walk into my class, look down at my legs, and fear they would never be able to wear a skirt again after some indoor cycling rides with me. The fact is that cycling reduced much of the bulky-ness of my legs and toned them. No joke, my legs used to be twice the size as they are now. So why did this happen? First, cycling doesn’t provide high impact on the muscles (unless you crash into something which is unlikely indoors). Impact, such as when the foot strikes the ground when running or jumping, will cause the muscle to rapidly resist force resulting in an eccentric contraction. An eccentric contraction will cause the muscle fibers to lengthen as they attempt to stabilize the joints (resist collapsing or flexing). This impact can be very traumatic on the muscle resulting in micro-tears and muscle growth. Second, indoor cycling usually does not provide consistent muscle overload which would provoke more muscle fiber recruitment. Portions of a class may have some explosive efforts or muscular strength drills, but the majority of the time will be spent at low to moderate workloads.
Cycling is predominantly a high repetition activity. In general, high repetition exercise will serve to tone muscle because it promotes increased blood flow and muscle conditioning without the overload. Using weight training as a comparison, someone lifting weights to build muscle mass will target heavy loads and sets consisting of 6 to 10 repetitions. A person interested in toning their muscles will use lighter weight and sets of 15 to 20+ repetitions. Applying this concept to indoor cycling, we are pedaling thousands of rotations (repetitions) per hour*, which is going to have an overall toning and conditioning affect on the muscles.
So the answer is no, it is highly unlikely that indoor cycling will bulk up your legs. So ride away and advertise your class as the way to a beautiful, toned and fit body (at least the legs anyway).
* An average cadence of 80 RPM for a 60 minute class will result in 4800 pedal rotations for one leg.
Originally posted 2011-06-26 06:00:14.
by Tom Scotto | Apr 4, 2020 | Master Instructor Blog
 My approach to indoor cycling has always been to bring the qualities of cycling outdoors into the indoor cycling studio. On one hand, there are the general qualities of fitness and condition that everyone enjoys, cyclist or not. However, there are definitely attributes of training and riding that appeal specifically to those that enjoy riding outdoors. I thought I’d have a little fun and give you a glimpse into what goes on in my head when I design an indoor ride. Ok, maybe “fun” was not the right word and the thought of entering my head may have sent your mouse uncontrollably toward the back button. Regardless, here is taste of what goes on during an outdoor group ride and how it translates to almost every indoor ride I create (with the exception of race days).
Meet Up and Warm-Up
I’ve joked around multiple times that every good ride begins and ends at a coffee shop. That may not really be the case. The group I ride and train with on Saturday mornings meets at a local bike shop called Quad Cycles. After the usual banter, bragging and coveting of the latest gear, we roll the ride. Everything starts at an easy pace – very conversational. Often times we are riding 2 by 2 (or 2 abreast) chatting and catching up on whatever. You can often pick out the serious riders or those who understand proper warm-up buy their faster cadence (90-100 RPM). Their legs are spinning fast and smooth, and the pace is easy. After 20-30 minutes, we arrive at our first stop. This signifies the end of the initial warm-up and time to decide what we are going to be doing for the day.
Warm-Up Part 2 and the Ride / Training Focus
Our groups can range from 12 to 60 riders depending on the weather. There are usually 2-3 ride leaders who will create smaller sub-groups and will announce what their focus will be as we continue. “Tom abi”, which is how I’m referred to (which is “brother Tom” in Turkish), “What’s the plan for today?” I’ll let the group know the focus of what I’m planning to do, plus the distance (or time) and target speed. Each ride leader does the same and then people choose which group they want to continue riding with.
We pull out of the parking lot and begin the second part of the warm-up. The second part of the warm-up is both more intense and more focused toward what we are planning to do.
The Route
The second part of the warm-up leads us to our route – the roads where we are going to carry out the “mission”. Maybe it is a set of hills for some climbing or a long flat road for aerobic intervals or sprints. It can also be a rolling meandering course just to get some good endurance miles and time in the saddle. The point is, we select the road or course based on the purpose of what we want to get out of the ride.
Shut it Down
After we hit and complete the main course (pun intended), it is time to shut down and roll home easy. It’s a great time to chat and just chill on the bike. Technically we refer to this as “active recovery”. However, if the workout was designed right, shutting it down is welcome regardless of what you call it. Now I’ve been on many group rides around the country and this “shut down” is sadly rare. People will hammer until the last 100 feet before coming to a screeching halt at the café. I’m fairly strict and let people know when and where we will shut it down. You’ll be surprised how much comfort it brings people when they know everything will calm down at some point. This knowledge also makes the “route” more intense. Since everyone knows the shutoff point, they are now free to really go for it during the “main course”. Are you seeing the connection to indoor cycling? How the effectiveness of an indoor ride can be increased or hindered by how it is created or explained?
Bringing the Experience Indoors
So how does this translate to designing and indoor ride? Well, here is how it translates to me:
(1) Warm-Up 1 (5-6 minutes) — Easy spin to loosen up the legs, raise the heart rate and increase body heat. Explain the purpose of the ride and provide some options for people to choose from.
(2) Warm-Up 2 (5-8 minutes) — Greater focus during the second part of the warm-up to prepare the mind, muscles, energy systems, etc. for what is ahead.
(3) The Course (35-40 minutes) — Get down to business! The drills. The Intervals. The challenges.
(4) Cool-Down & Stretch (8-10 minutes). Depending on how intense the last efforts were, we may take 3-5 minutes to cool-down and then 6 minutes to stretch. We use this time to chat again and reinforce what we experienced and ways to interpret how our body responded to the ride.
————————————————–
So there you have it. That’s what’s on my mind when I’m designing the ride and actually riding a profile in class. If you are interested in attracting outdoor riders to your class, try to put together an experience they connect with. If you’ve never been on a group ride, take a Saturday or Sunday morning and join up with a local club or informal group. Just don’t expect it to go down “exactly” as I’ve described above. Those that know me, also know I like to keep things structured and well planned….a bit.
Originally posted 2017-04-03 14:12:49.
by Tom Scotto | Apr 1, 2020 | Master Instructor Blog
 It’s like trying to drink from a fire hydrant!
During the weeks of September we were focused on improving our instructor and coaching skills. Articles were posted on how we look, sound and feel as we lead our classes. We were already bubbling with info, thoughts and ideas and then the ICI/Pro Conference hit and WOW — knowledge/inspiration overload! I walked around during the little time I had between my sessions and witnessed the buzz, with excitement flying everywhere. Sometimes we can receive so much (good) information and energy that we end up overwhelmed and paralyzed and utter (in a very small voice)….”I just want to teach a great indoor cycling class…” We can struggle to try to implement EVERYTHING we learned which may run the risk of turning us into an instructor we are not. Huh!?
You bring a certain energy, passion and experience to your classes that is unique to you. That is why people love you. We want to hone our skills without changing the personality and style that make us who we are. Now if we realized something we were doing was not correct or better done a different way, by all means, change that. But sometimes we can stumble away from a bombardment of information thinking we need to be totally different. I’ve taken a week to digest what happened to me over the last month of both writing (which is a self-convicting exercise), presenting and digesting what others have been saying, and I needed a gut check and a way to approach “how” to improve AND “what” to improve on.
Here is a concept from Cycling Fusion’s Essential Training for Indoor Cycling workshop that may help sort it out. To help instructors with this improvement dilemma, Gene Nacey created the CHIME Cueing method. CHIME is an acronym that stands for the attributes of a good, well-rounded instructor: “Coaching, Helping, Inspiring, Motivating and Educating”. Among the benefits of using this method is the ability to assess what type of instructor you are and how to continually improve. I’ll give you some definition for each one, but before you start running amuck criticizing yourself, let me give you 2 pieces of guidance:
(1) The 10,000-Foot View
First, think through each attribute and how much of each you currently exhibit, and more importantly ENJOY using in class. This cursory exploration will provide a good view of our overall teaching approach. Each of us will have a tendency toward different attributes based on our style and what type of instructor we are or want to be. Some of us like to coach or are coaches so leaning toward that trait in our classes is natural. Others of us may bring inspiration which can be a great way to bring beginners into our world. And still others may be the eternal educators who provide life-changing wisdom with every ride. And the list goes on…. Who are you?
(2) Going Deep
Now, take another tour through these attributes to see which you believe need improving. You can do this in 2 ways: (1) be brutally honest with yourself or, (2) ask someone else to be brutally honest for you. Remember, the goal is not to have 100% of each attribute. Not only would that be rare, but it would demonstrate a lack of passion. What?! Yes, someone who is good at everything often does it at the expense of being great at something. We have an expression in athletic training; “Race your strengths and train your weaknesses” Continue to run (or ride) with your strengths as an instructor, but also work on those areas that are not your strong suit so you can become more effective.
C H I M E
Here is a brief description and example of each attribute to get you thinking:
Coaching
We tend to focus more on the big picture and the “complete” rider. We emphasize the commitment to what was started and seeing the changes as the goal grows nearer:
“I’m counting on seeing each of you here every Monday. It’s our commitment to each other. I’ve seen you working really hard in class. You’re doing great!”
Helping
We are always looking for ways to help riders with even the smallest things from finding the right cycling shoes to becoming more aware on the bike:
Instructor sees a student with inadequate resistance, and hips popping. “As we increase our cadence, you may begin to feel your hips pop or jump a little bit. If that happens, add just a little more resistance, and you will feel your hips stabilize”
Inspiring
We pull from past experiences, whether ours or someone else’s to inspire our class to push through:
Instructor has a student learning to use a heart monitor for the first time, and they seem confused.
“Don’t worry, I couldn’t even set my watch before I started using a heart monitor. Now I use it every time I train indoors and out. It has become as common as putting on my shoes and I’ve seen so much improvement in my fitness.”
Motivating
We look ahead at the goal and bring it to life, drawing it closer and making it tangible:
The class is in the last 5 minutes of a 20 minute power test. “Yeah, this is where it hurts, and this is where you want to back off, but this is also where you prove that you have what it takes to see it through to the end.”
Educating
We love and thrive on training concepts and know that if our rider’s understand them, they will train smarter and see “real” results:
The instructor is about to do Sprints in an advanced class. “In this advanced class, we are going to focus more on developing the fast twitch muscles. These are engaged in the most explosive efforts like sprinting, or hard accelerations.”
*********
Please feel free to share cues and approaches from your strengths so we can all learn, grow and become more well-rounded instructors.
Originally posted 2011-10-09 08:11:00.