Myth: My students would prefer that I not suggest changes to their setup / bike fit.
Alternates of this Myth are:
My students would be offended or embarrassed if I even touch their setup.
Other Instructors may be offended if I make suggestions to their student's setup.
People are creatures of habit and routine. We all derive comfort from the familiar. Like robots, we try to do exactly the same thing every time we find ourselves in these familiar situations/places.
For the regulars in your class this means they get to the club at the same time, park in the same general location, attempt to get the same locker, find the same bike and set it up in exactly the same way, every time.
Unfortunately just because some behavior is routine, doesn't mean it's correct or for that matter rational 🙁
I'm going to assume that you do want everyone looking right and feeling comfortable on their bikes. So let's get past this myth if it's holding you back.
First, I feel it's important that you recognize the initial resistance to change your offer may receive. It may not be as traumatic as missing Judge Wapner was for Rain Man, but for some of your participants change isn't a comfortable thing. So your success will come down to how to presenting (dare I say selling) your “suggestion” properly.
A while back I wrote a post about the importance of asking the right question. In it I discussed how I'm frequently asked; “Where can I get certified as an Instructor?” My quick answer was typically to have them check with all of the Indoor Cycling certification companies to see when they were hosting a certification near by and sign up. But then I realized they weren't asking the right question. Sure, getting certified is important, but it wasn't what they were really looking for. The right question was; “what do I need to do to become an Instructor and teach a regularly scheduled class at my local studio?”
It's all about the Benefits
No one woke up with an irresistible urge to order a ThighMaster – but thousands of people did because they wanted Suzanne Summers' legs. What sold these worthless pieces of exercise equipment was that people are motivated by the benefits (real or perceived) that they feel they will receive by purchasing a product or making a change. Going back to my earlier example, telling someone at a party you're Spinning® certified isn't nearly as impressive as proudly explaining that you are the Saturday morning Instructor at the local Big Box club.
Am I making sense here?
So the right questions to ask a participant who could benefit from a little adjustment could be:
Can I show you a trick (people love tricks) to be more comfortable riding today?It doesn't hurt if the benefit comes immediately either.
I just learned a how a small change in your position can improve your hamstring engagement, can we see if it would help you become more efficient, powerful or help you develop more shapely legs?
And most of us need to hear about those supposed benefits, over and over and over, before considering they apply to us. So why not start sprinkling the benefits of proper setup / bike fit into your class intro starting tomorrow?
NOTE: I'll be publishing what I believe are the 10 Myths of Indoor Cycle Rider Setup / Bike Fit on Wednesdays each week, starting today with:
Myth #1 – It's proper, for you the instructor, to cue people to draw in their knees.
I cringe whenever I hear; “OK people, now I want everyone to bring in your knees!” because, for most of the riders in class, everyone's knees are already where they need to be. Please note that I didn't say where they should be, but where they need to be based on a number of different factors. Some are based on how the rider is fitted to the cycle and some are because…
Indoor Cycles are perfectly symmetrical – Humans, not so much…
You can find dozens of books and multiple business who focus on the art of fitting an imperfect cyclist to a perfect bicycle. Discussions of Leg Length Discrepancies, Feet Pronation, Q Factor and Cycling Shoe Cleat Wedges are beyond the scope of an Indoor Cycle Instructor helping a student with setup.
But there is one aspect of Indoor Cycle setup that has a huge influence on knee position, and yet is universally ignored*- foot alignment.
Take a minute and try his test on yourself: Stand on a smooth floor wearing your socks. Feet shoulder width apart, with a soft bend in your knees (like you should have on the bike). Now transfer the majority of your weight to the balls of your feet (like you're standing on the pedals) and rotate your heels inward. Notice where your knees go?
For most of us they move out, did they for you [wlm_firstname]?
Now let's see what happens when you arbitrarily decide; “my knees are sticking out, I need to bring them in.” Go to the same position as before; soft bend, heels in, but now bring some of your weight back to your heels which will prevent your feet from moving (similar to how the pedal cages or cleats fix the position of your feet) and try to bring your knees in. What happened?
Because everything is connected (you remember the song; foot bone's connected to the ankle bone, the ankle bone's connected to the thigh bone, the thigh bone's connected to the knee bone, etc…) the position of your knee is exactly where it needs to be, based on your position on the cycle. If you have a student with improperly adjusted shoe cleats (or too low a saddle) and you tell them in your BIG INSTRUCTOR VOICE; “I want everyone to bring in your knees during this crushing 11 minute climb!” you could potentially hurt them over time. Worse, cause them to ignore the true reason their knees are out which for many people is simply having their heels rotated inward – like my buddy Randy demonstrates below.
Heels rotated in forces knees out
Feet aligned forward bring knees over pedal 🙂
There's actually a Sub- Myth here; the objective of proper bike fit isn't to just “bring in your knees”. The objective is to get your knee pushing directly down on your pedal = the most efficient transfer of power with the least amount of stress on the most vulnerable joint in the system – your knees. We live in a three dimensional world, not two 🙁 So when while helping a student get set up, be sure to observe them from the front, as well as from the side.
So what to do and/or cue as the Instructor?
Jim Karanas gave us a beautiful cue during a class I took last week in San Francisco. He had us down in the drops (I realize your cycle may not have drops – Spinning Instructors can read this as comfortably in position 2) and asked that we look down and we should see our knees in the space between our arms. Nothing more. He was simply suggesting that we observe what was happening.
You haven't heard it yet, but I will be publishing an interview with Jay Blahnik in December where he makes a similar point about suggesting your students observe something and then let them act on it.
You may also pay attention to what you see in your students and identify excessive foot rotation. But be careful – some people are naturally very duck footed (or whatever the opposite of pigeon toed is where you live) so my suggestion is to ask “did you have someone set up your cleats? This may give you a clue to if they put any thought or care into attaching their cleats. You could also have them stand naturally in their socks on a smooth floor to see if there's anything weird and refer them to your local bike fit expert if necessary.
*There are 100's of YouTube videos explaining a multitude of different ways to properly fit someone to an Indoor Cycle, but not one that I'm aware of makes any comment or suggestions as to foot position and it's effect on knee position / alignment. Even the Spinning® Fit System ignores this topic beyond “… the cleats must be adjusted properly on the shoe. A good bike shop or bike fit specialist can help with this if needed.” What “adjusted properly” means remains a mystery.
Note: We've added a new category “Correcting Form” to help you identify and correct common form related problems you see or discomfort/pain your students are experiencing.
The problem diagnosing form, discomfort or pain issues while riding, is that they aren't always obvious when you're student is rested and fresh. Here's a good example:
Question from one of my regular students: “John, do you know I can keep my hands from getting numb – going to sleep?” “It happens here in class, but more so when I'm riding outside… any ideas?”
I've experienced this situation myself, as has the senior group fitness instructor Amy – but only while riding “The Bus” our tandem bicycle on long rides.
First I asked a simple question; “do you wear gloves when you're riding outside?”
“Sometimes I do, but never here in class. Because it happens both indoors and out, I don't think that's the problem.”
She went on to explain; “I've researched it online and I think I've eliminated all the potential causes that I found.” “It's frustrating for me because 30-40 min. into a ride, my hands start tingling and then fall asleep.”
“If it's happening both indoors and out and with or without gloves, it's probably not a nerve compression in your hand problem. My guess it's probably your actual hand position on the bars… hop on this bike and let me take a look.”
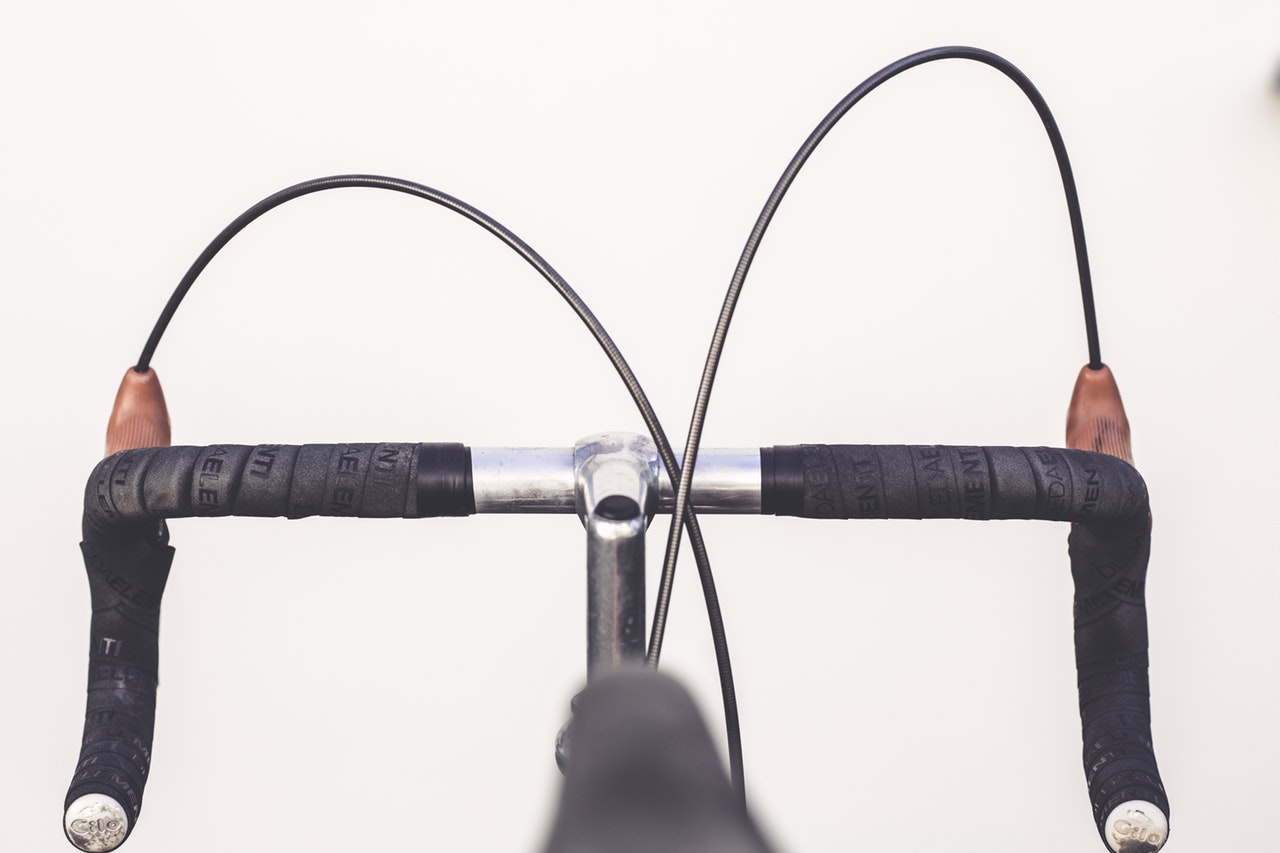
I had her jump on an Indoor Cycle in class and told her to get comfortable. Once she was in place, her hands were positioned like what's shown in this picture.
Proper hand position has straight wrists
“That would make sense. That wasn't discussed on any of the articles I found.” “But I never ride like that so that couldn't be the problem either.”
“Are you sure certain you never drop your elbows, which causes your wrists to collapse, when you have fatigued?”
I then went on to explain to her how subtle the change is and that when I had her drop her wrists, it didn't require changing her grip on the bars, only her dropping her elbows.
When we're fresh, we all sit up straight and tall. Everything about our form looks perfect. Yet as we fatigue, it's natural to experience small, often negative, changes in position. From my perch upon the instructor bike what I typically see is first shoulders tend to fall forward. This causes a little additional weight on your arms which result in your elbows collapsing in and downwards slightly. Because everything is connected, the lower position of your elbows, with no change in the position of your hands, naturally results in a greater angle of extension in your wrist.
Here are three suggestions you may use in class or on the road:
Identify the problem. Describe the need to maintain a straight wrist and how it will add to everyone's comfort on the bike. Talk about hand numbness and tingling and ask if anyone has experienced it.
Cue frequent hand position changes. If you're Spinning® instructor you're probably doing this already. I would add to your cuing the need to visually check that each new position results in a straight wrist. If you're not or if asking for hand position changes is something that you normally not do, this is a great time to start 🙂
Watch for the signs of fatigue. You may see your student's form degrading, but they may not be able to sense it. Asking them to look down at their wrists, late in class. Asking them to correct it may have the effect of bringing everything else back in line… As I said before; “everything is connected.”
Many (if not most of us) were taught some variation of; “scrape gum off the bottom of your shoe” and “try to push over the top” as the “proper” way to describe how to pedal like a “real” cyclist. But is that correct? If we really want our participants to pedal like a cyclist, is this the best way to cue proper/efficient pedaling technique?
My recently completed professional bicycle-fitting with Chris Balser the Bike Fit Guru says not necessarily.
I spent about two hours actually riding my VeloVie bicycle on a computrainer during my fitting. Not continuously and never at anything beyond a JRA level of effort. Early in the process Chris asked me; “where did you learn how to pedal?” Thinking that with way over 15,000 miles pedaling a bicycle, I've gotten to be a pretty good pedaler. So like most proud people I got defensive at his suggestion. Chris must of noticed it on my face because he quickly added; you're very smooth… but your ankle is all locked up. You are missing out on a bunch of power that's available if you'd #1) unlock your ankles and #2) focus on moving your knees through the greatest range of movement possible.
USA vs. EU pedaling techniques
To demonstrate what he was talking about he had me watch myself pedaling in a mirror from the side. My years of concentration on pushing over the top and scraping across the bottom showed Chris' observation was correct – I am smooth but my ankles were nearly locked solid with my foot at a right angle to my lower leg. That, he explained, was how people in the USA pedal.
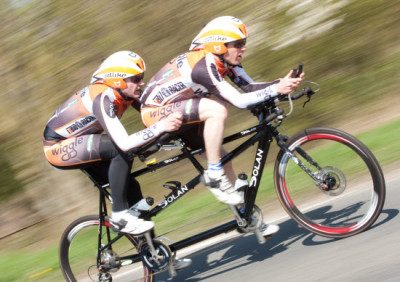
Then he showed me a number of pictures of professional cyclists like this one of a very fast tandem team from the UK:
From http://magazine.bikeradar.com
Notice how high this captain's heel is as it crosses over the top? The idea here is that by allowing the ankle to flex and the heel to rise, you create a longer lever. Longer levers create more leverage and the force can begin earlier in the down stroke = more power. When you watch a cyclist using this technique, you'll see what Chris called “big knees” – the riders knees move in a very large plane up and down. It isn't just that their legs are long or that they're riding with long cranks. The exaggerated movement of their knees comes from the additional rage of motion allowed by the flexion of their ankles.
In this video, Joe Friel demonstrates the USA focus on “push over the top and scrap across the bottom.”
Former UK professional cyclist Rebecca Ramsay runs EasyCycling.com and her video below is an excellent example of what Chris describes as the EU pedaling technique. A closeup view of this technique in slow motion begins at the 2:00 mark. Notice how much flexion she has in her ankle as it crosses the bottom. Yes she cues the “scrape across the bottom” but no push across the top. With your heel elevated there's really no way to “push” forward… just down in a strong, fluid motion that I'm learning can create some much needed, additional power from my 52 year old legs 🙂
So who's right? Good question… but I'm not sure it's the right question.
A better question would be; which way of cuing, USA or EU, will be easier to understand by our students? Or would a combination / hybrid be helpful?
I've got two assignments for you to compete and report back:
#1 – Next time you're on a bike give this a try. Concentrate on what Rebecca cues as “a flick of the ankle” at the bottom. You may feel your calf contract slightly which you'll see in the video.
#2 – Watch a stage of the Tour De France. Pay attention to the vertical movement of the rider's knees and then let us know what you find.
Myth: Rider Setup / Bike Fit should be done before class.
Common sense says that the best time to help someone with their bike setup would be before class. After all, this new student has just walked in and they have 45 – 60 minutes in the saddle ahead of them.
So pre-class would be the best time, right?
Well… no, it probably isn't. And when you think about it for a few minutes, I'll bet you'll agree.
I got this myth from our local bike fit guru Chris Balser, who's actually known as The Bike Fit Guru.
4. Saddle Height is not static. To demonstrate, bend forward and try to touch the floor. Do it again. Try repeating the exercise when it is cold, hot, at the end of a hard ride, before an easy ride, etc. It will never be identical because our activities and climate are always changing. Remember this when prescribed the “magic number”.
The point I think Chris is making here is that there are a bunch of external factors that can influence setting a rider's saddle height properly… the most important being the temperature.
Living here in the “Frozen North” we face the issue of “shrinkage” when we're cold – no, not that shrinkage silly 🙂 I'm talking about how your muscles and connective tend to shorten/tighten when they are cold. One of the worst feelings imaginable is how your back tenses up after climbing into a car, when it's been cooling all day in a 10° parking lot. You're forced bolt upright, with your back muscles near spasm and you can't bend forward to save to save your soul. Thank heavens for heated seats!
The opposite occurs when we are warm. We relax. Our muscles loosen and can extent completely. Is this beginning to make sense to you?
It's only after a thorough warm-up can a leg (or legs) comfortably extend. And proper saddle height can only be set with full extension.
So wouldn't it make more sense to check/adjust participants at the end of class?
When I rode with the top level cycling team here in Minneapolis, it wasn't uncommon for one to the club leaders to ride by and offer; “You need to raise your saddle 2 millimeters”. So I would. Except I can remember thinking the next morning when I went off on a training ride; “that can't be right… my seat is too high”, as I would feel the pulling in the back of my knee with each revolution. But then it would go away, or I forgot about it. Either way, once I was warm and could fully extend, my saddle height was exactly where it belonged.
Outdoor riding tip in cool/cold weather: If you leave home and don't feel slightly chilled for the first mile or two (or a slight pull in the back of your knee), you're wearing too many clothes – or your saddle's too low… or both.
But what about a new person to class?
I say get them close, but don't forget about them at the end of class. You could discuss this during your into/warm-up and then remind everyone during the transition/cool-down that you will be available post class to assess everyone's warm position.
I'm guessing you'll get more than a few takers – because I can guarantee that they've never heard this before.
You know the sensation: A bit into class you start feeling some tingling in your hands and up into your fingers. You shake them out, hoping to relieve the dull ache, but it doesn’t seem to make a difference. What do you do?
Many cyclists, both indoor and out, from novice to pro, experience hand numbness from time to time. Compressed nerves in the shoulder, elbow or wrist can cause a tingling feeling that can take several hours to dissipate after your class is over. While the ideas below may not permanently prevent the problem, they can help alleviate or reduce numbness during class.
1) Take weight off of your arms: Whether you’re aware of it or not, it’s easy to fall into a habit of sitting in a more forward position. Next time, think about sitting back on the saddle and use your core instead of your arms to support your body.
2) Change your hand position: The standard bike has three distinct and positions: the drops, the hoods and the tops. Each has their own advantage in certain situations, but it’s important to keep your hands moving between the three to keep blood flowing and take pressure off certain nerves. Don’t spend too much time in one position.
3) Change your arm position: Locking out your elbows while riding is never a good idea. Ride with a slight bend in the elbow instead of riding with your arms stretched out straight. If this doesn’t feel comfortable, it might be time to have your instructor give you a bike fit.
4) Relax: You don’t need to white knuckle your handlebars when riding. Gripping the handlebars to tightly creates tension that can make your hands go numb. If this sounds like you, it is simple: relax and move your fingers. Not only will the numbness subside, but you enjoy your ride more.
5) Buy a pair of cycling gloves: Similar to double wrapping your bars on an outdoor bike, cycling specific gloves have built in padding that protects sensitive pressure points and nerve endings.
6) Get a bike fit: Whether your hands are numb or not, you should ask your instructor to give you a bike fit. They should use a plumb bob and goniometer, if not, you may not be getting a great fit.
7) Stretch: Cycling is a repetitive sport, so immobility and imbalance issues can sneak up on you before you know it. Working on your range of motion and flexibility on a regular basis and help alleviate numbness both on and off the bike. Try for arm stretches, rest rolls and shoulder rolls to strengthen and improve flexibility over time, before and after each class.