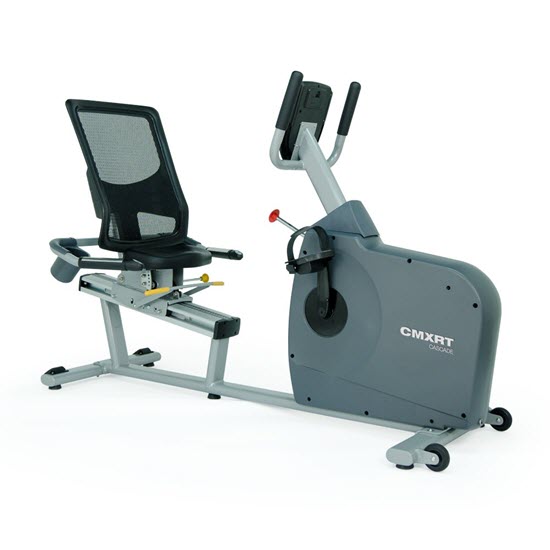
Would a few of these recumbents make your class more inclusive?
Would you agree that Indoor Cycles are a poor method/modality of exercise – for some populations?
There's a long list of people who would never consider participating in our classes, or even riding an indoor cycle alone at home. There's a bunch of reasons:
Physical limitations
Obese/overweight
Existing injury
Just plain afraid of that skinny, little, bicycle saddle 🙁
So, would it make sense to add a few recumbent cycles to your studio?
The reason I'm asking is because I met a great guy at this past IHRSA convention. John Kennedy's company, Cascade Health and Fitness, manufactures that recumbent cycle pictured above. He shared his idea to incorporate recumbent indoor cycles, into a traditional indoor cycling class, to accommodate people who won't or can't ride a conventional Indoor Cycle. I'll admit, at first it sounded like a crazy idea to me. But the more I thought about the potential to make our classes more accessible I got excited.
That would mean more butts-in-seats = people exercising. I'm all for that!
The first place I can see recumbents making a positive impact is in Parkinson's Cycling Classes. Parkinson's Cycling Coach Kathy Helmuth has taught me that many people suffering with PD have physical limitations.
The symptomatic relief that comes from cycling isn't available to someone who can't ride a typical cycle. A recumbent is completely different; a big comfy seat that sits low and a step-through frame that anyone who can stand should be able to mount. I think this could be a way to make PD cycling classes more inclusive. Awesome!
What about your run-of-the-mill cycling class? Would a recumbent work there too?
I've got no idea, so let's find out!
We're conducting an experiment
We're looking for two studios to participate in a trial to see what happens when you add a few recumbents to a cycling studio. John has offered two of their recumbents at no cost + you'll keep them in the end.
In exchange they're asking that you:
Install the recumbents in your studio and make them available in as many classes as possible.
Experiment with different class formats, profiles, cuing, etc. You'll be charting new territory here and I'm happy to help you as much as possible.
Actively promote this new accommodation to your customers – running the trial to see what happens for two months.
At the end of the trial you will be interviewed by me on my podcast We will explore what worked and what didn't, your ideas for improvements, etc…
You'll provide a few short video interviews, where you discuss these classes with your actual participants.
This week we are exploring How You Sound and in the spirit of learning about ourselves and our individual “sound”, I want you to do something….it will be easier for those of us that teach in a club setting, but hopefully those of us in a studio setting will be able to explore this as well. Please find the best STEP class (yes, they are still out there and wildly crowded) and go to it. By the best, I mean one where the participants would describe the instructor as, “easy to follow”.
The reason behind this is simple: a good step instructor has learned how to cue properly. Why? Because if they don’t, the results are disastrous in their studio…people turning every which way- into each other, into the steps, falling, getting hurt- you get the idea. If you are not a stepper, simply listen. How do they cue? How early? How late? A good cue typically is given 4 beats before the needed action. Any later and it is too late for the verbal cue to be carried out. Any earlier, and the action will most likely be carried out before the instructor wanted it to be.
Why is cueing important as a cycle instructor? I don’t know if you all are like me, but I like to know what is coming. In a broad sense, as in what we are doing for our overall ride, and in a narrower sense, as in what is coming up on the specific road and what the expectations are in the next few seconds. I personally get frustrated when cues are thrown at me and the movement is already in play.
One of the best examples of this is lifts, or jumps. Cueing to lift out of the saddle 4 beats ahead gives the rider time to prepare and the sense of satisfaction when they are ready and able to lift out of the saddle on time.
We have a large ride here in Minneapolis every year and it is classic…the instructor cues the lifts like this: “up, down, up, down, up, down” ad nausium and the ups and the downs come right on the beat of the movement. As I look around the room of 100’s of riders, no one is lifting or lowering at the same time.
This could all be remedied simply with good cueing.
Even things like, “In four counts we are going to get up out of the saddle and tackle this billy goat path, taking our heart rate up to AT”, or “in 4 counts we are going to add some load and pull out to the left, passing the rider in front of us”, give our riders confidence in us as their coach and instructor.
So, check out the group fitness step instructor…the GOOD one that keeps their class in control and rocking and rolling in an orderly fashion. Listen to how they cue. When they do it and how the class responds. I took it for granted until I had to start doing it because a good one makes it look really easy. In fact, we don’t even know they are doing it. You can be like that too with a little practice.
If you are interested in learning more about cueing check out Gin Miller's Blog. Gin invented the “Step Class” and you may find her articles on cueing helpful.
One more thing – When John recorded his class he found that he works too hard. I am going to figure out how to record on my Droid and I will let you know in the weeks ahead what I learn about How I Sound 🙂
How steep is a 4% grade? 8%? Over 10%? How do I effectively explain % of grade to my class? What are the feelings I would experience climbing different % grades on a bicycle?
And finally, how do I effectively communicate that feeling to my class?
Every July we hear commentators Phil Liggett, Paul Sherwin and Bob Roll discuss how the Tour de France is won or lost in the mountains. Just winning one of the popular climbs; Alpe d'Huez, Mont Ventoux, Col du Tourmalet or others can be the highlight of any cyclists career. But when Liggett explains that Alpe d'Huez has an average grade of 8% what exactly does that mean? Based on context, we can assume that this is a very difficult climb… but how difficult? What does it feel like to ride with the professional Peloton as everyone powers up a long climb at 8% grade?
So with the Tour only a month away and many Instructors and students riding outdoors, I felt you might benefit from some cliff notes on Grade and Slope. If you are reading this outside of North America, the concepts that I'm going to present are the same, but how they are noted on street signs varies from country to country.
Simply put, % Grade is gain in elevation (what's called the Rise), over a horizontal distance (the Run) – “typically” 100 feet or meters. The actual distance traveled is the Slope length which is slightly longer than the Run – it's that A²+B²=C² Pythagorean theorem thing you grew to love in highschool 🙂
So…
A 5% grade = a 5′ increase in elevation in 100′ of horizontal travel.
Image from Wikipedia
So you don't confuse the engineer's in your class, be careful not to mix up % of grade and the degrees of angle. They're completely different and roads aren't measured in °. If you feel it would be helpful to your students, you may want to comment that a road at 45° (as if that would be possible) would have a 100% grade, i.e. 100′ forward @ 100′ up.
Wikipedia has an informative page on Grade / Slope if you'd like to learn more.
Alpe d'Huez has an average grade of 8.1% over a run of about 13 km. Click to see the profile. That sounds impressive but it really tells you nothing if you don't understand what it feels like to ride a bicycle up an 8.1% grade. Actually 8.1% is the average. The first kilometer and a half are at over 10%.
If you want to clearly communicate the pain of climbing a 8.1% my suggestion is to find a steep hill, ride up it and experience what it feels like.
So now you may be thinking; “great idea John… but I don't recall seeing the grades marked any of the roads in my neighborhood.” My response would be; go out, find one and measure it.
I made the video below for a different project where I recommend that cycling studios measure and mark the road as a helpful guide to outdoor cyclists. In the video I describe the simple process of measuring the grade of one of the local climbs in your town.
If that went by to quickly, you divide the number of vertical inches by 120 (10′) which gives you the % grade.
How I communicate % grade in my classes.
Discussions of % grade typically come up when I'm teaching a virtual ride using an Epic Planet DVD or Global Ride's Dirty Dozen DVD, the grade of each climb is listed in the information bar at the bottom of the screen and I'll use it to help explain the intensity of each effort. I start by explaining that, although it doesn't sound like much, 4% is a serious climb that will have most of us at Threshold HR or Power FTP if it's of any length. I go on to explain that (at least where I live) most roads or highways rarely exceed 4%.
I'll reference local roads, that I understand the % grade, to my class – my apologies to those of you in flat lands of Iowa or Florida, you're on your own. Some of these roads, on established cycling routes, have steeper grades that I have measured. I'll talk about them by name; “Fox Road Turn” 8%, “Carver Wall” 12% and “Eden Prairie Road” 13.5% as a way to appeal to my cyclists who have experienced these climbs for real.
Other examples:
5% has you in your small chain ring (the sprocket in the front) and you need to manage (limit) your effort so as not to blow up!
8% and you're wishing you had a smaller gear and it's everything you can do to ride in a straight line. It's also everything you can do keep your pedal stroke smooth. Time here is short with your HR way over VT2 – Threshold.
10% is the limit of most recreational cyclists, if the climb is longer than a block or two. Smallest gear, out of the saddle and HR is as close to maximum as you can tolerate.
15% or more and you get off and walk 🙁
Once you've measured and ridden a climb with known grade, my guess is you're going to have a new appreciation for how truly difficult those famous climbs in the Tour de France really are and a new respect for the professional cyclists who climb them.
You can find the profiles of every climb, in every major Tour, along with 33,773 others at http://www.climbbybike.com/
You know the sensation: A bit into class you start feeling some tingling in your hands and up into your fingers. You shake them out, hoping to relieve the dull ache, but it doesn’t seem to make a difference. What do you do?
Many cyclists, both indoor and out, from novice to pro, experience hand numbness from time to time. Compressed nerves in the shoulder, elbow or wrist can cause a tingling feeling that can take several hours to dissipate after your class is over. While the ideas below may not permanently prevent the problem, they can help alleviate or reduce numbness during class.
1) Take weight off of your arms: Whether you’re aware of it or not, it’s easy to fall into a habit of sitting in a more forward position. Next time, think about sitting back on the saddle and use your core instead of your arms to support your body.
2) Change your hand position: The standard bike has three distinct and positions: the drops, the hoods and the tops. Each has their own advantage in certain situations, but it’s important to keep your hands moving between the three to keep blood flowing and take pressure off certain nerves. Don’t spend too much time in one position.
3) Change your arm position: Locking out your elbows while riding is never a good idea. Ride with a slight bend in the elbow instead of riding with your arms stretched out straight. If this doesn’t feel comfortable, it might be time to have your instructor give you a bike fit.
4) Relax: You don’t need to white knuckle your handlebars when riding. Gripping the handlebars to tightly creates tension that can make your hands go numb. If this sounds like you, it is simple: relax and move your fingers. Not only will the numbness subside, but you enjoy your ride more.
5) Buy a pair of cycling gloves: Similar to double wrapping your bars on an outdoor bike, cycling specific gloves have built in padding that protects sensitive pressure points and nerve endings.
6) Get a bike fit: Whether your hands are numb or not, you should ask your instructor to give you a bike fit. They should use a plumb bob and goniometer, if not, you may not be getting a great fit.
7) Stretch: Cycling is a repetitive sport, so immobility and imbalance issues can sneak up on you before you know it. Working on your range of motion and flexibility on a regular basis and help alleviate numbness both on and off the bike. Try for arm stretches, rest rolls and shoulder rolls to strengthen and improve flexibility over time, before and after each class.
Ben Greenfield is our newest ICI/PRO Team Contributor. Through his new RockStar Triathlete Academy, Ben has promised to help me with my training for the three Multi-Sport events I have committed to this summer.
Besides all of his education and experience as a competitive endurance athlete Ben is an Indoor Cycling Instructor just like us. He knows how to use a Spinning Indoor Cycling class to train for competitive endurance events and how to build a class that focuses on training (what I call Indoor Cycling 2.0). You can learn more about Ben here.
Listen to the Podcast below or subscribe for free using iTunes or Zune.
This Podcast is was last published on Oct 14, 2009, I have updated it with our new Podcast host information and I am representing it now. I hope you enjoy it, Joey
One of the things that most excites me about the potential here at ICI and the technology we are tapping into, is that we have created a platform that allows us to seek out and interview some of the most progressive and experienced people in indoor cycling and bring them to you, our listeners and members. Where else can you hear interviews with the pros on subjects that help you grow as an instructor? (Except at an expensive conference once a year!)
We certainly do not know everything there is to know about indoor cycling, but we know how to seek it out and bring it to you. I have so many mentors I've learned from over the years who I would like to bring into the discussion at ICI. With every new person we interview, you will learn a different style, a different approach, or perhaps a new twist on something you haven't considered.
Today we are speaking with Master Instructor Janet Toussaint from the Boston area.
One of Janet's expertises is teaching endurance. She ran the Spinning program for years at the Boston Athletic Club and not only got the instructors to buy into the concept of teaching a moderate intensity ride, but the large member base as well. Now that is a tough challenge when all they seem to want is high intensity all the time - I am sure many of you are faced with a similar challenge.
In January of 2003 Janet came out to visit me in Vail on a ski vacation with her son JP. When we weren't skiing, I made her teach Spinning at my club! We were in the middle of a base building program at the time so I had her teach an Endurance workshop to my instructors. She had such a positive impact on our instructors and our program and I still use some of her special cues and metaphors that she used to motivate riders.
When you hear Janet's passion, I am sure she will inspire you too!
John and I enjoyed this discussion so much that we decided to go deeper into the subject of endurance and scheduled even more time with Janet. For ICI/PRO members, we will offer two additional podcasts that you will receive in your Super-Secret iTunes feed. The next interview will go more deeply into the essence of teaching an endurance ride. Even more exciting, the second one will be an audio PROfile on Janet's own favorite endurance ride, The Endurance Connection, replete with her all-star cueing, coaching and playlist.
If you have difficulty coming up with motivational things to say in your endurance classes, you won't want to miss any of these podcasts!
Listen to the Podcast below or subscribe for free using iTunes or Zune.